Set up and use Webchat 3.x.x
To set up Webchat 3.x.x, you need to create a deployment key, link the deployment key to a chat address, and add the Flex-generated embed code to your website. This page provides detailed instructions.
You can have up to 10 deployment keys for different use cases. For example, if you have multiple brands with different domains, you can have a separate webchat widget for each brand.
Before setting up or updating Webchat, review the following considerations:
- If you are updating to Webchat 3.2.0 or later from Webchat 3.0.x or 3.1.x, you must contact our support team when you're done with the update to finish setting up the latest security changes. Because the changes would otherwise be a breaking change, only our Twilio support team can enable them for you to ensure that Webchat continues working smoothly.
- If you are using Flex UI 2.9.x or earlier, agents won't see a notification when the customer has left the chat. We recommend updating to Flex UI 2.10.x or later.
- If you are updating from Webchat 3.0.x to Webchat 3.1.x or later, you must ensure there are no conflicts with the new end chat functionality. Beginning in Webchat 3.1.0, customers can end a chat themselves. Previously, only an agent could end the chat. If you previously implemented a Webchat 3.0.x customization to enable customers to end the chat, you must check for conflicts between your customization and the Webchat 3.1.0 feature. If you find any conflicts, you must resolve them before updating to the later Webchat version.
- If you're using Webchat 3.x.x with Unified Profiles in Flex:
- You must configure Unified Profiles in Flex and your Segment space before following these steps.
- You'll need to update your Webchat flow in Studio using the instructions in Step 3: Update the Webchat flow in Studio.
Use the following steps to set up Webchat 3.x.x:
In some environments, one deployment key is already set up for you and connected to a messaging address. If your environment includes a default deployment key and you'd like to use it, skip to Step 4: Test your webchat flow.
Otherwise, complete the following steps to create a deployment key:
-
In Console, navigate to Flex > Channel management > Webchat.
-
Click Create Deployment Key.
-
Enter the following information:
- Friendly name: The name you want to use for this deployment key. If you leave this field blank, the name will match the deployment key SID.
- Allowed origins: Enter up to 10 trusted URLs where your users can start a chat. Chat sessions are only accepted from these URLs. You must include the protocol and host, and can optionally include a port. The default value is
https://demo.flex.twilio.com, which enables you to use Webchat 3.x.x in the Flex demo environment. - Fingerprint sensitivity: We recommend leaving the IP address checkbox selected to use this option and make your webchat widget more secure.
-
Click Create Deployment Key.
You are returned to the Webchat page. Your new deployment key appears in the Deployment Keys list.
-
Navigate to Flex > Channel management > Messaging.
-
Click Create new address.
-
Enter the following information:
- Address type: Chat
- Address implementation: Conversations
- Deployment key SID: Click the field to see a list of deployment keys. Select the deployment key that you created.
- Address friendly name: Optionally, enter a name that you want to use for this address.
- Integration type: Studio or Webhook. The most common configuration is to integrate a chat address to Flex using a Studio Flow.
- Studio Flow: Select the flow that you want to use for chat. Unless you have removed or reconfigured it, the out-of-box Studio Flow Chat Flow is a good option.
-
Click Create Address.
You can personalize conversations with customer profile data by using Webchat with Unified Profiles. To use Webchat with Unified Profiles, you must update the Studio flow that you used in step 2 to include the Search for a profile widget.
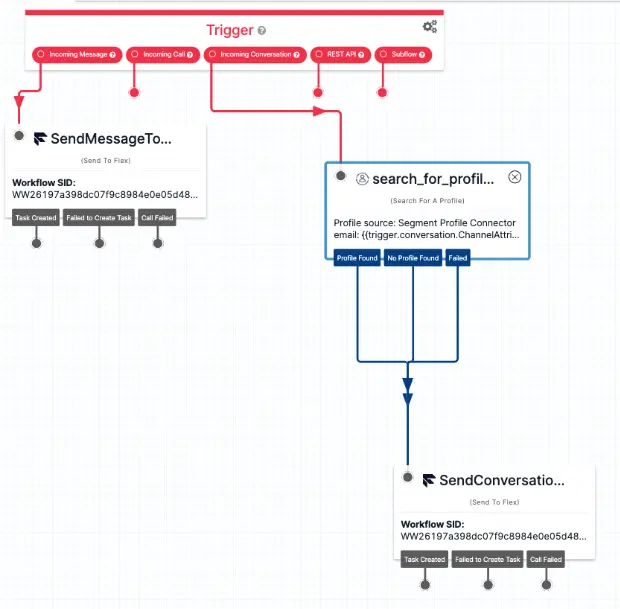
- In Console, navigate to Studio > Flows > Chat Flow.
- Add the Search for a profile widget to the flow.
- Connect the Search for a profile widget to the Incoming Conversation trigger.
- Connect the Profile found, No Profile Found, and Failed transitions to SendConversationToAgent (or the next step in your Studio flow, if it has other customizations).
- Select the Search for a profile widget and update its settings:
- From the Connection list, select your Segment connection.
- From the Identifier list, select Email Address.
- Replace the existing Search value with
{{trigger.conversation.ChannelAttributes.pre_engagement_data.email}}. - Click Save.
- Click Publish.
- Navigate to Flex > Channel management > Webchat.
- In the row for your deployment key, click Launch Demo. A new tab opens with a webchat widget.
- Enter a name, email address, and webchat message, then click Start chat.
If you're using Webchat with Unified Profiles, use anemailidentifier that has a linked customer profile in your Segment space. - From Flex UI, ensure your status is set to Available, then go to the tasks list to verify and accept the chat task.
If testing with Unified Profiles, verify that the customer profile associated with theemailidentifier was found and appears. - Reply as the agent, then return to your demo tab and verify that you see the response in the chat.
- In the row for your new deployment key, click the edit icon.
- On the Edit Deployment Key page, scroll down to the Embed code section.
- Copy the embed code sections to the head and body of your website's index.html file. You may need to work with your website administrator to complete this task.
Reminder
If you are updating to Webchat 3.2.x from Webchat 3.0.x or 3.1.x, contact our support team when you're done to finish updating your security settings.
You can customize the following for Webchat 3.x.x:
- Pre-engagement form and context: Gather user information (such as name and email) before the start of a chat, or collect context from the data you already have (such as a user's login name or HTTP referrer).
theme.isLight: Control whether webchat uses light mode or dark mode.appStatus: Control whether the webchat widget is open by default.
By default, file attachments are enabled in Webchat 3.x.x. For details about attachments in Webchat 3.x.x, see File Attachments and API Limits.
You can restrict chat attachment file size and file types. For details, see "How do I update my file attachment configuration for Flex Conversations?" in Conversations FAQ and Troubleshooting.
Because Webchat 3.x.x is built on Twilio Conversations, you can change orchestration and messaging flows with the Interactions API.
If you are using Webchat 3.1.0 or later with Flex UI 2.10.0 or later, you have the option to display a message to agents to let them know when a customer has left the chat. This option is turned off by default. To turn it on, navigate to the Flex Feature Settings page and enable the Show message when customer leaves webchat feature.
After you create your deployment key, you can update its settings. From Twilio Console, navigate to Flex > Channel management > Webchat and click the edit icon for your deployment key.
If you need to update Allowed origins or Fingerprint sensitivity, you may want to do so outside of normal business hours. When you change these settings, any existing webchat conversations might be disconnected.
You cannot change the deployment key SID or address configuration SID. If you need to change these, see the steps to replace the deployment key for an existing webchat widget.
If your deployment key is compromised, complete the following steps:
- Follow steps 1-3 above to set up a new webchat widget with a new deployment key and a new chat address. You cannot update an existing chat address with the new deployment key.
- In Step 5: Embed the webchat widget on your website, delete your existing webchat embed code entries and replace them with the new embed code.
- Delete the compromised deployment key and chat address.