Manage Conversations Addresses for Google Business Messages (Public Beta)
End of Life
Google Business Messages (GBM) will be turned off on July 31, 2024. The Twilio GBM API and Google Business Profiles chat will no longer work after that point.
Info
Not a HIPAA Eligible Service
Google Business Messages for Flex is not a HIPAA Eligible Service and cannot be used in Flex workflows that are subject to HIPAA.
This guide describes how to add Google Business Messages (GBM) as a Conversations channel in Flex. Once added, customers can start chats with Flex agents directly from Google Search and Google Maps. Customers must message you first, as agent-initiated outbound messages are not supported.
To learn more about supported functionality, see Google Business Messages.
For limitations, see File Attachments and API Limits and Known Issues.
- Twilio Console account with Admin access
- Flex UI v2.4.x or later
- Google Business Profile
-
In the Twilio Console, from the Develop sidebar, click Explore Products.
-
Under Marketplace, click Channels. Tip: To pin Channels to the sidebar for access later, click the pin icon.
-
In the sidebar, click Google Business Messages.
-
Click Get Started.
-
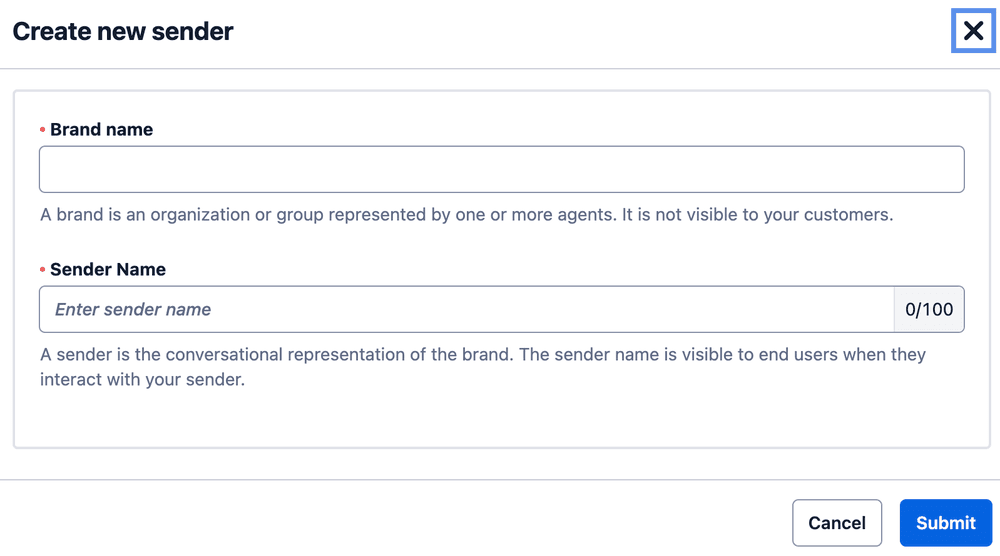
In the Your first sender window, enter a brand, sender, and email address.
- The brand is usually the name of your company. This is visible to you, Twilio, and Google, but isn't shown to end users. Twilio recommends using only one brand per Twilio account SID or Subaccount SID. If you create more senders in the future, you can reuse the same brand.
- A sender is the address used to interact with the business. The sender name is visible to end users. Note that Google calls the sender an "agent."
-
Click Submit. Your sender is created in Twilio so you can test it right away, but it isn't connected to your Google Business Messages yet.
To receive and respond to messages in Flex, you can create a Conversations address for Google Business Messages from the Console or with the Conversations API.
-
In the sidebar, click Flex > Channel management > Messaging.
-
Click Create New Address.
-
From the Address Type list, select Google Business Messages.
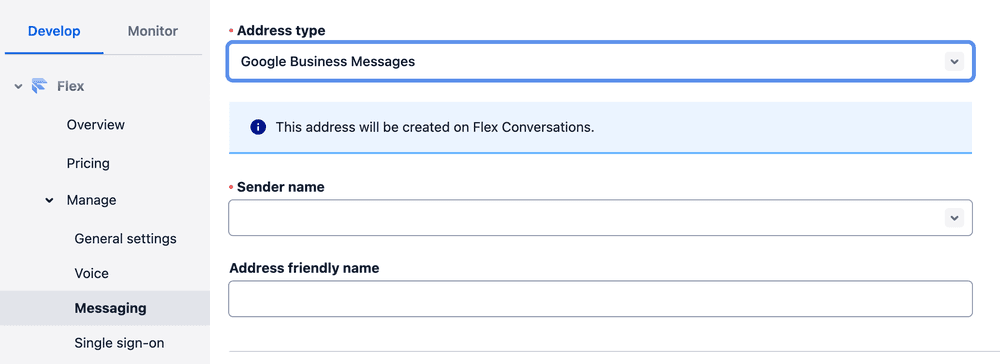
-
From the Sender name, select your sender.
-
From the Integration type list, select how you'd like conversations to pass to Flex, via Studio or Webhook.
- If you selected Studio, from the Studio Flow list, you can select the out-of-box Messaging Flow, unless you have removed or reconfigured your studio flow.
- To learn more about configuring Studio Flows, see Configure pre-agent workflow with Studio and Set up a Studio Flow chatbot to respond to GBM messages.Twilio recommends setting up a chatbot to provide prompt responses and clear escalation paths to end users. -
Click Create Address.
You can programmatically create and manage a GBM address using the Conversations API's Address Configuration Resource.
1// Download the helper library from https://www.twilio.com/docs/node/install2const twilio = require("twilio"); // Or, for ESM: import twilio from "twilio";34// Find your Account SID and Auth Token at twilio.com/console5// and set the environment variables. See http://twil.io/secure6const accountSid = process.env.TWILIO_ACCOUNT_SID;7const authToken = process.env.TWILIO_AUTH_TOKEN;8const client = twilio(accountSid, authToken);910async function createConfigurationAddress() {11const addressConfiguration =12await client.conversations.v1.addressConfigurations.create({13address: "gbm:<sender_id>",14"autoCreation.enabled": true,15"autoCreation.studioFlowSid": "FWXXXXXXXXXXXXXXXXXXXXXXXXXXXXXXXX",16"autoCreation.type": "studio",17type: "gbm",18});1920console.log(addressConfiguration.sid);21}2223createConfigurationAddress();
Response
1{2"account_sid": "ACaaaaaaaaaaaaaaaaaaaaaaaaaaaaaaaa",3"sid": "IGaaaaaaaaaaaaaaaaaaaaaaaaaaaaaaaa",4"address": "gbm:<sender_id>",5"type": "gbm",6"friendly_name": "My Test Configuration",7"address_country": "CA",8"auto_creation": {9"enabled": true,10"type": "webhook",11"conversation_service_sid": "ISaaaaaaaaaaaaaaaaaaaaaaaaaaaaaaaa",12"webhook_url": "https://example.com",13"webhook_method": "POST",14"webhook_filters": [15"onParticipantAdded",16"onMessageAdded"17]18},19"date_created": "2016-03-24T21:05:50Z",20"date_updated": "2016-03-24T21:05:50Z",21"url": "https://conversations.twilio.com/v1/Configuration/Addresses/IGaaaaaaaaaaaaaaaaaaaaaaaaaaaaaaaa"22}
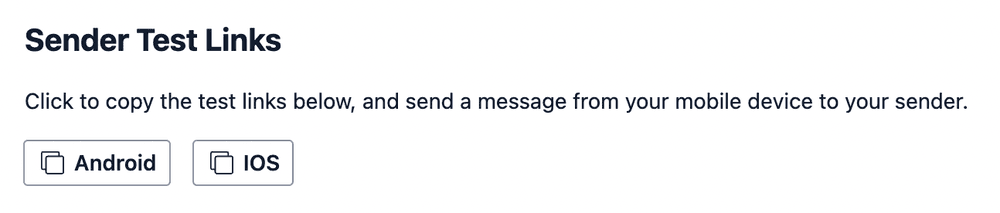
Twilio creates sender test links for iOS and Android, so you can test your sender and see what your customers will experience on a mobile device.
-
In the Console, go to Channels > Google Business Messages, and select the Sender.
-
From Sender Test Links, click Android or iOS. You can send the copied link to yourself in an email or WhatsApp message, for example, so you have access to the link on your mobile device.
-
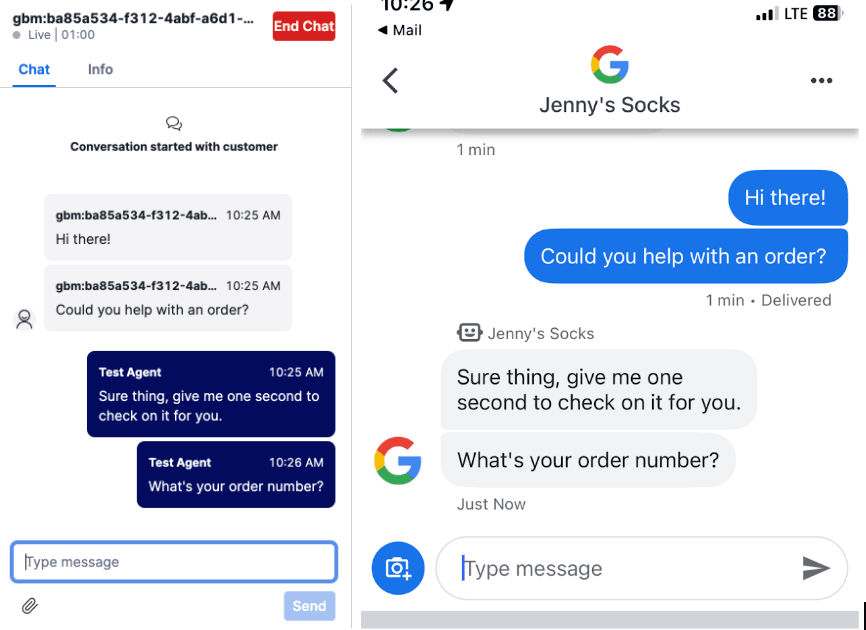
On your mobile device, open the link to send a message as a customer.
-
Open the Flex UI and log in as an agent.
-
Set your status to Available.
-
Accept the Incoming chat request and type a reply. The reply appears in Google Business Messages.
- In Channels > Google Business Messages, select the Sender.
- Review the sender details and click Verify Sender. The sender shows as Pending verification in the Console.
- To complete verification, follow steps 3-5 in Google's Business Messages.
