Send templates created with the Content Template Builder
This guide explains how to send messages using templates created with the Content Template Builder. You'll learn how to configure the required fields in your API request and use Messaging Services to send content templates.
To send messages with templates you create in the Content Template Builder, include two fields in your API request. First, configure a Messaging Service and create your content template.
Use the existing messaging endpoint with an additional ContentSid parameter. You may also include the ContentVariables field to substitute any placeholder values in your templates.
POST https://api.twilio.com/2010-04-01/Accounts/{AccountSid}/Messages
The following table describes the fields used to send content templates:
| Field | Required | Description |
|---|---|---|
ContentSid | Yes | String that identifies the preconfigured content. Required to send templates created using the Content Template Builder. |
ContentVariables | No | JSON string that defines values for placeholder variables in the template. Key-value pairs of placeholder variable names and substitution values. You can include up to 100 key-value pairs per request. |
Info
If you send a WhatsApp message outside the 24-hour free-form session, you must use a WhatsApp-approved template. To learn more, see Content API quick start.
The following example shows how to send a message with a content template:
Warning
Exclude Body and MediaUrl. ContentSid replaces both parameters. You might need to update your library to support ContentSid.
1// Download the helper library from https://www.twilio.com/docs/node/install2const twilio = require("twilio"); // Or, for ESM: import twilio from "twilio";34// Find your Account SID and Auth Token at twilio.com/console5// and set the environment variables. See http://twil.io/secure6const accountSid = process.env.TWILIO_ACCOUNT_SID;7const authToken = process.env.TWILIO_AUTH_TOKEN;8const client = twilio(accountSid, authToken);910async function createMessage() {11const message = await client.messages.create({12contentSid: "HXXXXXXXXX",13contentVariables: JSON.stringify({ 1: "Name" }),14from: "whatsapp:+15551234567",15to: "whatsapp:+18551234567",16});1718console.log(message.body);19}2021createMessage();
Response
1{2"account_sid": "ACXXXXXXXXX",3"api_version": "2010-04-01",4"body": "Hello! 👍",5"date_created": "Thu, 24 Aug 2023 05:01:45 +0000",6"date_sent": "Thu, 24 Aug 2023 05:01:45 +0000",7"date_updated": "Thu, 24 Aug 2023 05:01:45 +0000",8"direction": "outbound-api",9"error_code": null,10"error_message": null,11"from": "whatsapp:+15551234567",12"num_media": "0",13"num_segments": "1",14"price": null,15"price_unit": null,16"messaging_service_sid": "MGaaaaaaaaaaaaaaaaaaaaaaaaaaaaaaaa",17"sid": "SMaaaaaaaaaaaaaaaaaaaaaaaaaaaaaaaa",18"status": "queued",19"subresource_uris": {20"media": "/2010-04-01/Accounts/ACaaaaaaaaaaaaaaaaaaaaaaaaaaaaaaaa/Messages/SMaaaaaaaaaaaaaaaaaaaaaaaaaaaaaaaa/Media.json"21},22"to": "whatsapp:+18551234567",23"uri": "/2010-04-01/Accounts/ACaaaaaaaaaaaaaaaaaaaaaaaaaaaaaaaa/Messages/SMaaaaaaaaaaaaaaaaaaaaaaaaaaaaaaaa.json"24}
To send a content template, replace the Body field with ContentSid and, optionally, ContentVariables. The following table describes the required fields for this method:
| Field | Required | Description |
|---|---|---|
From | Yes | The sender initiating the message. Use the following format:
|
To | Yes | The identifier of the recipient you're sending the message to. Use the following format:
|
ContentSid | Yes | String field used to identify the preconfigured content. Required to send templates created using the Content Template Builder. |
ContentVariables | No | JSON string used to define the values of any placeholder variables found in the preconfigured content. Key-value pairs of placeholder variable names and substitution values. |
You can also use a Messaging Service to send content templates. Using Messaging Services can help you organize your account and manage complexity as your messaging application grows. To learn more about Messaging Services features, see Messaging Services.
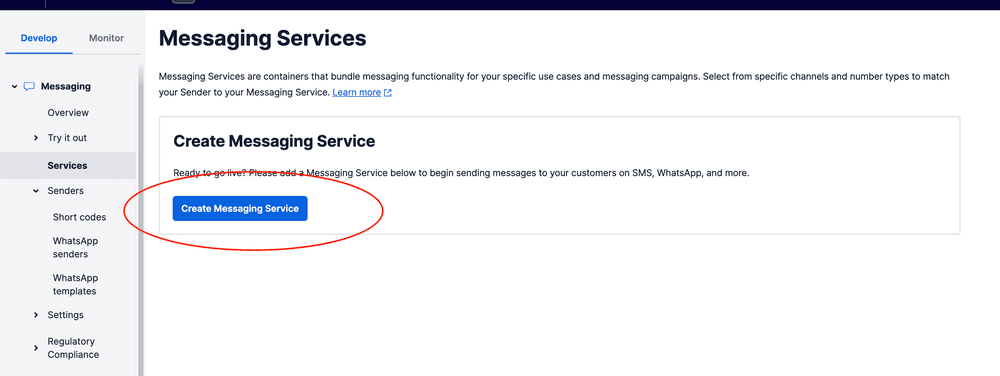
To create a Messaging Service, go to the Messaging > Services section of the Twilio Console. See Content API quick start for a detailed guide.

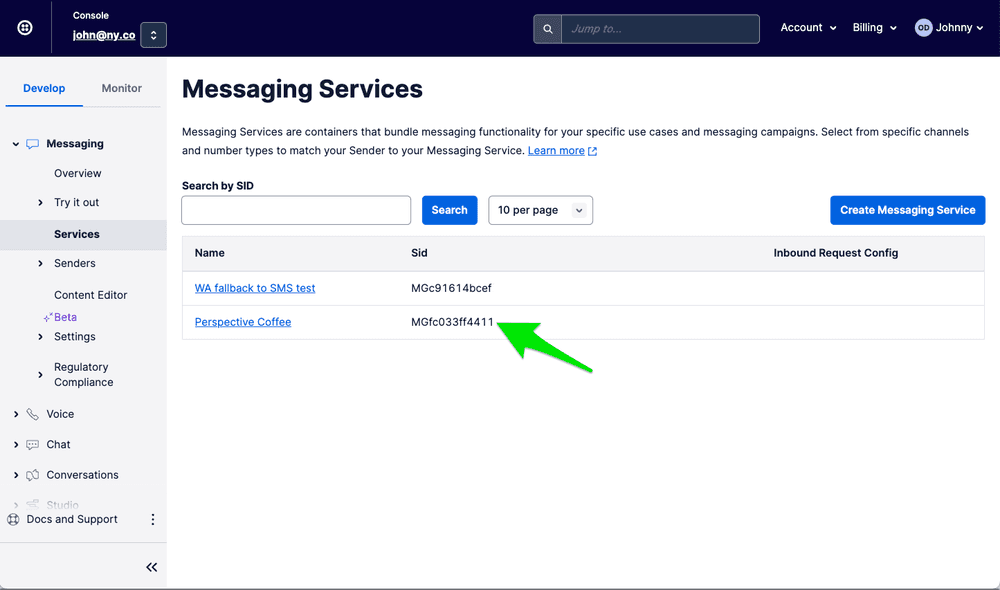
Copy your Messaging Service SID from Twilio Console > Services.

You can send a template created with the Content Template Builder using two methods:
- Use the
Fromfield to specify the Messaging Service SID - Include a
MessagingServiceSidfield
The following example demonstrates how to send a message using a Messaging Service in the From field:
Warning
Body and MediaUrl should be excluded. They are not required. They are both superseded by the ContentSid.
The body in the response will be empty. Since this is a templated message, the body is in the template. If you would like to see the body that was delivered, you can view it in the Twilio logs in the Console.
1// Download the helper library from https://www.twilio.com/docs/node/install2const twilio = require("twilio"); // Or, for ESM: import twilio from "twilio";34// Find your Account SID and Auth Token at twilio.com/console5// and set the environment variables. See http://twil.io/secure6const accountSid = process.env.TWILIO_ACCOUNT_SID;7const authToken = process.env.TWILIO_AUTH_TOKEN;8const client = twilio(accountSid, authToken);910async function createMessage() {11const message = await client.messages.create({12contentSid: "HXXXXXXXXX",13contentVariables: JSON.stringify({ 1: "Name" }),14from: "MGXXXXXXXX",15to: "whatsapp:+18551234567",16});1718console.log(message.body);19}2021createMessage();
Response
1{2"account_sid": "ACXXXXXXXX",3"api_version": "2010-04-01",4"body": "Hello! 👍",5"date_created": "Thu, 24 Aug 2023 05:01:45 +0000",6"date_sent": "Thu, 24 Aug 2023 05:01:45 +0000",7"date_updated": "Thu, 24 Aug 2023 05:01:45 +0000",8"direction": "outbound-api",9"error_code": null,10"error_message": null,11"from": "MGXXXXXXXX",12"num_media": "0",13"num_segments": "1",14"price": null,15"price_unit": null,16"messaging_service_sid": "MGaaaaaaaaaaaaaaaaaaaaaaaaaaaaaaaa",17"sid": "SMaaaaaaaaaaaaaaaaaaaaaaaaaaaaaaaa",18"status": "queued",19"subresource_uris": {20"media": "/2010-04-01/Accounts/ACaaaaaaaaaaaaaaaaaaaaaaaaaaaaaaaa/Messages/SMaaaaaaaaaaaaaaaaaaaaaaaaaaaaaaaa/Media.json"21},22"to": "whatsapp:+18551234567",23"uri": "/2010-04-01/Accounts/ACaaaaaaaaaaaaaaaaaaaaaaaaaaaaaaaa/Messages/SMaaaaaaaaaaaaaaaaaaaaaaaaaaaaaaaa.json"24}
This method requires adding a sender to a Messaging Service. This approach is recommended if you plan to scale your traffic with multiple senders.
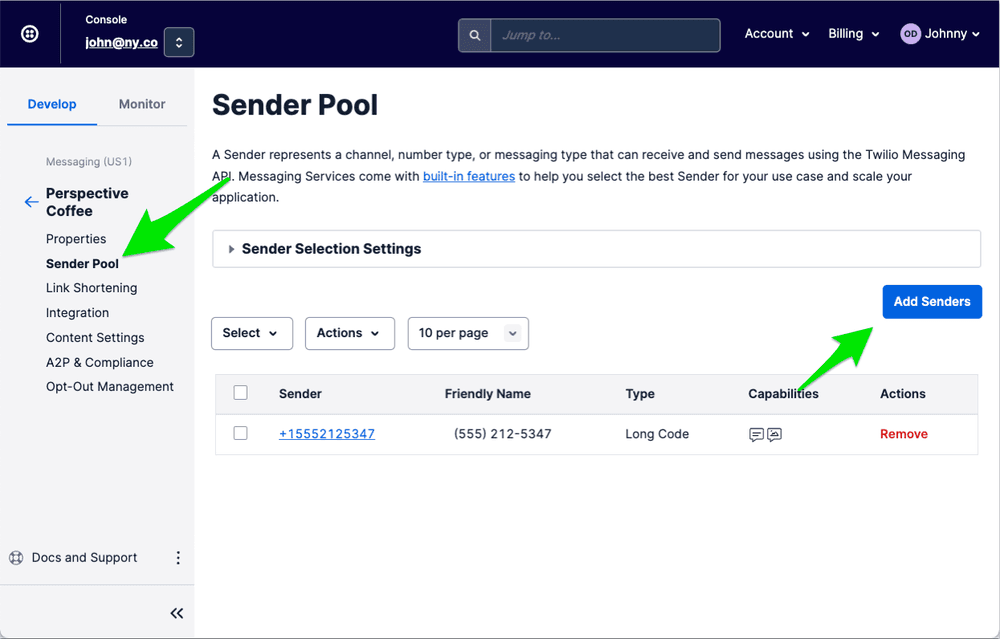
Each Messaging Service has a Sender Pool that contains all the senders associated with the service.
Follow these steps to add a sender to a Messaging Service:
- Go to the Messaging Service.
- In the Develop tab on the left, click on Sender Pool.
- Click Add Senders.

Messaging Services support the following sender types:
- Phone numbers
- Short codes
- Alpha senders
- WhatsApp senders
- Facebook Messenger senders
Info
If you don't see an option for Facebook Messenger, file a support ticket to activate the "Facebook Messenger with Messaging Services feature." For more information, see our Facebook Messenger with Twilio documentation.
The following table summarizes all the fields used in the API request:
| Field | Required | Description |
|---|---|---|
From | Yes | The Messaging Service SID, MGXXXXXXXX. |
To | Yes | The identifier of the recipient you're sending the message to. Use the following format:
|
ContentSid | Yes | String field used to identify the preconfigured content. Required to send templates created using Content Template Builder. |
ContentVariables | No | JSON string used to define the values of any placeholder variables found in the preconfigured content. Key-value pairs of placeholder variable names and substitution values. |
The following example shows how to send a message using both MessagingServiceSid and From fields:
1// Download the helper library from https://www.twilio.com/docs/node/install2const twilio = require("twilio"); // Or, for ESM: import twilio from "twilio";34// Find your Account SID and Auth Token at twilio.com/console5// and set the environment variables. See http://twil.io/secure6const accountSid = process.env.TWILIO_ACCOUNT_SID;7const authToken = process.env.TWILIO_AUTH_TOKEN;8const client = twilio(accountSid, authToken);910async function createMessage() {11const message = await client.messages.create({12contentSid: "HXXXXXXXXX",13contentVariables: JSON.stringify({ 1: "Name" }),14from: "whatsapp:+15551234567",15messagingServiceSid: "MGXXXXXXXX",16to: "whatsapp:+18551234567",17});1819console.log(message.body);20}2122createMessage();
Response
1{2"account_sid": "ACXXXXXXXXX",3"api_version": "2010-04-01",4"body": "Hello! 👍",5"date_created": "Thu, 24 Aug 2023 05:01:45 +0000",6"date_sent": "Thu, 24 Aug 2023 05:01:45 +0000",7"date_updated": "Thu, 24 Aug 2023 05:01:45 +0000",8"direction": "outbound-api",9"error_code": null,10"error_message": null,11"from": "whatsapp:+15551234567",12"num_media": "0",13"num_segments": "1",14"price": null,15"price_unit": null,16"messaging_service_sid": "MGXXXXXXXX",17"sid": "SMaaaaaaaaaaaaaaaaaaaaaaaaaaaaaaaa",18"status": "queued",19"subresource_uris": {20"media": "/2010-04-01/Accounts/ACaaaaaaaaaaaaaaaaaaaaaaaaaaaaaaaa/Messages/SMaaaaaaaaaaaaaaaaaaaaaaaaaaaaaaaa/Media.json"21},22"to": "whatsapp:+18551234567",23"uri": "/2010-04-01/Accounts/ACaaaaaaaaaaaaaaaaaaaaaaaaaaaaaaaa/Messages/SMaaaaaaaaaaaaaaaaaaaaaaaaaaaaaaaa.json"24}
This method lets you keep using the From field to specify the sender ID. You need to reference a Messaging Service by including a new MessagingServiceSid field. Note that while a Messaging Service is required, you don't have to add the sender to its Sender Pool (more on this later). This method may be simpler if you're getting started with Messaging Services.
The following table describes all the fields used in the API request:
| Field | Required | Description |
|---|---|---|
From | Yes | The sender that's initiating the message. Use the following format:
|
To | Yes | The identifier of the recipient you're sending the message to. Use the following format:
|
MessagingServiceSid | Yes | The Messaging Service SID, MGXXXXXXXX. |
ContentSid | Yes | String field used to identify the preconfigured content. Required to send templates created using the Content Template Builder. |
ContentVariables | No | JSON string used to define the values of any placeholder variables found in the preconfigured content. Key-value pairs of placeholder variable names and substitution values. |