How to Monitor Super SIM Connection Events using AWS ElasticSearch and Kibana
Twilio Event Streams is a new, unified mechanism to help you track your application's interactions with Twilio products. Event Streams spans Twilio's product line to provide a common event logging system that supports product-specific event types in a consistent way. You use a single API to subscribe to the events that matter to you.
Super SIM provides a set of event types, called Connection Events, which are focused on devices' attempts to attach to cellular networks and, once they are connected, the data sessions they establish to send and receive information.
This tutorial will show you how to integrate Super SIM Connection Events into a typical business process: routing the data to AWS ElasticSearch so it can feed your Kibana dashboards. To do so, you'll set up Event Streams to send Super SIM Connection Events to an AWS Kinesis Data Stream and into ElasticSearch via AWS Kinesis Firehose.
Info
If you'd prefer to start with a more basic guide to using Super SIM connection events, or your use-case doesn't require AWS, we have another tutorial that focuses on streaming Super SIM Connection Events to a webhook in your cloud.
With the AWS resources in place to read and feed events to Kibana, you'll explore probing the event data, setting up visualizations to help you spot underlying trends in the data, and configuring a dashboard so you're ready to monitor event data regularly.
This tutorial assumes you're working on a Linux box or a Mac, but it should also work under Windows if you're running Windows Subsystem for Linux. Whatever platform you're using, we'll take it as a given that you're familiar with the command line.
You don't need to have experience of working with AWS accounts and processes, unless you plan to change or upgrade the resources configured during the tutorial. All of the AWS setup required by the tutorial is driven by a script, so you can focus on the flow rather than keying in code or navigating the AWS console. The script is fully commented so you can understand exactly what is to be installed.
Info
If you've already set up Event Streams for another Twilio product, then you may prefer to jump straight to the documentation that describes the event types unique to Super SIM. No problem.
Let's get started.
To work through this tutorial, you'll need your Twilio Account SID and Auth Token to log in with the Twilio CLI tool. If you don't have these credentials handy, you can get them from the Console.
You'll also need an AWS account set up with an AWS user that has resource creation permissions. You'll make use of these in Steps 2 and 3.
Warning
The tutorial creates and uses AWS resources, so please be aware that this will come at a cost to your AWS account holder. We've made sure we used as few and as limited resources as possible. For more details, check out AWS' pricing page.
You may also find that certain configurations are not available in your preferred AWS region, so you may need to modify the config you use accordingly. Make sure you thoroughly review the supersim_events.tf script in Step 3, which has all the details of the config you'll use and will be where you'll make any changes you need.
You may have already completed some of these tasks for other tutorials you have followed, or as part of your own workflow, so just skip those steps. For each step, we've linked to the relevant setup guide, so just jump straight there if you need further assistance then hop back here when you're done.
- Install and configure the Twilio CLI using this guide.
- Install and configure the AWS CLI. Amazon has full guidance for you.
- Install the JSON processor JQ from its website. JQ is used to process data in a script you'll run shortly to validate the Events Stream Sink you set up.
- Install the Terraform CLI. Terraform lets you build out infrastructure using code. Because this tutorial involves the creation of many AWS resources of various types, you'll use Terraform and a ready-to-go setup script to automate this process. Terraform's developer, Hashicorp, has a guide to get you started with the installation process — come back here as soon as you've installed the CLI tool — there's no need to go further.
In this step you'll put in place all of the AWS resources you need and connect them together so that they're ready to receive your Super SIM Connection Events and make them available to Kibana. You will create:
- A Kinesis Data Stream as an entry point for Super SIM Connection Events.
- An ElasticSearch domain to receive, store, and work with the events, which will be presented by Kibana.
- A Kinesis Firehose to bridge the Data Stream and ElasticSearch.
- An S3 Bucket as a store for records Firehose could not pass to ElasticSearch.
- Assorted Roles and Policies to authorize Twilio to write to your stream, and for the AWS components to interact with each other.
The entire set up process is automated using Terraform code-as-infrastructure technology and a script you'll download shortly. Feel free to review the script before you run it.
-
Open a terminal and run the following commands to prepare your working directory:
1mkdir supersim_events2cd supersim_events -
Copy the first of the three scripts below and save it to your
supersim_eventsdirectory assetup_aws.shand then runchmod +x setup_awsto make the script executable. You'll need to update the first line of the script with your preferred AWS region. -
Get the second script, save it as
validate_sink.sh, and runchmod +x validate_sink.sh. -
Copy the third script and save it to your
supersim_eventsdirectory assupersim_events.tf. This does not need to be made executable. It is read by the Terraform CLI and used to build a setup scheme. You should review this script to make sure you're happy with its role and policy settings. -
Edit
setup_aws.shand set your AWS region where marked, eg.us-east-2. -
You're now ready to put your AWS infrastructure into place. Remember, there is a cost implication for your account holder, which we've attempted to minimize by instantiating as few and as limited a set of AWS resources as possible. For more details, check out AWS' pricing page.
-
Run:
./setup_aws.shThis script sets the variables Terraform will use and calls two Terraform CLI commands, one to check the
supersim_events.tfscript, and the other to build the infrastructure from the script, which it does via the AWS CLI. It will output what it is going to generate, and then ask you how you'd like to proceed. Review its plan, then type inyesand hit Enter. -
As the AWS resources are created, you'll receive progress reports in the terminal, and then it will output some key data: the External ID value, the stream ARN, and the role ARN that you'll use to set up your Twilio Events Stream Sink, and the URL you'll use to access Kibana. You'll need to keep all of these values handy for future steps.
Info
If you subsequently make changes to your Terraform script, just run terraform apply to see the changes Terraform will make and, if you agree, apply them. You don't need to run setup_aws.sh again, but if you wish to, just make sure you replace the $(...) section in line 3 with the external ID output on the first run. If you change the external ID, either via the script or manually, you will need to recreate your Sink.
Here are the scripts, or just jump to the next step.
Info
You can also find all of these files in our public GitHub repo.
1#!/bin/bash2export TF_VAR_your_aws_region='<YOUR_AWS_REGION>'3export TF_VAR_external_id=$(openssl rand -hex 40)4export TF_VAR_your_computer_external_ip=$(curl -s https://checkip.amazonaws.com/)5terraform init6terraform validate7terraform apply
Download this script from the Event Streams documentation.
1/*2* Define Terraform variables3* These are set in the 'setup_aws.sh' script4*/5variable "your_aws_region" {6type = string7}89// This is required to give your computer access to Kibana10variable "your_computer_external_ip" {11type = string12}1314// Randomly generated string to verify connections from Twilio15variable "external_id" {16type = string17}1819/*20* Base Terraform setup21*/22terraform {23required_providers {24aws = {25source = "hashicorp/aws"26version = "~> 3.42.0"27}28}2930required_version = ">= 0.15.0"31}3233provider "aws" {34profile = "default"35region = var.your_aws_region36}3738/*39* Set up policies40*/4142// Create a Policy to permit Twilio to write records to our Kinesis Stream43resource "aws_iam_policy" "supersim_kinesis_stream_record_write_policy" {44name = "supersim-kinesis-stream-record-write-policy"45policy = jsonencode({46Version = "2012-10-17"47Statement = [48{49Effect = "Allow"50Resource = "*"51Action = [52"kinesis:PutRecord",53"kinesis:PutRecords"54]55},56{57Effect = "Allow"58Resource = "*"59Action = [60"kinesis:ListShards",61"kinesis:DescribeLimits"62]63}64]65})66}6768// Create a policy to provide read access to ElasticSearch Kibana69// NOTE We limit access to your computer's external (eg. router) IP address,70// which is required for web access to Kibana71resource "aws_elasticsearch_domain_policy" "supersim_elasticsearch_kibana_access_policy" {72domain_name = aws_elasticsearch_domain.supersim_elastic_search_kibana_domain.domain_name73access_policies = jsonencode({74Version = "2012-10-17"75Statement = [76{77Action = [78"es:ESHttp*",79"es:DescribeElasticsearchDomain",80"es:ListDomainNames",81"es:ListTags"82]83Effect = "Allow"84Resource = "${aws_elasticsearch_domain.supersim_elastic_search_kibana_domain.arn}/*"85Principal = {86"AWS": "*"87}88Condition = {89"IpAddress": {90"aws:SourceIp": [91var.your_computer_external_ip92]93}94}95}96]97})98}99100// Set up a policy to manage Firehose's access to various resources:101// * To write records to ElasticSearch102// * To read from ElasticSearch (may not be necessary)103// * To write to S3 records it could not write to ElasticSearch104// * To read records from the Kinesis Data Stream105// * To access EC2 resources for data transfer (may not be necessary)106resource "aws_iam_policy" "supersim_firehose_rw_access_policy" {107name = "supersim-firehose-rw-access-policy"108policy = jsonencode({109Version = "2012-10-17"110Statement = [111{112Effect = "Allow"113Action = [114"es:DescribeElasticsearchDomain",115"es:DescribeElasticsearchDomains",116"es:DescribeElasticsearchDomainConfig",117"es:ESHttpPost",118"es:ESHttpPut"119]120Resource = [121"${aws_elasticsearch_domain.supersim_elastic_search_kibana_domain.arn}",122"${aws_elasticsearch_domain.supersim_elastic_search_kibana_domain.arn}/*"123]124},125{126Effect = "Allow"127Action = [128"es:ESHttpGet"129]130Resource = [131"${aws_elasticsearch_domain.supersim_elastic_search_kibana_domain.arn}",132"${aws_elasticsearch_domain.supersim_elastic_search_kibana_domain.arn}/*"133]134},135{136Effect = "Allow"137Action = [138"s3:AbortMultipartUpload",139"s3:GetBucketLocation",140"s3:GetObject",141"s3:ListBucket",142"s3:ListBucketMultipartUploads",143"s3:PutObject"144]145Resource = [146"${aws_s3_bucket.supersim_failed_report_bucket.arn}",147"${aws_s3_bucket.supersim_failed_report_bucket.arn}/*"148]149},150{151Effect = "Allow"152Action = [153"kinesis:DescribeStream",154"kinesis:GetShardIterator",155"kinesis:GetRecords",156"kinesis:ListShards"157]158Resource = aws_kinesis_stream.supersim_connection_events_stream.arn159},160{161Effect = "Allow"162Action = [163"ec2:DescribeVpcs",164"ec2:DescribeVpcAttribute",165"ec2:DescribeSubnets",166"ec2:DescribeSecurityGroups",167"ec2:DescribeNetworkInterfaces",168"ec2:CreateNetworkInterface",169"ec2:CreateNetworkInterfacePermission",170"ec2:DeleteNetworkInterface"171]172Resource = "*"173}174]175})176}177178179/*180* Set up roles181*/182183// Create a Role Twilio will assume to access the Stream184resource "aws_iam_role" "supersim_twilio_access_role" {185name = "supersim-twilio-access-role"186assume_role_policy = jsonencode({187Version = "2012-10-17"188Statement = [189{190Action = "sts:AssumeRole"191Effect = "Allow"192Principal = {193"AWS" = "arn:aws:iam::177261743968:root"194}195Condition = {196StringEquals = {197"sts:ExternalId" = var.external_id198}199}200}201]202})203}204205// Create a Role Firehose will assume to access ElasticSearch206resource "aws_iam_role" "supersim_firehose_access_role" {207name = "supersim-firehose-access-role"208assume_role_policy = jsonencode({209Version = "2012-10-17"210Statement = [211{212Effect = "Allow"213Action = "sts:AssumeRole"214Principal = {215"Service" = "firehose.amazonaws.com"216}217}218]219})220}221222223/*224* Attach policies to roles225*/226227// Attach the Stream write Policy to the Twilio access Role228resource "aws_iam_role_policy_attachment" "supersim_attach_write_policy_to_twilio_access_role" {229role = aws_iam_role.supersim_twilio_access_role.name230policy_arn = aws_iam_policy.supersim_kinesis_stream_record_write_policy.arn231}232233// Attach the resource read/write/access Policy to the Firehose access Role234resource "aws_iam_role_policy_attachment" "supersim_attach_rw_policy_to_firehose_access_role" {235role = aws_iam_role.supersim_firehose_access_role.name236policy_arn = aws_iam_policy.supersim_firehose_rw_access_policy.arn237}238239240/*241* Set up AWS resources242*/243244// Set up a Kinesis Stream to receive streamed events245// NOTE One shard is sufficient to the tutorial and testing246resource "aws_kinesis_stream" "supersim_connection_events_stream" {247name = "supersim-connection-events-stream"248shard_count = 1249}250251// Create our Elastic Search Domain252// This uses minimal server resources for the tutorial, but253// a real-world application would require greater resources254resource "aws_elasticsearch_domain" "supersim_elastic_search_kibana_domain" {255domain_name = "supersim-es-kibana-domain"256elasticsearch_version = "7.10"257258cluster_config {259instance_type = "t2.small.elasticsearch"260instance_count = 1261}262263ebs_options {264ebs_enabled = true265volume_type = "standard"266volume_size = 25267}268269domain_endpoint_options {270enforce_https = true271tls_security_policy = "Policy-Min-TLS-1-2-2019-07"272}273}274275// Create an S3 Bucket276// This is used by Firehose to dump records it could not pass277// to ElasticSearch. In a real-world app, you might also choose278// to store all received records279data "aws_canonical_user_id" "current_user" {}280281resource "aws_s3_bucket" "supersim_failed_report_bucket" {282bucket = "supersim-failed-report-bucket"283grant {284id = data.aws_canonical_user_id.current_user.id285type = "CanonicalUser"286permissions = ["FULL_CONTROL"]287}288}289290// Create a Kinesis Firehose to link the Kinesis Data Stream (input)291// to ElasticSearch (output)292resource "aws_kinesis_firehose_delivery_stream" "supersim_firehose_pipe" {293name = "supersim-firehose-pipe"294destination = "elasticsearch"295296kinesis_source_configuration {297kinesis_stream_arn = aws_kinesis_stream.supersim_connection_events_stream.arn298role_arn = aws_iam_role.supersim_firehose_access_role.arn299}300301elasticsearch_configuration {302domain_arn = aws_elasticsearch_domain.supersim_elastic_search_kibana_domain.arn303role_arn = aws_iam_role.supersim_firehose_access_role.arn304index_name = "super-sim"305306processing_configuration {307enabled = "false"308}309}310311s3_configuration {312role_arn = aws_iam_role.supersim_firehose_access_role.arn313bucket_arn = aws_s3_bucket.supersim_failed_report_bucket.arn314buffer_interval = 60315buffer_size = 1316}317}318319320/*321* Outputs -- useful values printed at the end322*/323output "EXTERNAL_ID" {324value = var.external_id325description = "The External ID you will use to create your Twilio Event Streams Sink"326}327328output "KIBANA_WEB_URL" {329value = aws_elasticsearch_domain.supersim_elastic_search_kibana_domain.kibana_endpoint330description = "The URL you will use to access Kibana"331}332333output "COMPUTER_IP_ADDRESS" {334value = var.your_computer_external_ip335}336337output "YOUR_KINESIS_STREAM_ARN" {338value = aws_kinesis_stream.supersim_connection_events_stream.arn339}340341output "YOUR_KINESIS_ROLE_ARN" {342value = aws_iam_role.supersim_twilio_access_role.arn343}
A Sink is an Event Stream destination. To set up a Sink, you create a Sink resource using the Event Streams API. Event Streams currently support two Sink types: AWS Kinesis and webhooks. You'll use the former, which you created and set up in the previous step.
In your terminal, run the following command. The details you need to add to the command — <YOUR_KINESIS_STREAM_ARN>, <YOUR_KINESIS_ROLE_ARN>, and <EXTERNAL_ID> — were output by Terraform at the end of the previous step.
1twilio api:events:v1:sinks:create --description SuperSimSink \2--sink-configuration '{"arn":"<YOUR_KINESIS_STREAM_ARN>", "role_arn":"<YOUR_KINESIS_ROLE_ARN>", "external_id":"<EXTERNAL_ID>"}' \3--sink-type kinesis
The command creates a Sink and outputs the new Sink's SID, which you'll need to paste into the code in the next step. If you get an error, check that you entered the command correctly.
Kinesis Sinks need to be validated before events can be delivered to them, in contrast to webhook Sinks. To validate a Sink, you need to tell the Sink that you want to test it. This automatically sends a test message to the Sink, which you'll then retrieve from the Sink itself and use to confirm that the Sink is operational. This validates the Sink.
-
In one terminal tab or window, run the
validate_sink.shscript:./validate_sink.sh supersim-connection-events-streamIt will wait for records to enter the stream and display them when they arrive.
-
Open a second terminal tab or window and run the following command to get Twilio to send a test message. Replace
<SINK_SID>with the SID value you got in Step 4.twilio api:events:v1:sinks:test:create --sid <SINK_SID> -
Switch back to the first terminal and you'll shortly see a block of JSON code. Look for the
datakey and note the value of its nestedtest_idkey. You're done with the validation script, so hit Ctrl-c to quit from it. -
Execute the following command, using your Sink SID and the test ID returned just now:
1twilio api:events:v1:sinks:validate:create --sid <SINK_SID> \2--test-id <TEST_ID>This should display the result valid in the terminal — your Sink has been validated and is ready to receive Super SIM Connection Events.
Event Streams uses a publish-subscribe (aka 'pub-sub') model: you subscribe to the events that interest you, and Twilio will publish those events to your Sink.
There are six Super SIM Connection event types, each identified by a reverse domain format string:
| Event Type | ID String |
|---|---|
| Attachment Accepted | com.twilio.iot.supersim.connection.attachment.accepted |
| Attachment Rejected | com.twilio.iot.supersim.connection.attachment.rejected |
| Attachment Failed | com.twilio.iot.supersim.connection.attachment.failed |
| Data Session Started | com.twilio.iot.supersim.connection.data-session.started |
| Data Session Updated | com.twilio.iot.supersim.connection.data-session.updated |
| Data Session Ended | com.twilio.iot.supersim.connection.data-session.ended |
The types are largely self explanatory. The exception is Attachment Failed, which is a generic 'could not connect' error that you may encounter when your device tries to join a cellular network.
In a typical connection sequence, you would expect to receive: one Attachment Accepted, one Data Session Started, and then multiple Data Session Updated events. When your device disconnects, you'll receive a Data Session Ended event at that point.
Now let's set up some subscriptions.
To get events posted to your new Sink, you need to create a Subscription resource. This essentially tells Twilio what events you're interested in. Once again, copy and paste the following command, adding in your Sink SID from Step 4:
1twilio api:events:v1:subscriptions:create \2--description "Super SIM events subscription" \3--sink-sid <SINK_SID> \4--types '{"type":"com.twilio.iot.supersim.connection.attachment.accepted","schema_version":1}' \5--types '{"type":"com.twilio.iot.supersim.connection.attachment.rejected","schema_version":1}' \6--types '{"type":"com.twilio.iot.supersim.connection.attachment.failed","schema_version":1}' \7--types '{"type":"com.twilio.iot.supersim.connection.data-session.started","schema_version":1}' \8--types '{"type":"com.twilio.iot.supersim.connection.data-session.ended","schema_version":1}' \9--types '{"type":"com.twilio.iot.supersim.connection.data-session.updated","schema_version":1}'
You specify your chosen event types as --types arguments: each one is a JSON structure that combines the type as an event ID string and the events schema you want to use.
The code will output the new Subscription resource's SID and confirm the subscription has been applied. The events you've subscribed to will now start flowing into ElasticSearch as your Super SIMs connect to cellular networks and, bring up and tear down data sessions.
Warning
We've included the Data Session Updated event because it will allow you to monitor your Super SIMs' data usage in Kibana, but please be aware that this event is emitted every six minutes for every Super SIM in your account so you can quickly use up your free event allowance. If this might be an issue for you, consider omitting the last line of the command.
To halt the flow of events, you can also remove the Subscription from your Sink. To do so, run the following command; you'll need the Subscription SID output when you set up the Subscription:
1twilio api:events:v1:subscriptions:remove \2--sid <SUBSCRIPTION_SID>
The URL you use to access Kibana was output at the end of Step 3. If it's not still visible in your terminal, navigate to the working directory, run terraform show, and scan the results for the kibana_endpoint key — its value will give you the URL you need.
If you know your way around Kibana, you can jump out of the tutorial at this point if you wish. The remainder focuses on using Kibana to explore and chart the incoming Connection Events data. You should, however, check out the Super SIM Connection Events documentation, which describes the information contained within each event.
-
Staying with us? Good. Paste the Kibana URL into a browser and hit Enter.
-
Click on the hamburger menu at the top left and select Stack Management under Management.
-
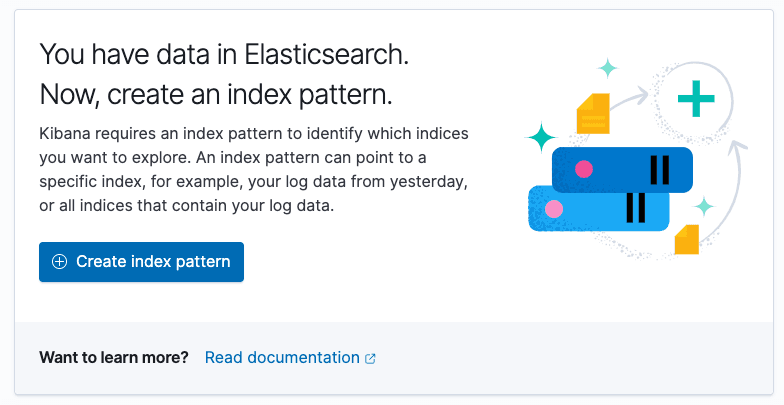
Click on Create index pattern:
-
Under Index pattern name, enter
super-sim*and then click Next Step. -
Under Time field, select data.timestamp, and then click Create Index Pattern. What you've done is establish the data fields Kibana can use and the particular field that it uses to track the flow and order of incoming events. Let's see what we can do with these events.
-
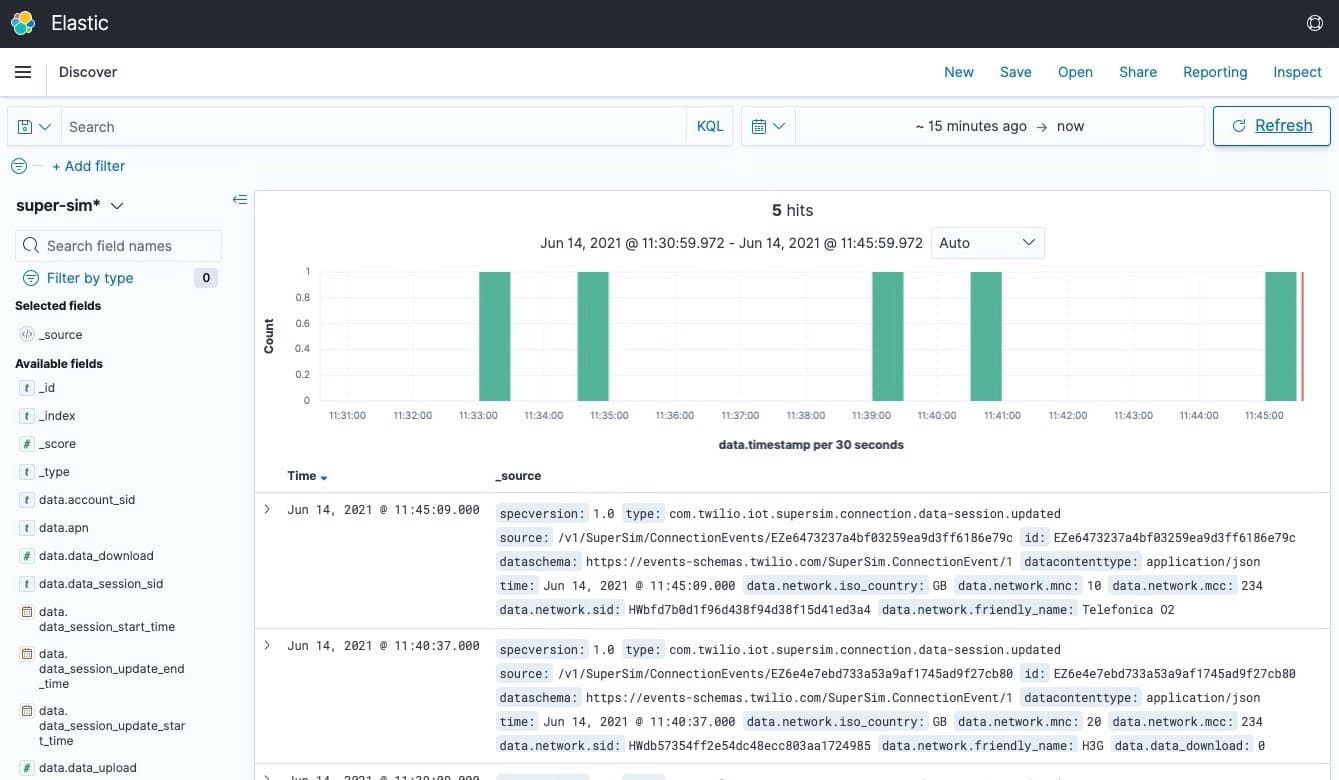
Click on the hamburger menu at the top left and select Discover under Kibana. This will show you the most recent records received. How recent is set by the date value at the top right of the screen; you can click this to change the time period in focus:
-
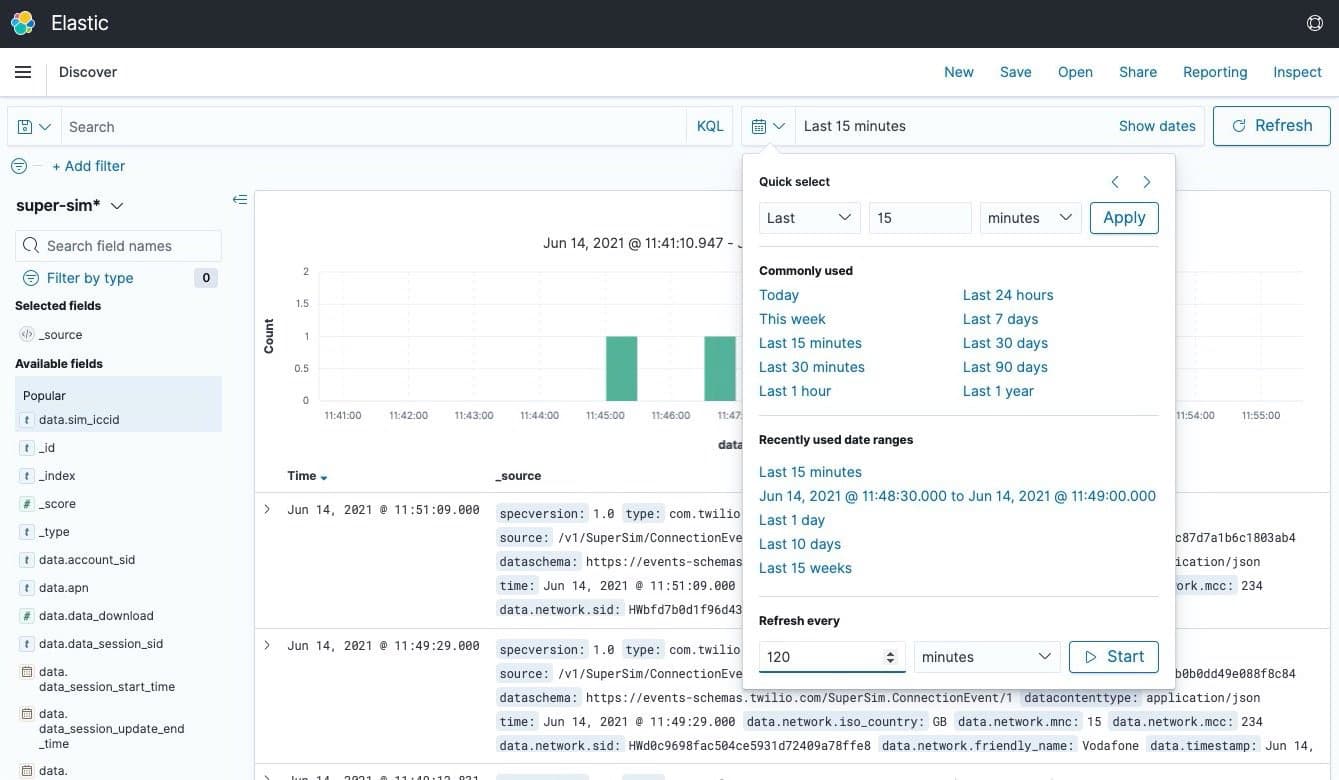
You can click Refresh to update the list of events, but it's better to click the calendar icon next to the date range, add a period under Refresh every, and then hit Start. This will refresh the data automatically:
-
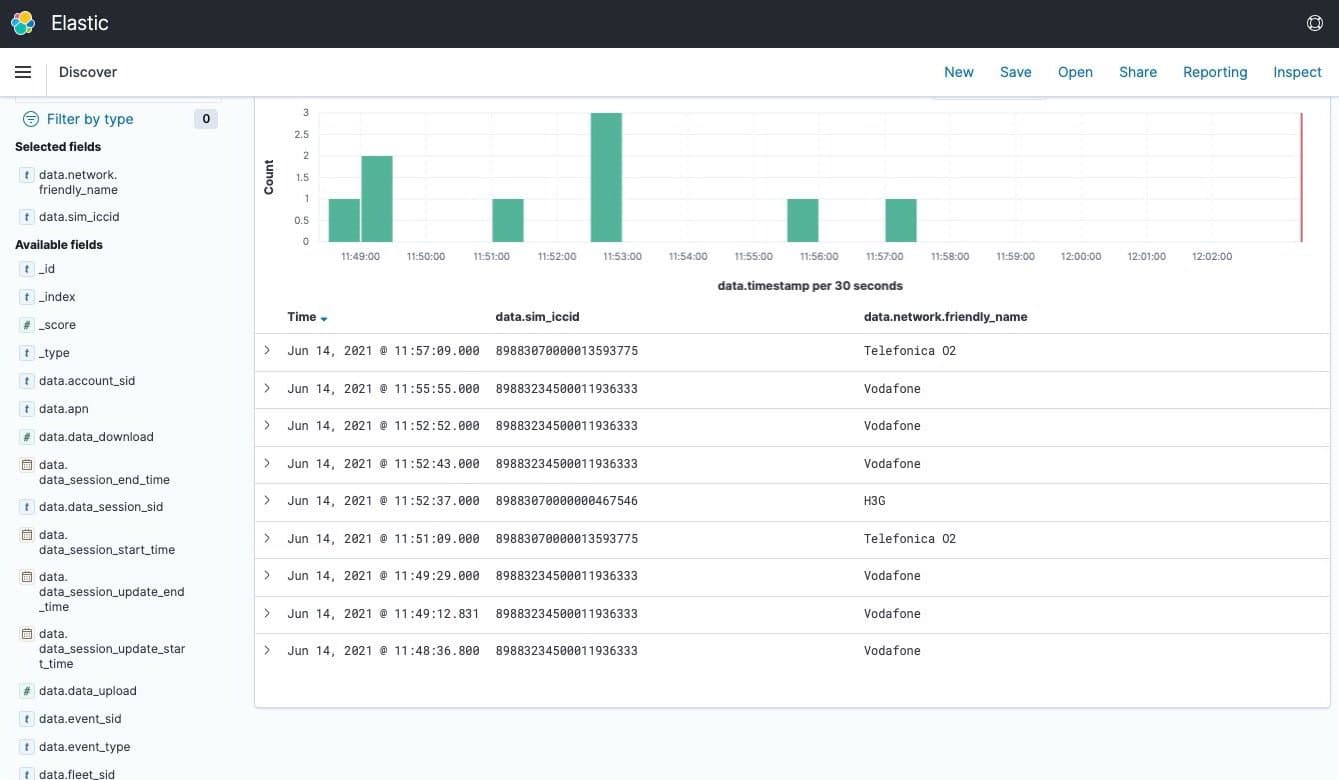
At the left, under Available fields, is a selection of all the data types available in each Super SIM connection event. Scroll down a little and locate data.sim_iccid. Move your mouse over it to reveal a + symbol, which you should click.
-
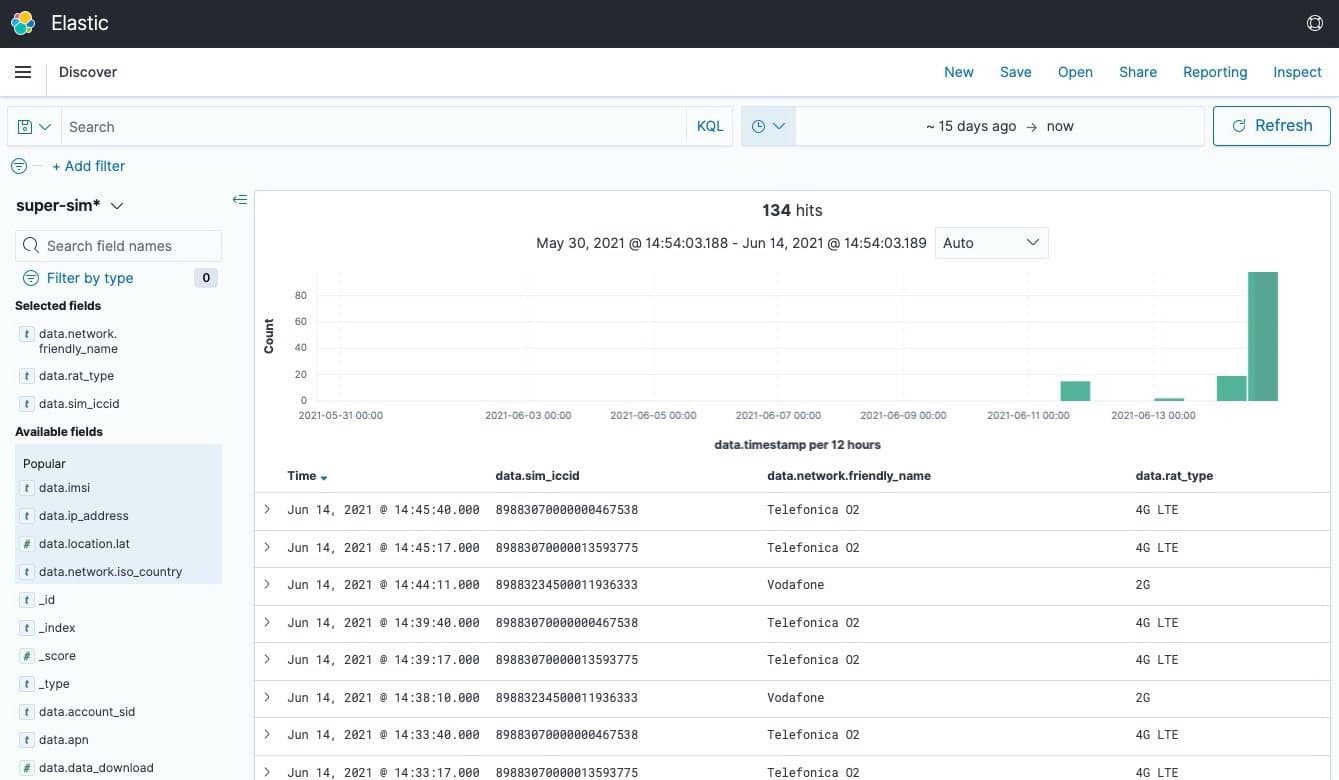
The events are now segmented by each of your Super SIMs' ICCIDs. Look back at the left-hand list of data fields and add data.network.friendly_name to the table (click on the + that appears alongside it). You can now see the networks your SIMs have connected through:
-
Go to Available fields and add data.rat_type to the table. Now you can see what cellular technologies your devices used to connect:
-
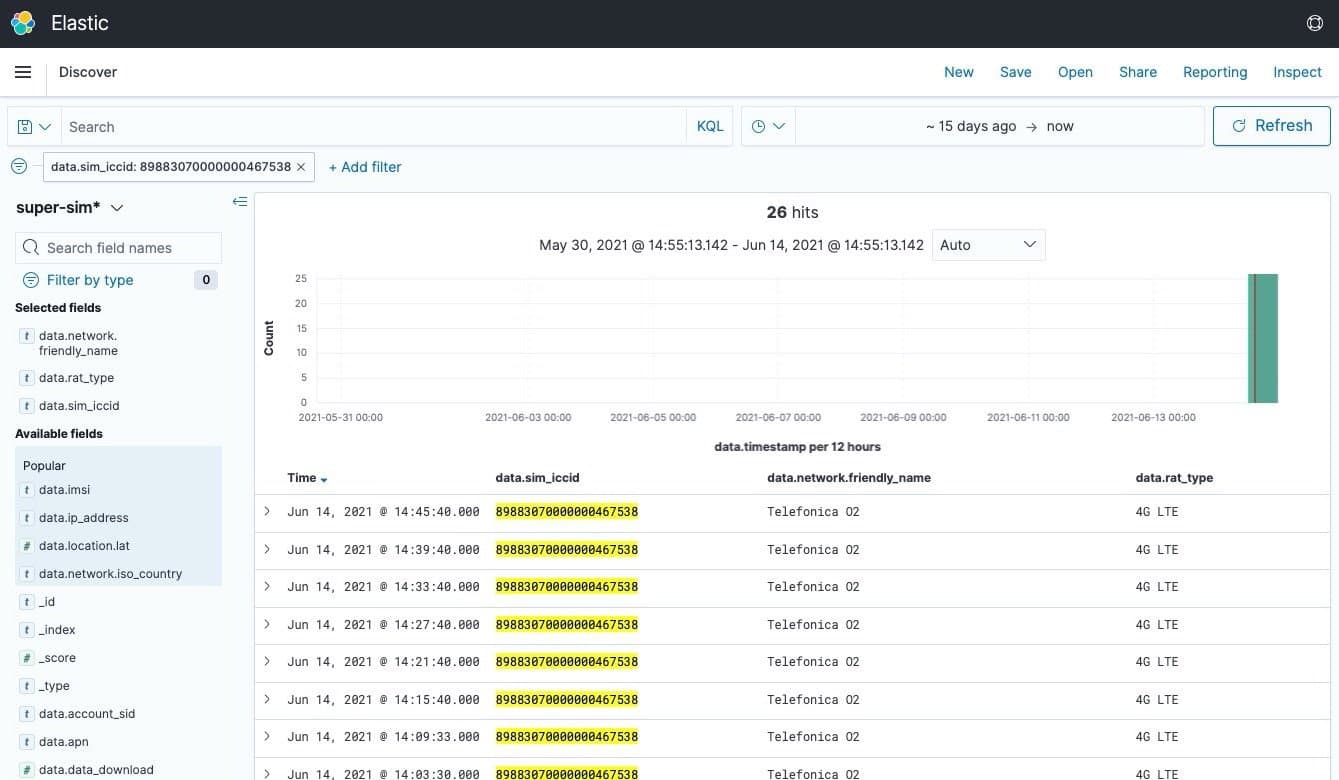
Pick a Super SIM and move your mouse to one of its rows. You'll see + and - icons appear at the right of the data.sim_iccid column. Click the + and Kibana will show only events experienced by that SIM:
-
Filters like the one you just set up are listed above the chart; click on any filter's X symbol to clear it. You can do the same with column headings to remove them from the table. The << and >> symbols you'll see when you move your mouse over a column heading allow you to reorder the columns. If you like, click Save — it's in the menu at the top right — and save your search parameters for use again.
-
Click on the hamburger menu at the top left and select Visualize under Kibana.
-
Click Create visualization.
-
In the New Visualization dialog, locate Vertical Bar (it's toward the bottom of the list) and select it.
-
Under New Line / Choose a source, click super-sim*.
-
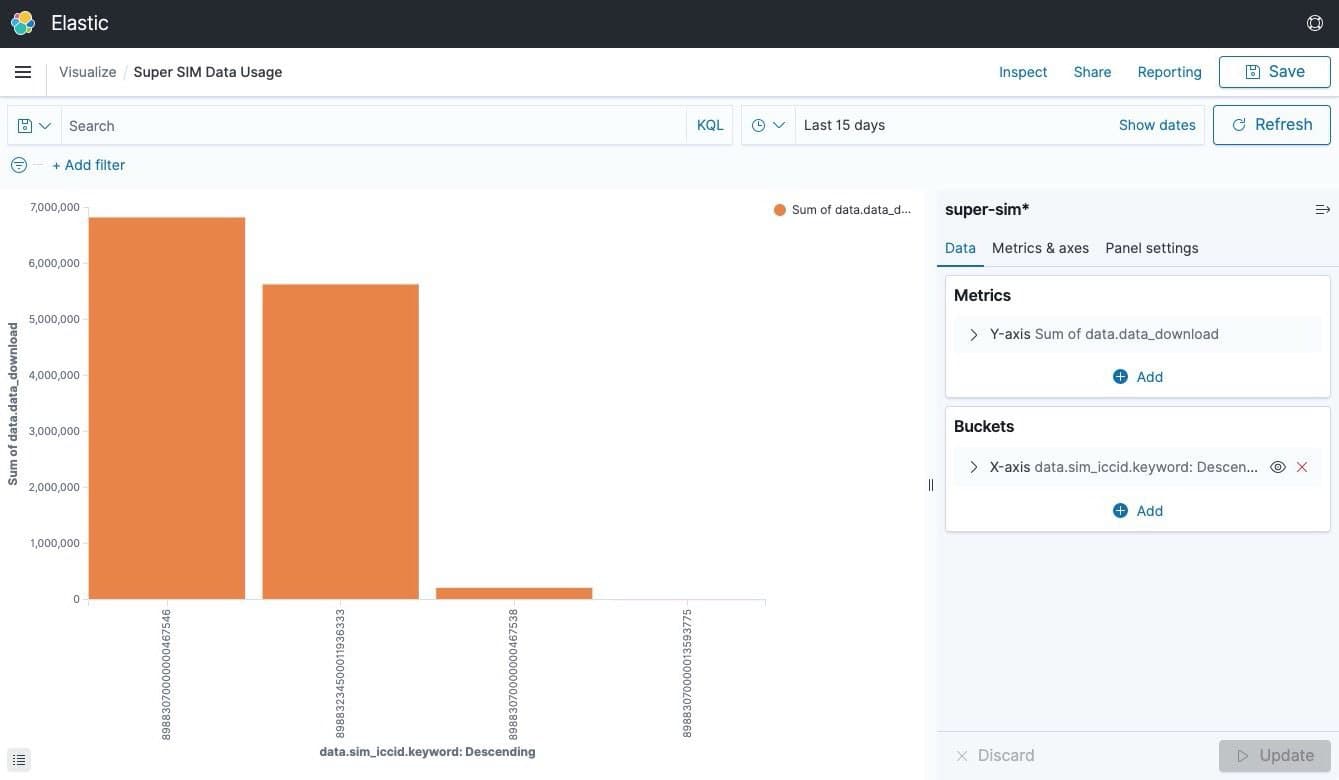
You're going to visualize how much data each of your Super SIMs have downloaded. This will be the Y axis value; you'll list the SIMs on the X axis. First, click on Y-axis Count under Metrics. Then, under Aggregation, click Count, scroll down through the list of options and click Sum.
-
Click on Select a Field, start typing
down, and select data.data_download when it's suggested: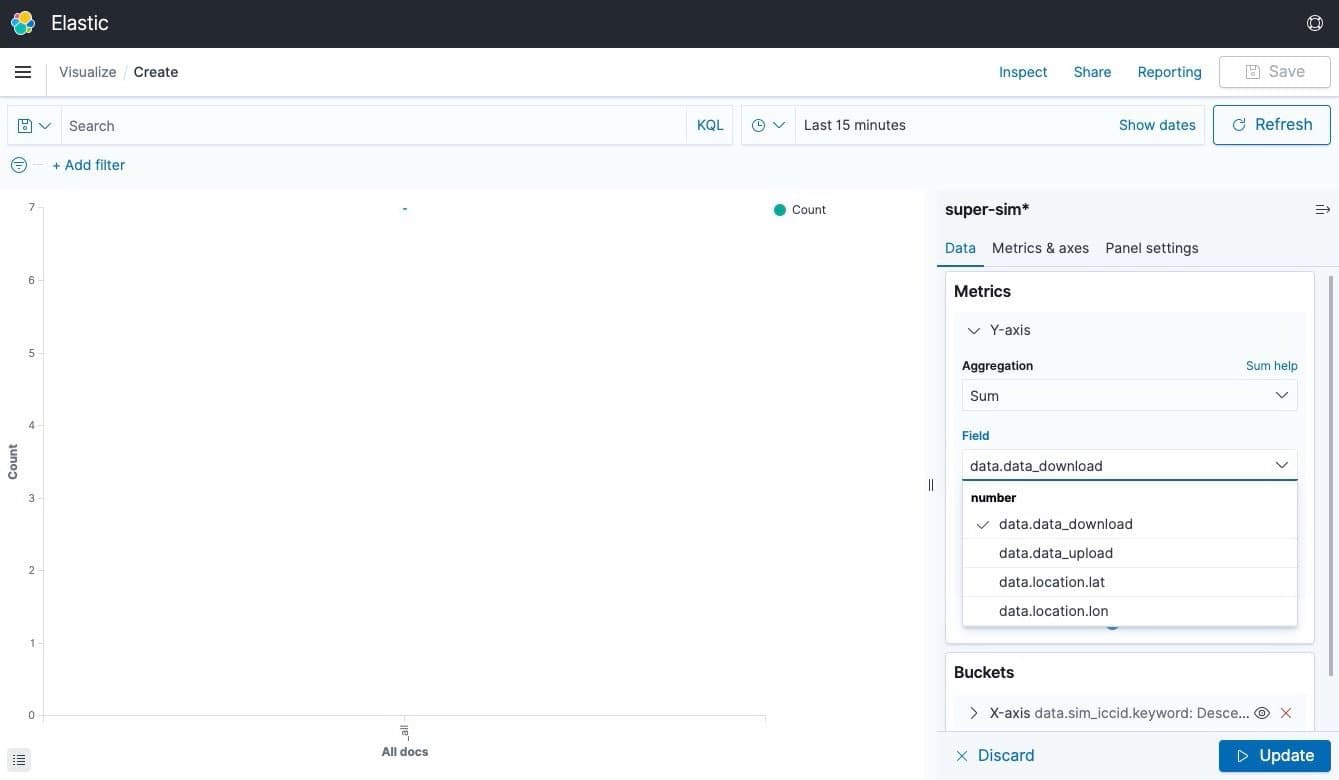
-
Click Add under Buckets. Click on X-axis in the pop-up that appears, and then, under Aggregation, click on Terms.
-
Click on the Field text field and start typing
icc— Kibana will suggest data.sim_iccid.keyword, so select it: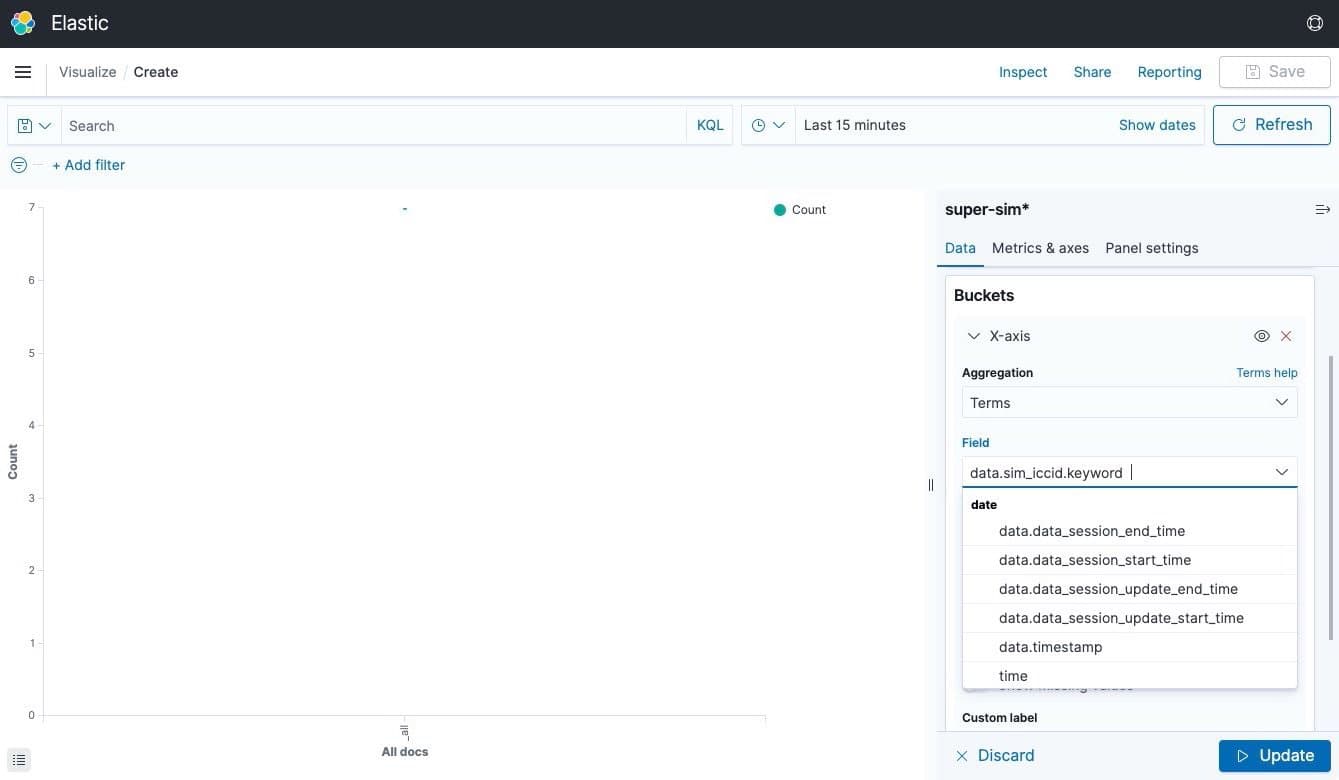
-
Click Update at the bottom right of the screen. You'll now see a chart showing how much data in bytes each Super SIM has downloaded:
-
Depending on the number of Super SIMs you have, you might need to adjust the Size setting under Buckets > X-axis, and the date range you're using (this works just the way you saw in Step 7).
-
Let's include upload data volumes too. Click Add under Metrics and select Y-axis. Under Aggregation, click Sum.
-
Under Field, click Select a field, start typing
uploadand select data.data_upload when it's suggested: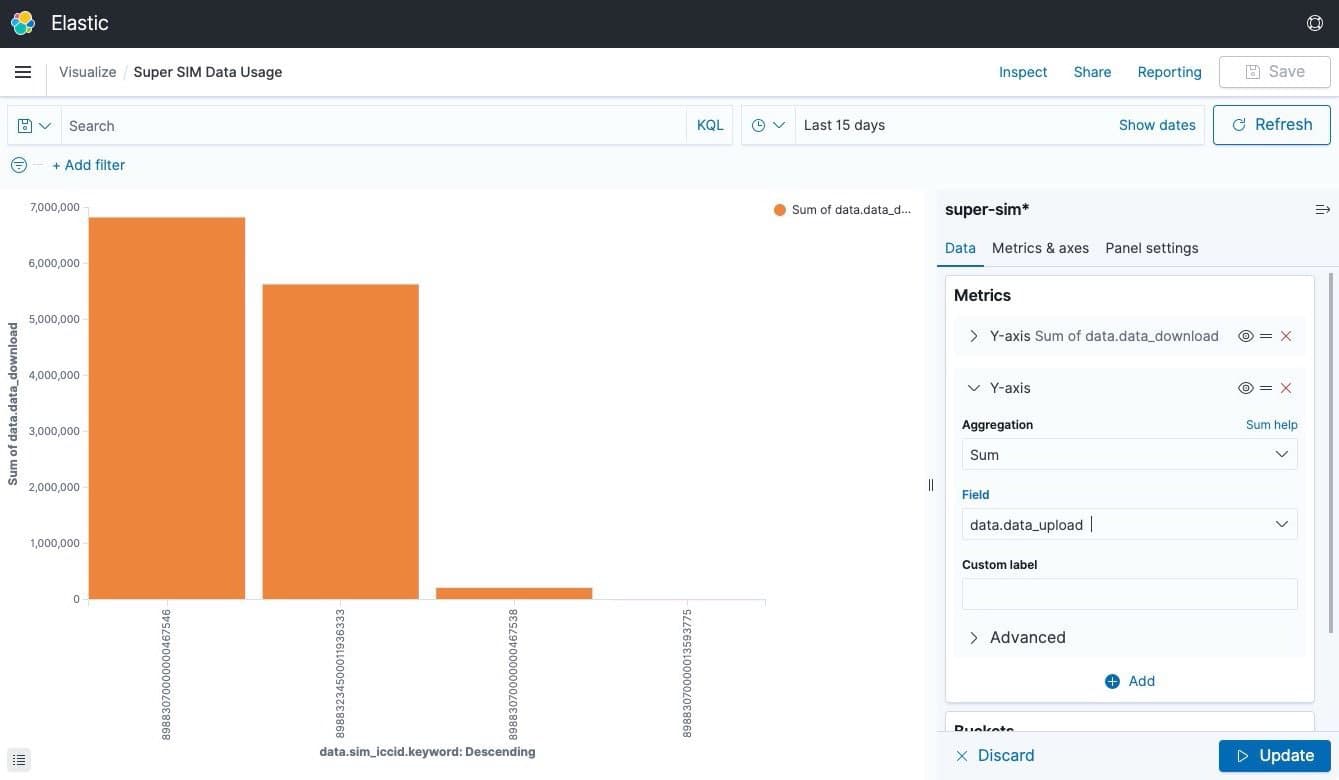
-
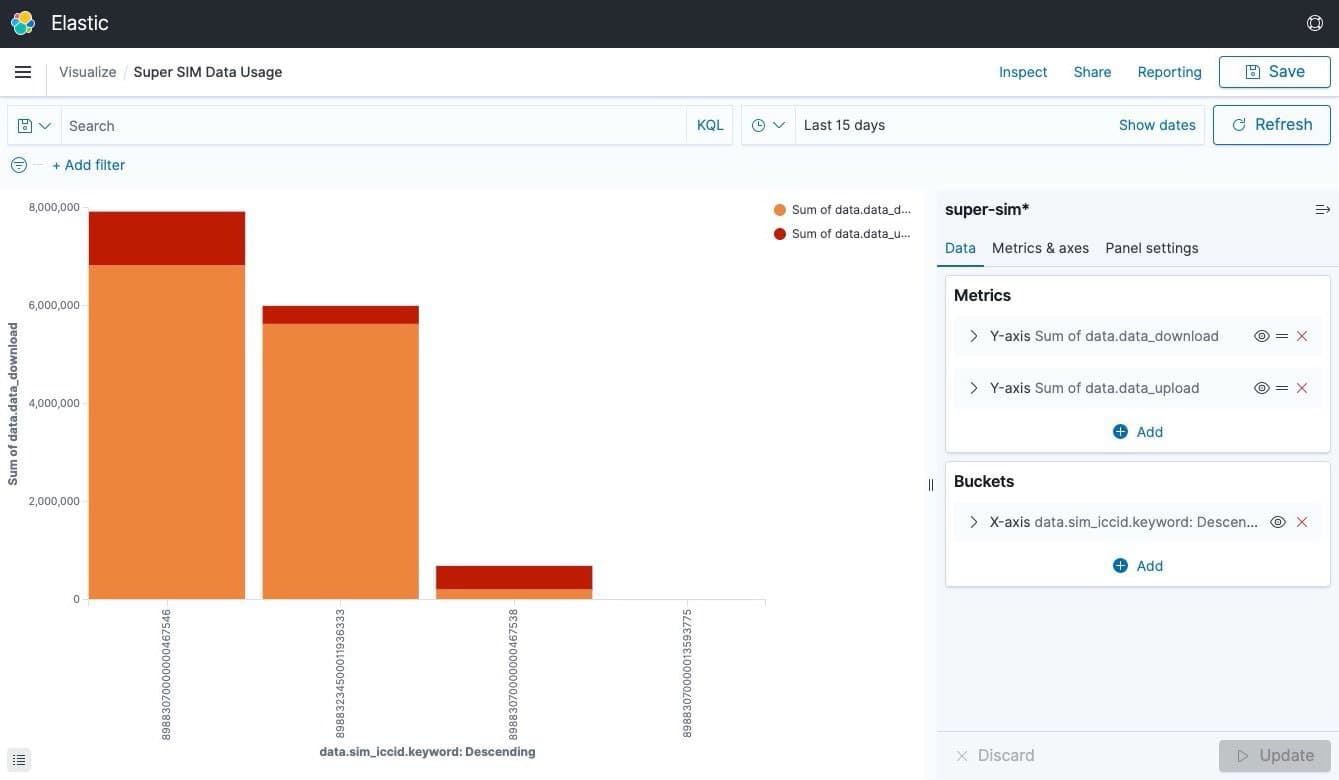
Click Update. You'll see something like this:
-
Again, you might need to adjust the date range to see meaningful data.
Setting up visualizations for occasional use is all very well, but what you really want to do is add them to a dashboard that you can check regularly. Let's do that now with the visualization you just made.
-
Click on **Save **at the top right. Give the visualization the name
Super SIM Data Usageand click the Save button. -
Click on the hamburger menu at the top left and select Dashboard under Kibana.
-
Click Create new dashboard.
-
Kibana invites you to create a new dashboard widget — or "object" — but let's use the visualization you just created. Click Add in the menu at the top right, and under Add panels select Super SIM Data Usage — the visualization you just made.
-
Click the X in the top right of the panel to close it:
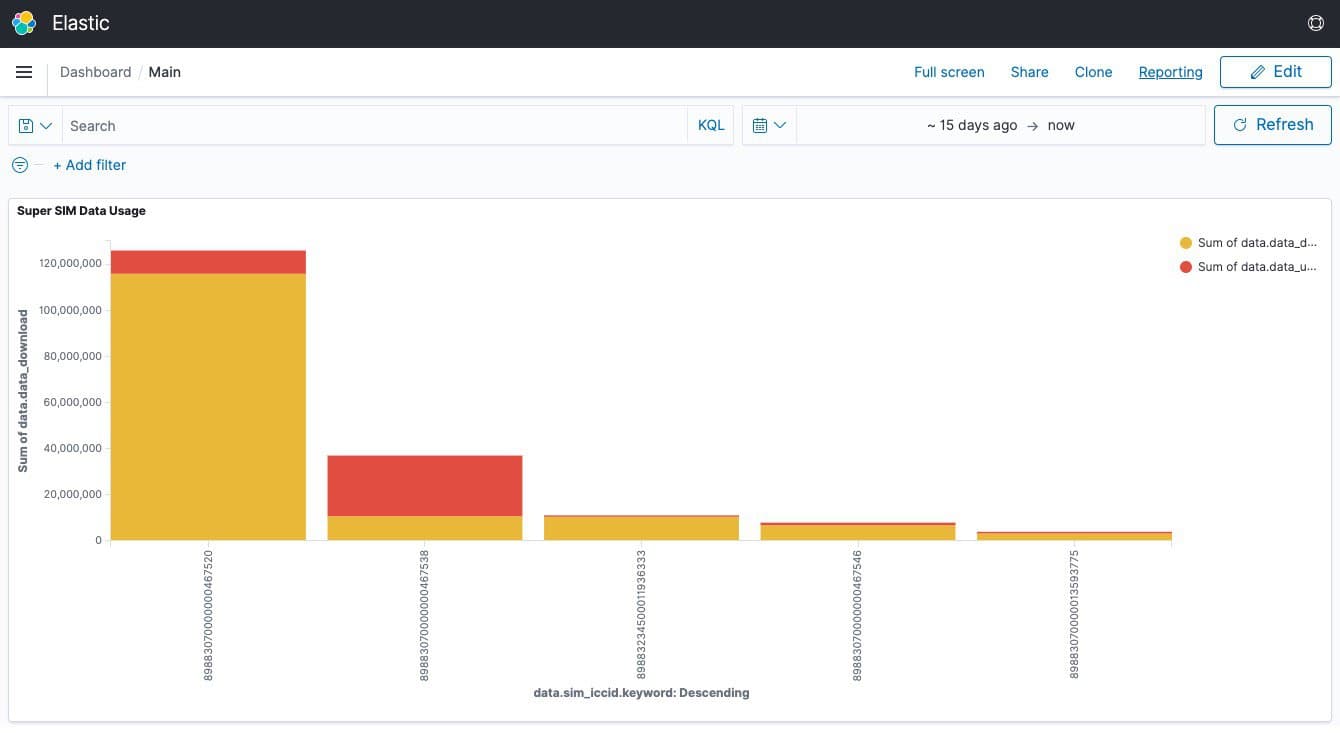
1.Click Save in the top right menu to save the dashboard so it's accessible next time you visit.
Well done — you've come a long way. You've used Terraform to put in place your AWS infrastructure and then set up Twilio Event Streams to first create a connection to your infrastructure, called a Sink. You've subscribed to a series of Super SIM Connection Events which have then begun to flow from Twilio to your AWS setup as your IoT devices' Super SIMs connect to networks and transfer data.
You've used Kibana to explore the events data that has been received, from all your SIMs right down to single SIM, and you've learned how to create graphs to help you spot trends in your devices' data usage. You've added that graph to a dashboard you can use regularly to monitor the behavior of the devices in your fleet.
We've only just scratched the surface of what Kibana can do, but having real, meaningful data to work with — all those Super SIM Connection Events — will make it much easier to explore the rest to see how it can help your business.
Try adding some more visualizations to your dashboard that will help you understand which radio technologies your devices are using to connect.
Imagine you're fielding a support query from a customer. Drill down to examine how a specific Super SIM or small group of SIMs behaved around a certain point in time.
Want to know more? Kibana's developer, Elastic, has a bunch of tutorials which will walk you through common scenarios and help you grow your knowledge.
We can't wait to see what business intelligence tools you build with Super SIM Connection Events!