Applications and Bundles
Microvisor Public Beta
Microvisor is in a pre-release phase and the information contained in this document is subject to change. Some features referenced below may not be fully available until Microvisor's General Availability (GA) release.
Application code is delivered to Microvisor-based devices in the form of Bundles. As a developer, you will use the Microvisor toolchain to create a bundle from your latest application build, upload it to the Microvisor cloud, and trigger its deployment it to your development devices. Subsequent code changes follow the same path, and your final production release will also be transferred to devices on the assembly line by way of a bundle. Later, devices in the field will receive code updates in the form of bundles.
A bundle is how application code, generated as a linkable binary, is packaged for use by Microvisor. Bundles are zip files. The application code these archives contain is sliced up into a series of non-overlapping, discrete blocks called Layers. This allows bundles to be more readily transferred to devices over low-bandwidth connections. If the download is interrupted, Microvisor needs only reacquire the current layer, not those that preceded it. It also allows layers to be installed in any order. The layer files are generated by the bundle creation tool.
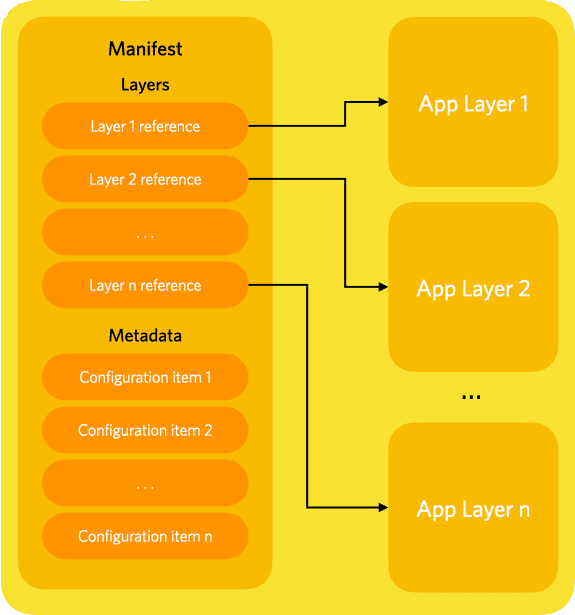
A bundle's layers are enumerated in its Manifest, a signed file that also includes metadata, such as the application's debugging policy, or network configuration information. Microvisor downloads the manifest first and uses it to determine which layers it needs to retrieve.
A layer is a block of opaque code that is stored in the cloud for subsequent installation in a device's flash. The bundle's manifest lists all the layers that make up the application. Each entry in the list includes the layer's SHA-256, which Microvisor uses to request the required layer from the server.
As the developer, it's up to you whether layers are encrypted or not. Layers can be encrypted by supplying a private key when the bundle is created. All of a bundle's layers are encrypted with the same key. If a layer is encrypted, then its entry in the manifest will indicate how the code is to be decrypted by Microvisor after it has been downloaded. This indication is not a cryptography key itself but a reference to a public key that must already be present on the device and which will be used to decrypt the layer.
Whether the referenced layer is encrypted or not, the layer entry in the manifest also includes the layer's SHA. We've already seen that this is used to request the layer from the server. It is also used to confirm that the layer has not been tampered with in flight and is safe to process. The authenticity of the recorded SHA itself is determined by verifying the manifest's own signature; Microvisor does this when it retrieves the bundle.
Finally, the layer entry specifies where the layer's bytes will eventually be written to in the device once the layer has been verified as safe to install. This indicates the storage medium of the device — for example, the STM32U585 microcontroller's internal flash for a code update, or internal or external flash for application data. The address at which the code will be written, and its length within the bounds of the medium, are included too. Layer location is typically set by the bundle creation tool using data from the build process, but it can be specified manually.
Let's say you have updated, built and signed a new version of your application. You then use the Twilio CLI tool and version 0.3.7 or above of its Microvisor Plugin to generate a bundle. Next, you use the Microvisor Plugin to upload the bundle to the Microvisor cloud.
You deploy the bundle using the Twilio CLI to instruct the Microvisor cloud to signal specified devices that an update has been staged for them to download.
On each device, Microvisor downloads the bundle's manifest and verifies its authenticity by signature. It then confirms that all the decryption keys referenced in the manifest's list of layers are present on the device. It will also check the bundle metadata to determine whether there are any other factors it needs to consider before proceeding with layer processing, such as whether remote debugging has been permitted for this build.
Microvisor then parses the manifest's layer list and uses it to request each layer and store them in the QSPI staging area. Each layer is encrypted and authenticated using fresh keys generated for this purpose. Layers may be downloaded in any order, so you should not anticipate any specific sequence to layers' arrival on the device. You cannot specify the layer download sequence.
When all of the update's layers have been downloaded, Microvisor shuts down the application. It then works through the layers in the QSPI staging area. Microvisor decrypts each one using the keys generated when the layer was written to QSPI and then hashes it. It compares this value with the layer's hash from the manifest; if they match, Microvisor moves on to the next layer. Once it has verified all the layers, Microvisor writes each layer to the location specified in the manifest.
When all the layers have been processed, and any metadata-specified configuration changes have been applied, Microvisor starts the updated application.
If any of the authenticity checks fail, or required keys are not present on the device, the installation process as whole fails. This ensures that updates are only ever installed fully.
We expect to implement limits on the number of bundles you can have stored in the Microvisor cloud at any one time, and the upload facility will also be rate-limited. The details of any such limitations have yet to be determined, but we will publish details as the Microvisor beta program progresses toward GA.
Bundle files must be 64MB or less in size.
You can create an application bundle and upload it to the Microvisor cloud with the Twilio CLI tool and version 0.3.7 or above of the Microvisor Plugin.
Compiling your application with the Microvisor tools generates a new .bin file. If you build the Microvisor FreeRTOS Demo code, for example, the compiled .bin file will be located here:
Microvisor-Demo-CMSIS-Freertos/build/Demo/gpio_toggle_demo.bin
To bundle the compiled binary, run this command:
1twilio microvisor:apps:bundle Microvisor-Demo-CMSIS-Freertos/build/Demo/mv-freertos-cmsis-demo.bin \2Microvisor-Demo-CMSIS-Freertos/build/Demo/mv-freertos-cmsis-demo.zip
The new bundle can then be found at the location specified in the second argument. To upload it, run:
twilio microvisor:apps:create Microvisor-Demo-CMSIS-Freertos/build/Demo/mv-freertos-cmsis-demo.zip
Once uploaded, the application contained in the bundle is represented by a Microvisor API App resource, for which a new instance is been created when the app is uploaded. The new App's details are returned by the upload request; these include the App's SID, which can be used to deploy the App to devices.
You can also get the App's SID by listing the Apps currently associated with your account:
twilio api:microvisor:v1:apps:list
Info
To avoid using SIDs, you may choose to provide the App with a unique friendly name to make it easier to identify in future. For example:
twilio microvisor:apps:create /path/to/bundle <UNIQUE_APP_NAME>
You should view this name as the identifier of a specific build, not of the application as a whole.
You can also upload a bundled App using the Twilio Console.
-
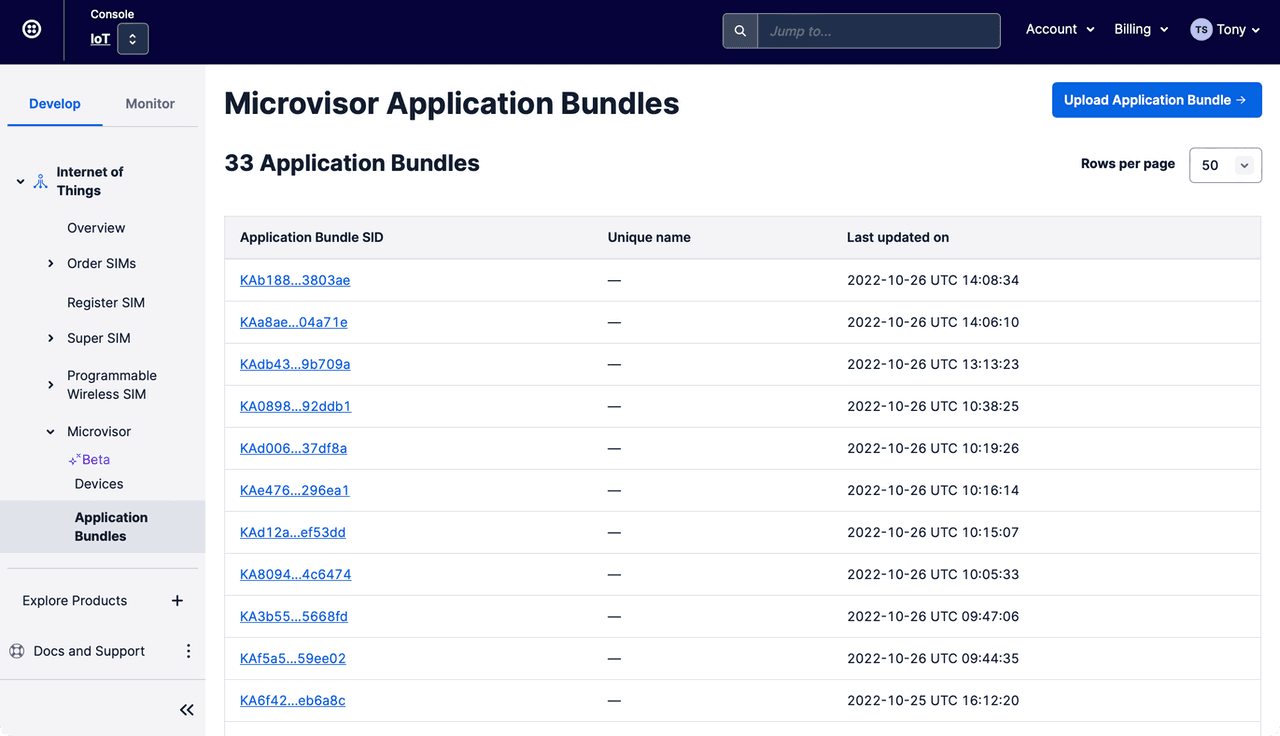
Navigate to the Internet of Things > Microvisor > Application Bundles section:
-
Click the Upload Application Bundle button.
-
On the Upload Application Bundle panel that appears, click the Browse button to select the
.zipfile you generated using the Microvisor plugin: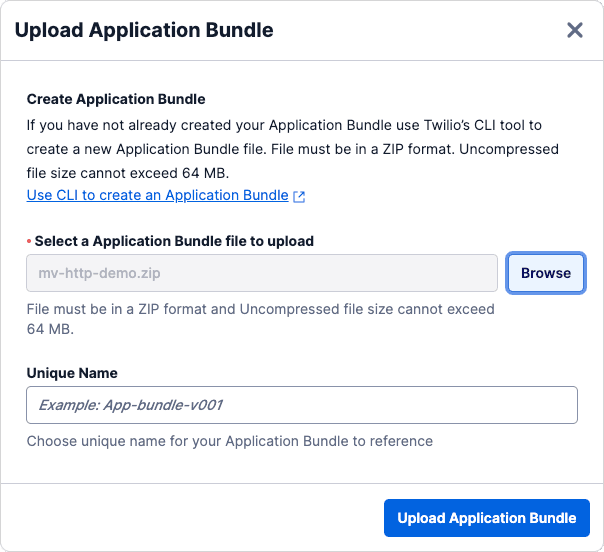
-
Use the Unique Name field to enter a memorable name for the App to make it easier to locate in future.
-
Click the Upload Application Bundle button.
-
View the uploaded App in the Microvisor Application Bundles list.
To deploy an App to a Microvisor-empowered device, send a request to the Microvisor API Device resource that represents your hardware:
1twilio api:microvisor:v1\:devices:update --sid $MV_DEVICE_SID \2--target-app <APP_SID_OR_NAME>
Info
If you don't have the Device SID handy, use the Twilio CLI to list your devices:
twilio api:microvisor:v1\:devices:list
You can also deploy an App to a specific Device using the Twilio Console.
-
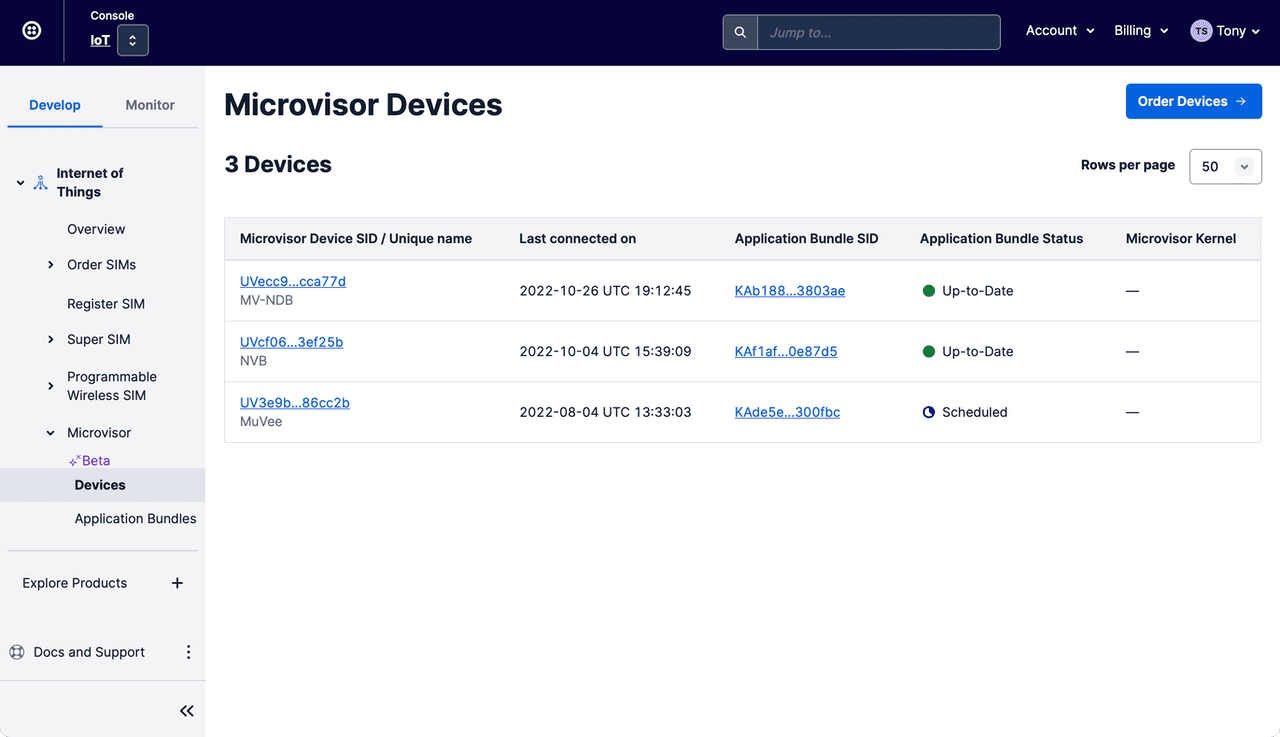
Navigate to the Internet of Things > Microvisor > Devices section:
-
Select the Device you'd like to update, locating it by its SID or unique name if you have set one.
-
On the Device's information page, click on the Change Application Bundle Target button.
-
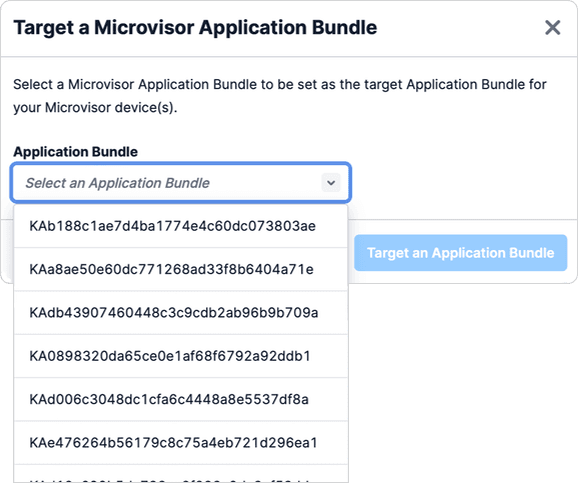
In the Target a Microvisor Application Bundle panel that appears, select the App to deploy from the Application Bundle popup menu. Locate the App by its SID or unique name if you have set one:
-
Confirm that you'd like to delete this App by clicking the Delete this Application Bundle bundle in the Delete an Application Bundle panel.
The device will be signalled that an application update is pending, and Microvisor will begin the download process, as described earlier.
If you make changes to your code, find it's not what you need, and want to revert to an earlier version, use the Twilio CLI to list your Apps, find the SID or the unique name of the version you want to redeploy, and then use twilio to send it to your NDB:
1# Get a list of apps2twilio api:microvisor:v1:apps:list34# Update the target5twilio api:microvisor:v1\:devices \6--sid <YOUR_DEVICE_SID_OR_UNIQUE_NAME> \7--target-app <THE_ROLLBACK_APP_SID_OR_UNIQUE_NAME>
You can delete unwanted App uploads with:
twilio api:microvisor:v1:apps:remove --sid <AN_APP_SID_OR_UNIQUE_NAME>
But you should note that you cannot delete an App which is currently deployed to one or more devices. To fully delete an App, deploy another one to your device(s) first.
You can also delete an App using the Twilio Console.
-
Navigate to the Internet of Things > Microvisor > Application Bundles section:

-
Select the App you'd like to delete, locating it by its SID or unique name if you have set one.
-
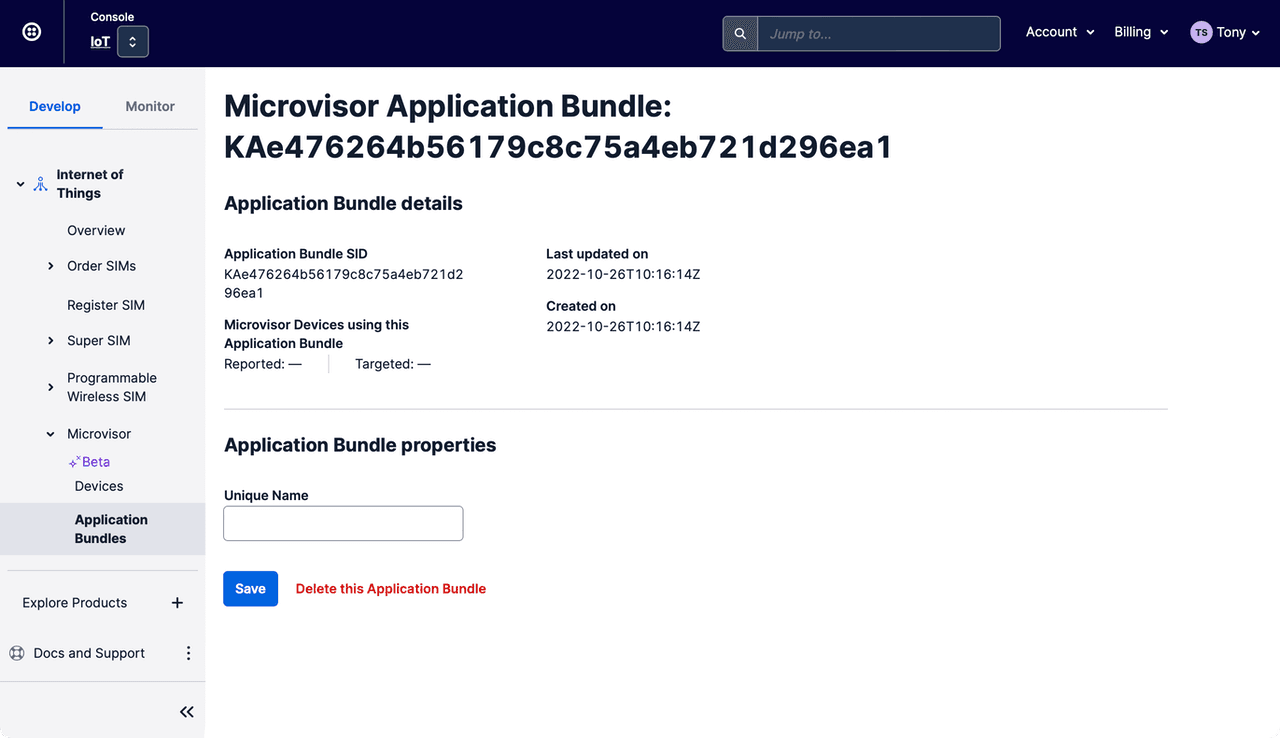
On the App's information page, click on Delete this Application Bundle:
-
Confirm that you'd like to delete this App by clicking the Delete this Application Bundle bundle in the Delete an Application Bundle panel.
The following Python program can be used to bulk delete old bundles during development. By default, "stale" bundles — those uploaded more than 24 hours earlier — are automatically deleted. If a stale bundle is installed on a device, it cannot be deleted and is listed as such.
The script assumes you have your Twilio login credentials set as environment variables: $TWILIO_ACCOUNT_SID and $TWILIO_AUTH_TOKEN.
1#!/usr/bin/env python323import os4import sys5import json6import requests7from requests.auth import HTTPBasicAuth8from datetime import datetime, timedelta910list_only = False11app_list = None12to_delete = []13url = "https://microvisor.twilio.com/v1/"14auth = HTTPBasicAuth(os.environ["TWILIO_ACCOUNT_SID"], os.environ["TWILIO_AUTH_TOKEN"])1516if len(sys.argv) > 1:17for index, item in enumerate(sys.argv):18if item.lower() in ("-h", "--help"):19print("Usage: apps [--delete]")20print("Options: --delete / -d Delete all stale apps.")21print("Stale apps are those more that 24 hours old. Stale apps")22print("that are still assigned to a device will not be deleted")23sys.exit()24if item.lower() in ("-d", "--delete"):25list_only = False26if item.lower() in ("-l", "--list"):27list_only = True2829print("Listing your Microvisor applications...")30date_now = datetime.now()31resp = requests.get(url + "Apps", auth=auth)32if resp.status_code == 200:33try:34app_list = resp.json()35if "apps" in app_list:36for app in app_list["apps"]:37sid = app["sid"]38name = app["unique_name"]39date_then = datetime.strptime(app["date_created"], '%Y-%m-%dT%H:%M:%SZ')40if date_now - date_then >= timedelta(days=1):41to_delete.append(sid)42sid = name if name else sid43print(sid, "STALE")44else:45print(sid, "OK")46except Exception as e:47print("[ERROR] Could not parse response from Twilio", e)48else:49print("[ERROR] Unable to access your apps")5051if list_only:52sys.exit()5354if len(to_delete) > 0:55print("Deleting stale apps...")56resp = requests.get(url + "Devices", auth=auth)57devices = None58if resp.status_code == 200:59try:60dev_list = resp.json()61if "devices" in dev_list:62devices = dev_list["devices"]63except Exception as e:64pass6566for sid in to_delete:67resp = requests.delete(url + "Apps/" + sid, auth=auth)68if resp.status_code == 204:69print(sid, "DELETED")70elif resp.status_code == 400:71dev_sid = ""72if devices:73for device in devices:74if device["app"]["target_sid"] == sid:75dev_sid = sid76break77print(sid, "NOT DELETED (DEPLOYED TO DEVICE", (dev_sid if dev_sid else "UNKNOWN") + ")")78else:79print(sid, "NOT DELETED (CODE: " + str(resp.status_code) + ")")
Microvisor Help and Support
We welcome all inquiries you may have about Microvisor and its implementation, and any support questions that arise once you've begun developing with Microvisor. Please submit your queries via a KORE Wireless ticket: log in to the Kore console and click the Contact Support button in the left-hand navbar.