Get Started with Super SIM IP Commands and the Raspberry Pi Pico
IP Commands is a new Super SIM feature that allows your cloud to communicate with your IoT devices by exchanging UDP/IP messages. You can use IP Commands to send server-initiated messages from your cloud to your Super SIM-connected devices, and to have the responses directed to the endpoint of your choice. The best part is that you don't actually need to know a device's IP address — Twilio will handle that for you. Nor do you need to maintain a persistent connection between a device and your server.
You can think of IP Commands as a lightweight alternative to using a Virtual Private Network (VPN) to reach a device from your cloud and exchange information.
This information is transferred in the form of User Datagram Protocol (UDP) messages. UDP provides basic, 'fire and forget' data exchange: there's no connection established between sender and receiver — but no guarantee that the message will be delivered. This simplicity makes UDP ideal for lightweight IoT applications: it's a great way to send commands ("change the air con setting to 40C") to a connected device. Such commands might come from your cloud, or from an app running on an end-user's mobile device. Typically, they would be more structured than the colloquial example shown above, but completely flexible: your application, not the transport, defines the command-response interaction.
To show you how to use Super SIM IP Commands, we're going to make use of the Raspberry Pi Pico microcontroller development board. The Pico is highly programmable. Though it's intended for traditional embedded applications, and therefore supports C/C++ development, it can also be used with MicroPython, a version of the popular language that's been tailored for use with microcontrollers rather than full PCs. This means that anyone who's used Python can quickly begin prototyping their own IoT devices with the Pico and Super SIM.
The Pico's RP2040 microcontroller is available in commercial quantities, so the development work you do can readily form the basis for production devices later.
Warning
This guide requires a Twilio account. Sign up here now if you don't have one. It also requires a configured Super SIM. If you haven't set up your Super SIM in the Console, please do so now. Our Super SIM First Steps guide has extra help if you need it.
To complete this tutorial, you will need:
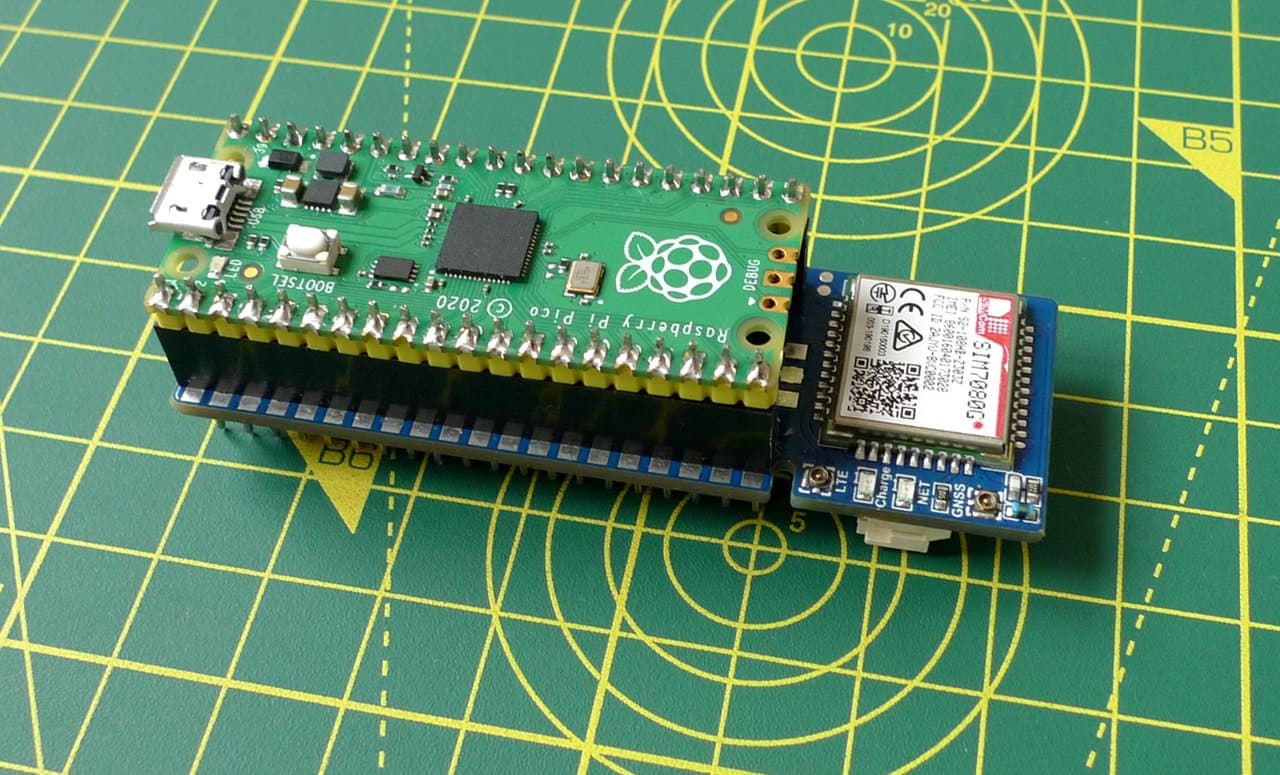
- A Raspberry Pi Pico
- These are widely available from many online electronics suppliers.
- A Waveshare Pico SIM7080 cellular modem
- You can order one direct from Waveshare.
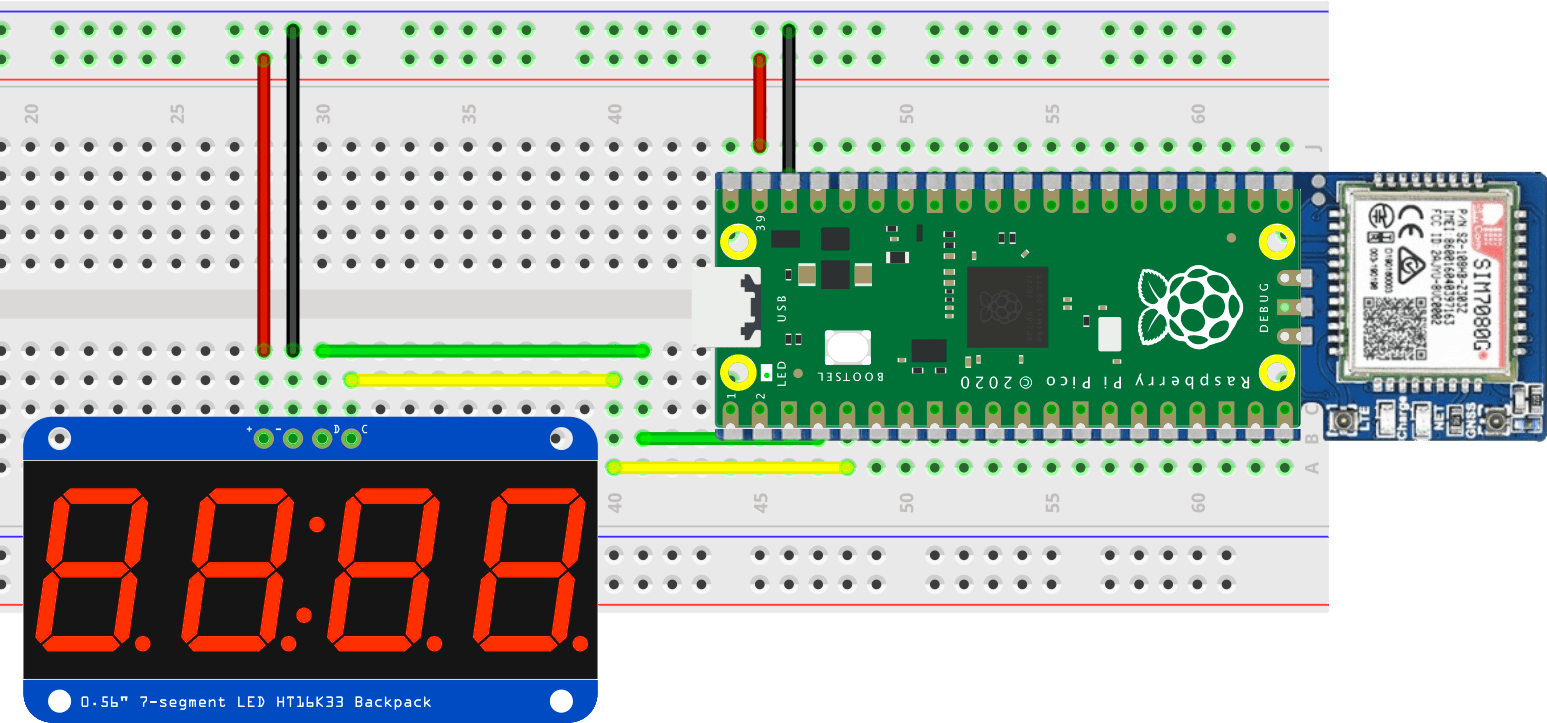
- An HT16K33-based four-digit, seven-segment LED
- Adafruit sells a good one here.
- A micro USB cable to power the hardware and connect it to your computer.
- Some jumper wires and a solderless breadboard.
You will also need to install and configure Twilio's CLI tool for your platform.
Warning
This tutorial assumes your Pico has MicroPython installed. Out of the box this is not the case, but our tutorial Get Started with Super SIM SMS Commands and the Raspberry Pi Pico will show you how to set up your device and to prepare the other components for use. It will also show you the software you need on your computer. If this is your first Super SIM Raspberry Pi Pico tutorial, hop over there now to get set up. Come back here when you've completed Step 4 .
If you've already finished the Get Started tutorial, you're ready to continue here.
At this point, you should have your Pico ready to go, fitted to the Waveshare module, and connected up like this:
You should have Minicom, or a similar terminal emulator, installed on your computer.
Run Minicom. Now hit Ctrl-C to break to the Python REPL. You won't use the REPL directly, but it provides a way to enter large blocks of MicroPython code. Hit Ctrl-E. This tells MicroPython to accept a full Python program pasted in. Click on the button at the top right of the following code to copy it and then paste it into Minicom. The copy button will appear when you mouse over the code. When you've pasted the code, hit Ctrl-D.
Info
You can find the a complete listing of the code, including all subsequent additions, at our public GitHub repo.
If you've copied the code, you can click to jump down the page.
1import sys2from machine import UART, Pin, I2C3from utime import ticks_ms, sleep45# Functions67'''8Send an AT command - return True if we got an expected9response ('back'), otherwise False10'''11def send_at(cmd, back="OK", timeout=500):12# Send the command and get the response (until timeout)13buffer = send_at_get_resp(cmd, timeout)14if len(buffer) > 0: return (back in buffer)15return False1617'''18Send an AT command - just return the response19'''20def send_at_get_resp(cmd, timeout=500):21# Send the AT command22modem.write((cmd + "\r\n").encode())2324# Read and return the response (until timeout)25return read_buffer(timeout)2627'''28Read in the buffer by sampling the UART until timeout29'''30def read_buffer(timeout):31buffer = bytes()32now = ticks_ms()33while (ticks_ms() - now) < timeout and len(buffer) < 1025:34if modem.any():35buffer += modem.read(1)36return buffer.decode()3738'''39Module startup detection40Send a command to see if the modem is powered up41'''42def boot_modem():43state = False44count = 045while count < 20:46if send_at("ATE1"):47print("The modem is ready")48return True49if not state:50power_module()51state = True52sleep(4)53count += 154return False5556'''57Power the module on/off58'''59def power_module():60print("Powering the modem")61pwr_key = Pin(14, Pin.OUT)62pwr_key.value(1)63sleep(1.5)64pwr_key.value(0)6566'''67Check we are attached68'''69def check_network():70is_connected = False71response = send_at_get_resp("AT+COPS?", 1000)72line = split_msg(response, 1)73if "+COPS:" in line:74is_connected = (line.find(",") != -1)75if is_connected: print("Network information:", line)76return is_connected7778'''79Attach to the network80'''81def configure_modem():82# AT commands can be sent together, not one at a time.83# Set the error reporting level, set SMS text mode, delete left-over SMS84# select LTE-only mode, select Cat-M only mode, set the APN to 'super' for Super SIM85send_at("AT+CMEE=2;+CMGF=1;+CMGD=,4;+CNMP=38;+CMNB=1;+CGDCONT=1,\"IP\",\"super\"")86# Set SSL version, SSL no verify, set HTTPS request parameters87send_at("AT+CSSLCFG=\"sslversion\",1,3;+SHSSL=1,\"\";+SHCONF=\"BODYLEN\",1024;+SHCONF=\"HEADERLEN\",350")88print("Modem configured for Cat-M and Super SIM")8990'''91Open/close a data connection to the server92'''93def open_data_conn():94# Activate a data connection using PDP 0,95# but first check it's not already open96response = send_at_get_resp("AT+CNACT?")97line = split_msg(response, 1)98status = get_field_value(line, 1)99100if status == "0":101# There's no active data connection so start one up102success = send_at("AT+CNACT=0,1", "ACTIVE", 2000)103elif status in ("1", "2"):104# Active or operating data connection105success = True106107print("Data connection", "active" if success else "inactive")108return success109110def close_data_conn():111# Just close the connection down112send_at("AT+CNACT=0,0")113print("Data connection inactive")114115'''116Start a UDP session117'''118def start_udp_session():119send_at("AT+CASERVER=0,0,\"UDP\",6969")120121'''122Split a response from the modem into separate lines,123removing empty lines and returning what's left or,124if 'want_line' has a non-default value, return that one line125'''126def split_msg(msg, want_line=999):127lines = msg.split("\r\n")128results = []129for i in range(0, len(lines)):130if i == want_line:131return lines[i]132if len(lines[i]) > 0:133results.append(lines[i])134return results135136'''137Extract a comma-separated field value from a line138'''139def get_field_value(line, field_num):140parts = line.split(",")141if len(parts) > field_num:142return parts[field_num]143return ""144145'''146Flash the Pico LED147'''148def led_blink(blinks):149for i in range(0, blinks):150led_off()151time.sleep(0.25)152led_on()153time.sleep(0.25)154155def led_on():156led.value(1)157158def led_off():159led.value(0)160161'''162Listen for IP commands163'''164def listen():165if open_data_conn():166start_udp_session()167print("Listening for IP commands...")168169# Loop to listen for messages170while True:171# Did we receive a Unsolicited Response Code (URC)?172buffer = read_buffer(5000)173if len(buffer) > 0:174lines = split_msg(buffer)175for line in lines:176if "+CANEW:" in line:177# We have a UDP packet, so get the data178resp = send_at_get_resp("AT+CARECV=0,100")179parts = split_msg(resp)180if len(parts) > 1:181# Split at the comma182item = parts[1]183cmd_start = item.find(",")184if cmd_start != -1:185cmd = item[cmd_start + 1:]186print("Command received:",cmd)187break188else:189print("ERROR -- could not open data connection")190191'''192Runtime start193'''194# Set up the modem UART195modem = UART(0, 115200)196197# Set the LED and turn it off198led = Pin(25, Pin.OUT)199led_off()200201# Start the modem202if boot_modem():203configure_modem()204205# Check we're attached206state = True207print("Attaching to cellular")208while not check_network():209if state:210led_on()211else:212led_off()213state = not state214215# Light the LED216led_on()217listen()218else:219# Error! Blink LED 5 times220led_blink(5)221led_off()
This is the basis of the code you'll work on through the remainder of the guide, so you should also paste it into a text editor where you can make the subsequent changes and additions, and then copy everything at each stage over to the Pico as described above.
MicroPython will check the code and, if it's free of syntax errors, run it. You'll see status messages appear in Minicom as the code boots the cellular module and configures it, and then connects to the network. You know you're ready for the next step when you see the message Listening for IP commands... in Minicom.
These states are also reflected in the Pico's green LED. It will be off initially, but blink slowly while the device is attempting to attach to the cellular network. When the Pico has done so, the LED will stay lit.
If the LED blinks rapidly five times, the Pico could not start the module. Check your soldering and that you have connected the Pico to the module correctly.
-
Open a second terminal or a new terminal tab on your computer.
-
Send a command using the
twiliotool as follows:1twilio api:supersim:v1:ip-commands:create \2--sim "<YOUR_SIM_NAME_OR_SID>" \3--payload BLUE \4--device-port 6969
Copy and paste thetwiliocommand to the command line (or to a text editor first) and edit it to fill in the identifier of the Super SIM you're using (you can get this from the Console if you don't have it handy), and your account credentials (also available from the Console).
The IP command to be sent is the value of the --payload parameter.
The response from Twilio, posted to the terminal, will look something like this:
1SID Status Date Created2HGxxxxxxxxxxxxxxxxxxxxxxxxxxxxxxxx queued Jan 26 2022 11:11:50 GMT+0000
As you can see, the message's status is queued: it's in Twilio's message pipeline waiting to be sent. When the IP Command leaves the Twilio Mobile Core for the network the device is attached to, its status will become sent. Later on, you'll use a webhook, which you'll set up in the next section, to receive notifications about message status changes as they occur. For details of the possible status values you may see, take a look at the API documentation.
Info
If you prefer to use a different port number, just change the value of --device-port in the twilio command above and in the Python code — it's set in the function start_udp_session().
Look at Minicom's output. Has the Pico reported that it received the command BLUE?
In a real-world application the IP Command would come from your server, not be sent manually, and your device-side application would parse any that arrive and perform actions accordingly. However, the demo gives you a picture of the flow. IP Commands also supports binary data. To send information in this form, you would add the --payload-type parameter to the message-send code and set its value to "binary":
1twilio api:supersim:v1:ip-commands:create \2--sim "<YOUR_SIM_NAME_OR_SID>" \3--payload BLUE \4--payload-type binary \5--device-port 6969
Logging a received command is a good start, but it's not particularly exciting. Let's make use of the four-digit display so show some values in bold color.
The display needs code to drive it. Rather than include it all here, just grab the code you need from this public GitHub repo. You want the contents of two files. Click the links below to view the raw code in your browser, then copy and paste each one into your text editor, right below the import statements at the top.
With the second file, make sure you copy only the class declaration — ignore the first two lines above it (starting # Import the base class...).
Now add the following function right after the existing listen() function:
1def process_cmd(line):2cmd = line3val = ""4val_start = line.find("=")5if val_start != -1:6val = line[val_start + 1:]7cmd = line[:val_start]8cmd = cmd.upper()9if cmd == "NUM" and len(val) < 5:10process_command_num(val)11else:12print("Command not recognized")1314'''15Display the decimal value n after extracting n from the command string16'''17def process_command_num(value):18print("Setting",value,"on the LED")19try:20# Extract the decimal value (string) from 'msg' and convert21# to a hex integer for easy presentation of decimal digits22hex_value = int(value, 16)23display.set_number((hex_value & 0xF000) >> 12, 0)24display.set_number((hex_value & 0x0F00) >> 8, 1)25display.set_number((hex_value & 0x00F0) >> 4, 2)26display.set_number((hex_value & 0x000F), 3).draw()27except:28print("Bad value:",value)
Add this line to the listen() function, right after print("Command received:",cmd):
process_cmd(cmd)
Finally, add the following lines after the # Setup the modem UART block:
1# Set up I2C and the display2i2c = I2C(1, scl=Pin(3), sda=Pin(2))3display = HT16K33Segment(i2c)4display.set_brightness(2)5display.clear().draw()
Copy all the new code from your text editor and paste it to the Pico in the usual way.
Now send a slightly different command via the IP Commands API:
1twilio api:supersim:v1:ip-commands:create \2--sim "<YOUR_SIM_NAME_OR_SID>" \3--payload "NUM=1234" \4--device-port 6969
Again, you'll need to do this in a separate terminal tab or window, and replace the <...> sections with your own data.
After a moment or two you should see 1234 appear on the LED. If it doesn't appear after a short time, check you have the LED wired to the Pico correctly — take a look at the wiring diagram. If you see Setting 1234 on the LED in Minicom, you know the command was received. If not, did you enter the command above correctly? Perhaps you mis-typed the payload value. You'll see an error message in Minicom in this case.
Now it's time to make the conversation two way.
The IP Commands API provides a specific IP address, 100.60.0.1, to which all IP Commands, from every device should be sent. Twilio uses a little bit of magic to streamline the relay of your messages to your cloud. How does it know where to send them? You specify a webhook address.
Super SIMs are organized into Fleets: groups of SIMs that have common settings, such as which networks they are able to connect to and whether they can make use of certain cellular services. Fleets are represented in the Super SIM API by Fleet resources, and IP Commands adds a property to each Fleet resource in which you can store your IP Commands webhook address.
So before we can send a message, we need to set up a webhook target URL and add that to your Super SIM's Fleet.
Beeceptor is a handy service for testing webhooks. It's designed for developing and testing APIs of your own, and offers free mock servers — virtual endpoints that can receive webhook calls. Let's set one up to receive messages from the device.
- In a web browser tab, go to Beeceptor.
- Enter an endpoint name and click Create Endpoint:
- On the screen that appears next, click on the upper of the two clipboard icons to copy the endpoint URL:
- Keep the tab open.
Now you update your Super SIM's Fleet to add an IP Commands webhook. You can do this with the API, but we'll use the Console for this demo.
- Open a second web browser tab and log into the Twilio Console.
- Go to IoT > Super SIM > Fleets and select the Fleet containing the Super SIM you are using.
- Scroll down to IP Commands Callback URL and paste in your webhook URL from the previous section. By default, webhooks are triggered with a
POSTrequest. Leave it unchanged for now, but if you need to use another method for your own application, you can change it later. - Click Save.
- Close the tab if you like.
To add message sending to the device code, you can add following function after all the other function definitions:
1def send_data(data_string):2data_length = len(data_string)3if send_at("AT+CASEND=0," + str(data_length), ">"):4# '>' is the prompt sent by the modem to signal that5# it's waiting to receive the message text.6resp = send_at_get_resp(data_string + chr(26))
Now add these two lines into the function process_cmd(), right after process_command_num(val):
1elif cmd == "SEND":2send_data("We can\'t wait to see what you build!")
Finally, add this line to the end of the function start_udp_session():
send_at("AT+CACFG=\"REMOTEADDR\",0,100.64.0.1,6969")
Save the file and copy it across to the Pico.
Let's quickly take a look at that last addition as it's key. The AT command +CACFG is a Simcom-only command that performs a specific configuration option. That option is "REMOTEADDR" — it sets the remote IP address all future UDP messages will be transmitted to, at least until the value is changed.
Which address do we apply? 100.64.0.1, the third parameter passed with the command. This is the standard IP Commands input address. The last parameter, 6969, is the local port number.
Send a new command, SEND, via different command via the IP Commands API:
1twilio api:supersim:v1:ip-commands:create \2--sim "<YOUR_SIM_NAME_OR_SID>" \3--payload SEND \4--device-port 6969
Jump back to the Beeceptor tab in the browser. You should see — or will shortly see — the endpoint has received a POST request. Click on it to see the request body, then on the JSON icon, {:}, to view the data more clearly.
Unlike messages sent to the device, which can be text or binary, messages that are sent from the device always arrive in binary form. The string sent as a result of your SEND command has been base64 encoded, so it'll need decoding before you can read it. Look for the line beginning Payload= and copy the characters that appear after it, up until the end of the line. It'll look something like this:
bm90IGEgcmVhbCBtZXNzYWdlCg==
Switch to a spare terminal and enter:
echo <BASE64_ENCODED_STRING> | base64 -d
making sure you paste the text you copied between the echo and the | symbol as indicated. You'll be presented with the message in English:
We can't wait to see what you build!
The webhook URL you just put in place was set up to receive IP Commands from the device. You can also use it in a tutorial context for monitoring messages being sent to the device. Use the same technique you applied in the Send IP Commands to the device section, above, but this time add the following extra command to the twilio call: --callback-url followed by a space and then your Beeceptor endpoint.
1twilio api:supersim:v1:ip-commands:create \2--sim "<YOUR_SIM_NAME_OR_SID>" \3--payload SEND \4--device-port 69695--callback-url <YOUR_WEBHOOK_URL>
Now you'll receive a series of notification messages as the IP Command's status moves from queued to sent. For details of the possible status values you may see, take a look at the API documentation.
You've set up a Raspberry Pi Pico and Simcom SIM7080 cellular module to send and receive UDP messages over a data connection, then you've actually sent those messages through Twilio Super SIM's IP Commands API.
You can try sending some alternative messages, including some binary data.
Try using IP Commands to toggle GPIO pins so the Pico can begin to control things. Create a web page to call the API and trigger the commands.
IP Command Resources are persisted for 30 days, so you can check your send and receive histories at any time. For example, a GET request made to https://supersim.twilio.com/v1/IpCommands will fetch all existing resources for inspection. If you have the SID of a specific Command's resource, you can add it as a path value to the endpoint above. Try it now.
The next stage, of course, is to build a device-side app that listens for a variety of commands, parses them and triggers actions accordingly. You may also want to create a server app that's able to request information from devices: it sends a request command which causes the device to send a second, data-bearing message back. Or you might code up a mobile app that uses IP Commands to control the device remotely.
We can't wait to see what you build with Super SIM IP Commands!