Build a Chatbot with Twilio Studio
Chatbots help users accomplish tasks through conversation. This tutorial shows you how to build a Flow that responds to incoming text messages and guides users through ordering a coffee.
Before you begin, ensure you meet the following prerequisites. You can skip to Create your Flow if you've already done these steps.
Complete the following steps before you begin:
- Sign up for a Twilio account. You can create a free account if you don't have one already.
- Purchase a Twilio phone number. For instructions, see Buy a phone number. The purchasing process varies by region.
- Familiarity with Twilio Functions.
Warning
This demo tutorial is best suited for use with a single Twilio Phone number. Due to Application-to-Person 10-digit long code (A2P 10DLC) compliance requirements, there are additional steps required. You must complete these steps before your purchased phone number can be used for A2P messaging over 10-digit long codes. Note that if you use Twilio Messaging Services, you can't use the Make Outgoing Call widget in this Flow.
You'll create a Twilio Studio Flow from a Twilio starter template in this tutorial. By the end, you'll understand how to construct a chatbot with minimal building blocks in place. You can also use the Messaging Chatbot template to begin with most of the pieces already in place.
Follow these steps to create your Flow:
- Log into your Twilio account and go to the Studio Dashboard.
- Click Create a flow.
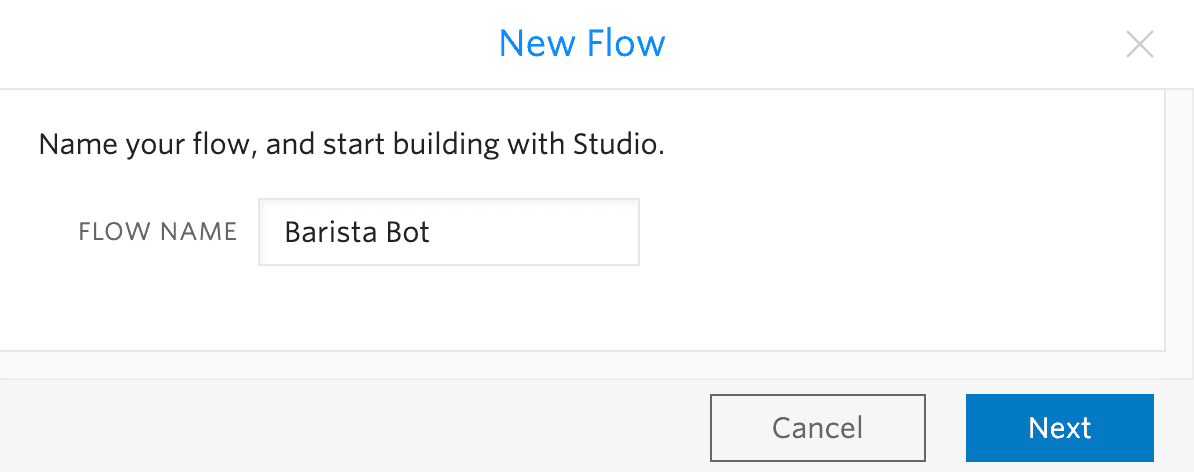
- A modal appears where you can name your Flow; this tutorial uses Barista Bot.
- Select Next.
- The modal will load several template options. Each template provides a different foundation of building blocks.
- Select Start from scratch to follow along with the rest of this tutorial. You can also select Messaging Chatbot to start with most of the pieces already on your Canvas and connected to one another.
The following image shows the new flow setup:
Once the Studio Flow is created, you'll see a Canvas with a Trigger widget already in place. This widget starts your Flow when it's triggered by an event that you specify. In this case, you want to receive SMS messages from customers, so you will trigger the Flow with an incoming message. You will add more widgets throughout this tutorial by dragging them from the Widget Library on the right side of the Canvas.
The following image shows the Studio Flow canvas:

When your bot receives a message, you will need to reply, prompting the customer for a coffee order.
Follow these steps to add the widget:
- Drag a Send & Wait for Reply widget onto the Canvas from the Widget Library.
- Connect it to the Trigger (Start) widget by dragging the red dot at the bottom of Incoming Call Transition to the grey dot at the corner of the new Send & Wait for Reply widget.
You can use this Send & Wait for Reply widget to deliver an SMS to the user. In this case, you will ask the user what kind of coffee they want to order. You can expect the customer to reply with one of the options you specify.
Follow these steps to configure the widget:
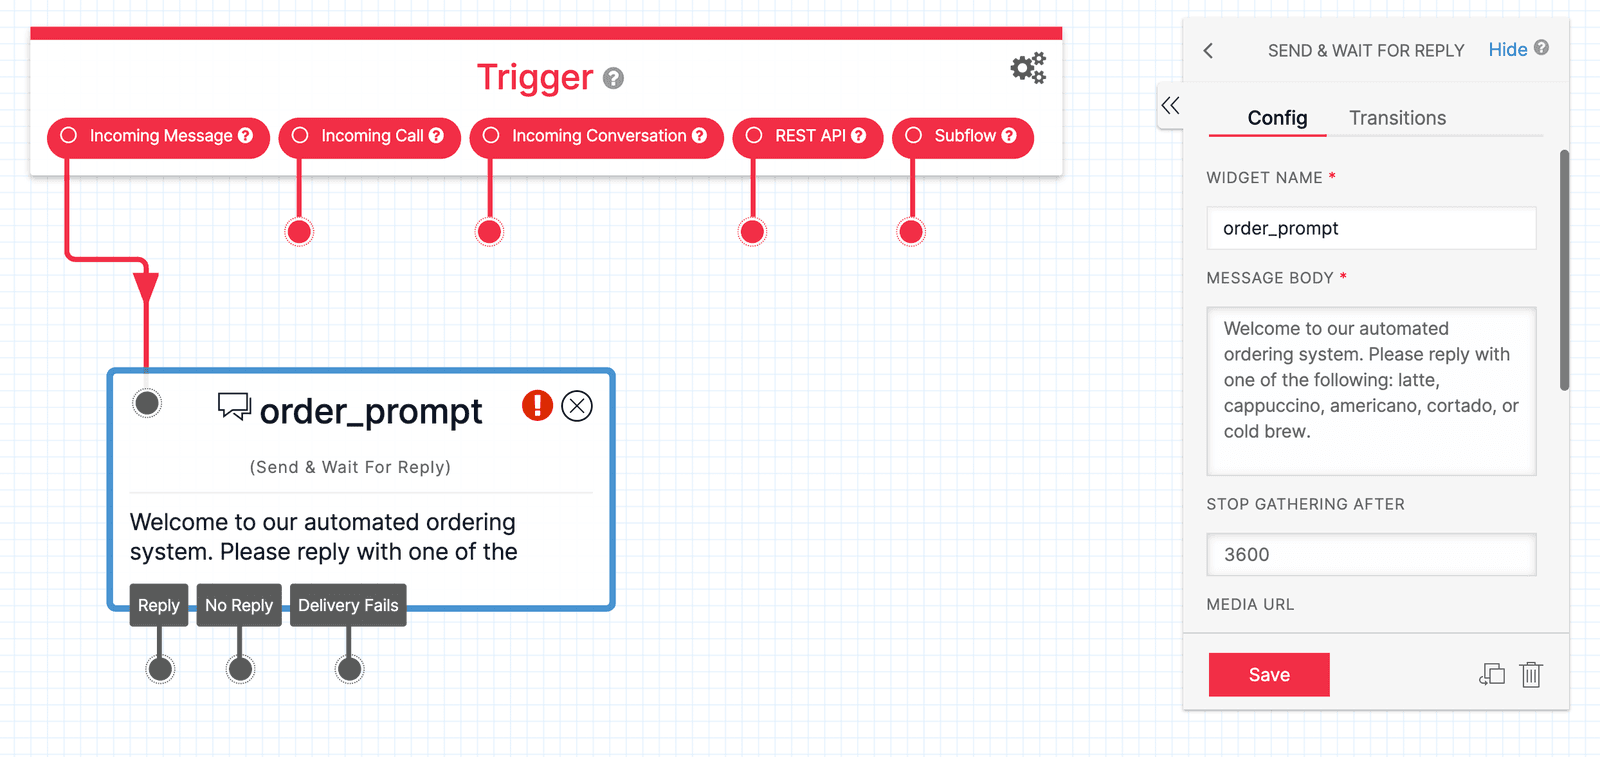
- Click the Send & Wait for Reply widget on the Canvas and select the widget's Config tab.
- You can name the widget anything you like. This tutorial will use
order_prompt. - In the widget's Message Body, add a friendly response that will be sent to the customer once your Flow is triggered—see the sample text below.
- You can leave the remaining widget fields empty or set to their default values and click Save.
Use the following sample text for the Message Body:
Welcome to our automated ordering system. Please reply with one of the following: latte, cappuccino, americano, cortado, or cold brew.
The following image shows the configured order_prompt widget:
Your Flow is prepared to reply to an inbound message and wait for a response. Once a response is received, you will need to take action based on its content. You can use a Split Based On... widget to handle this next step.
The Split Based On… widget allows you to distinguish among input (the customer's response, no response, and errors). It does this by setting a variable that you can test the input against.
Follow these steps to add and configure the widget:
- Drag a Split Based On widget to the Canvas.
- Connect the Send & Wait for Reply widget to the Split Based On widget by dragging the grey dot at the bottom of Send & Wait for Reply widget's Reply to the grey dot at the corner of the new Split Based On widget.
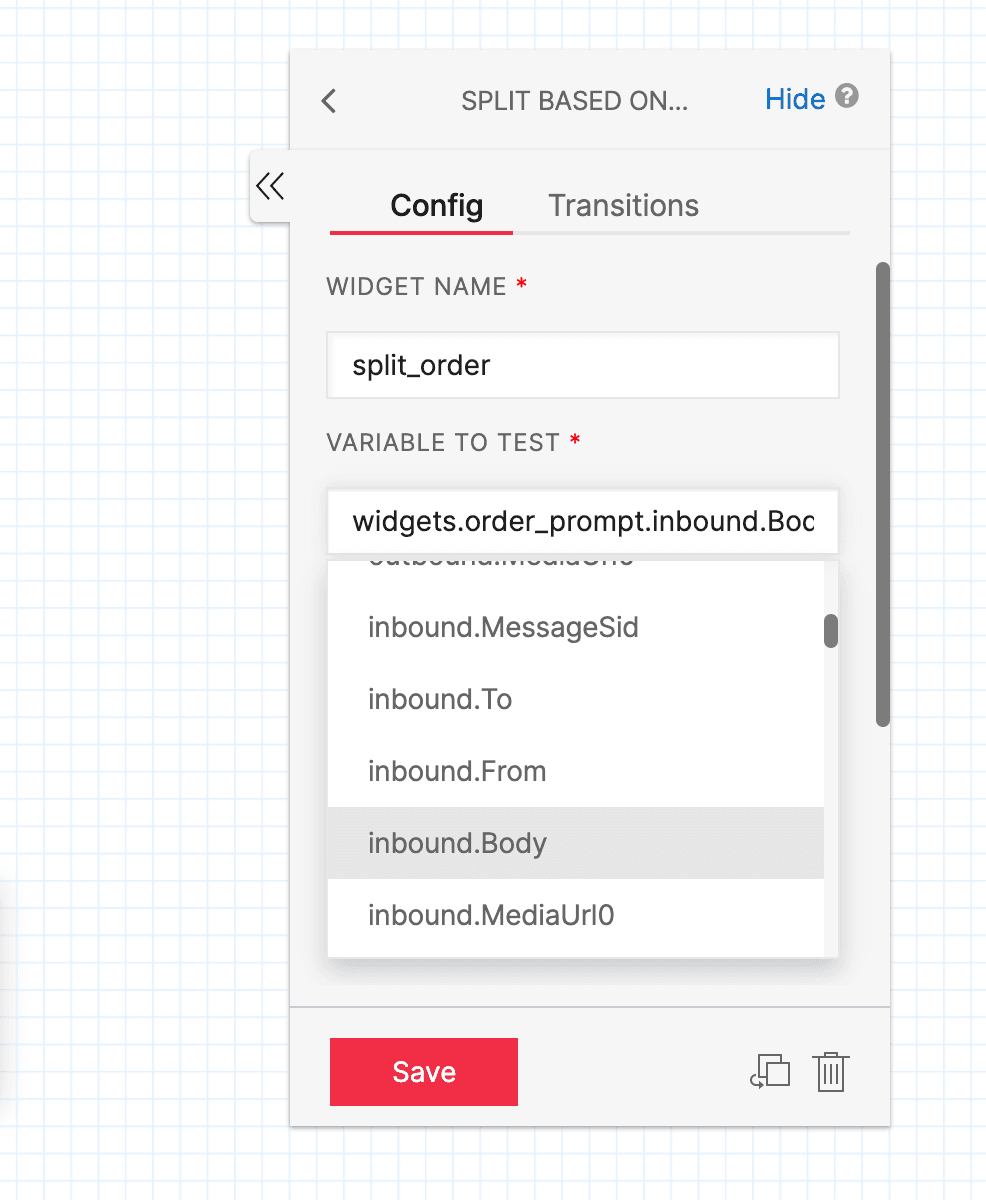
- Click on the Split Based On widget and select the Config tab.
- You can name the widget. This tutorial will use
split_order. - To set a variable to test input against, select
order_prompt> inbound.Body from the Variable to Test dropdown menu. This variable will contain the message body text sent by the customer.
The following image shows the configured Split Based On widget:
Next, you need to declare the choices you're looking for in the customer's response: latte, cappuccino, americano, cortado, and cold brew.
Follow these steps to add Transitions:
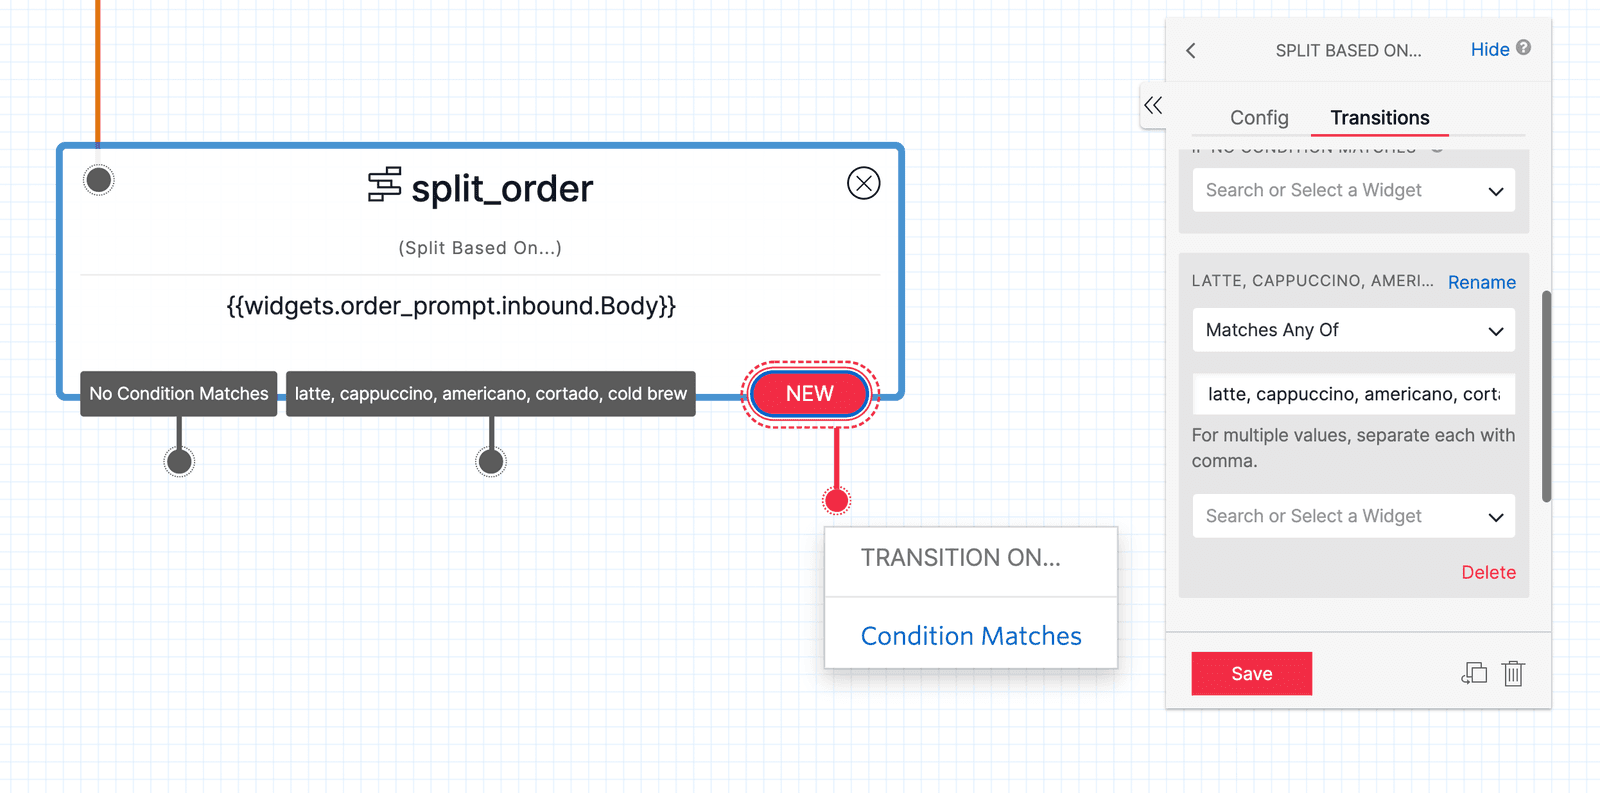
- Click the red New button at the bottom of the Split Based On... widget to reveal the widget's Transition On... dropdown menu. You can alternatively select the Transitions tab after clicking on the widget.
- Select Condition Matches to create a new Transition.
- From the widget's Transitions tab, find the new Transition that you just created. It will be under the heading If Value Equal_To.
- Select Matches Any Of from the first dropdown menu. You can now set the values you want to match from the customer's response —
latte,cappuccino,americano,cortado, andcold brew. - Save the new Transition and it will appear on the widget.
Use the following values for the Variable Matches Any Of field:
latte, cappuccino, americano, cortado, cold brew
The following image shows the configured Split Order widget:
If the user responds with something that the bot recognizes (one of your five drinks), you should send a request to the barista system to complete the order. You can use a Run Function widget to do this.
Twilio Functions is a serverless environment that allows you to write Twilio applications without managing infrastructure. Twilio Functions are perfect for event-driven applications like the Barista Bot.
Follow these steps to add and configure the Run Function widget:
- Drag a Run Function widget onto the Canvas. This widget is available in the Widget Library from Tools & Execute Code > Run Function.
- Click on the Run Function widget to configure it. You can name it anything you like — this tutorial will use
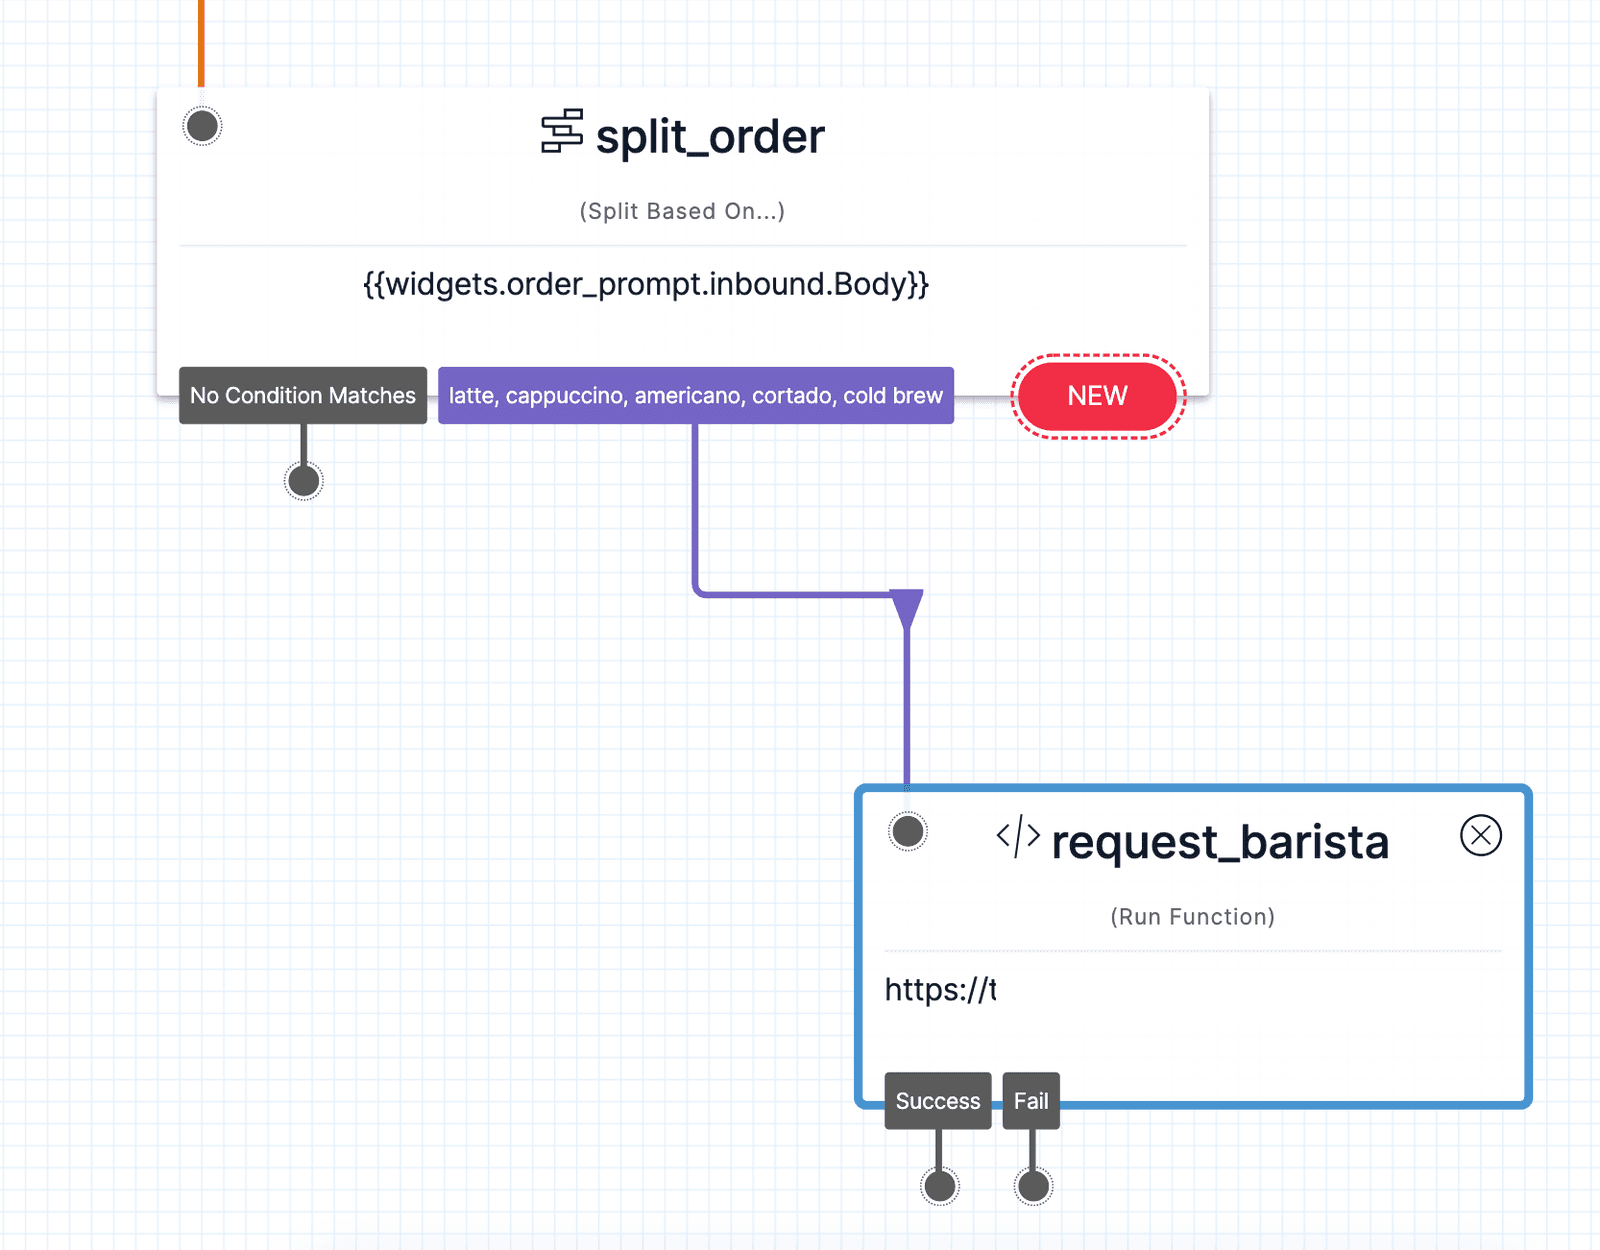
request_barista. - Connect the condition you just set in your Split Based On... widget to your Run Function widget.
Before you can finish configuring your widget, you must create a Twilio Function. Once created, you will have a URL to add to your Run Function widget.
The following image shows the connected widgets:
Follow these steps to build a Twilio Function:
- To build a Twilio Function, go to the Twilio Functions section of the Twilio Console.
- Click Create Service.
- A modal will appear where you can name your Service. The name cannot be changed after you create the Service. You can name the Service anything you like — this tutorial will use
Tutorial. - Click Next. You will be taken to the Functions interface.
- Click Add + at the top of the Function's page to add a Function to your environment.
- Add a path for the Function. You can make the path anything you like — this tutorial uses
/barista-bot - Some example code will be placed in the file editor. This editor is where you will place the code sample below.
- With your code in place, click Save and select Copy URL from the bottom of the code editor window.
- Select Deploy All to make your function live. Your Studio Flow will now be able to call the Function.
You can return to your Studio Flow.
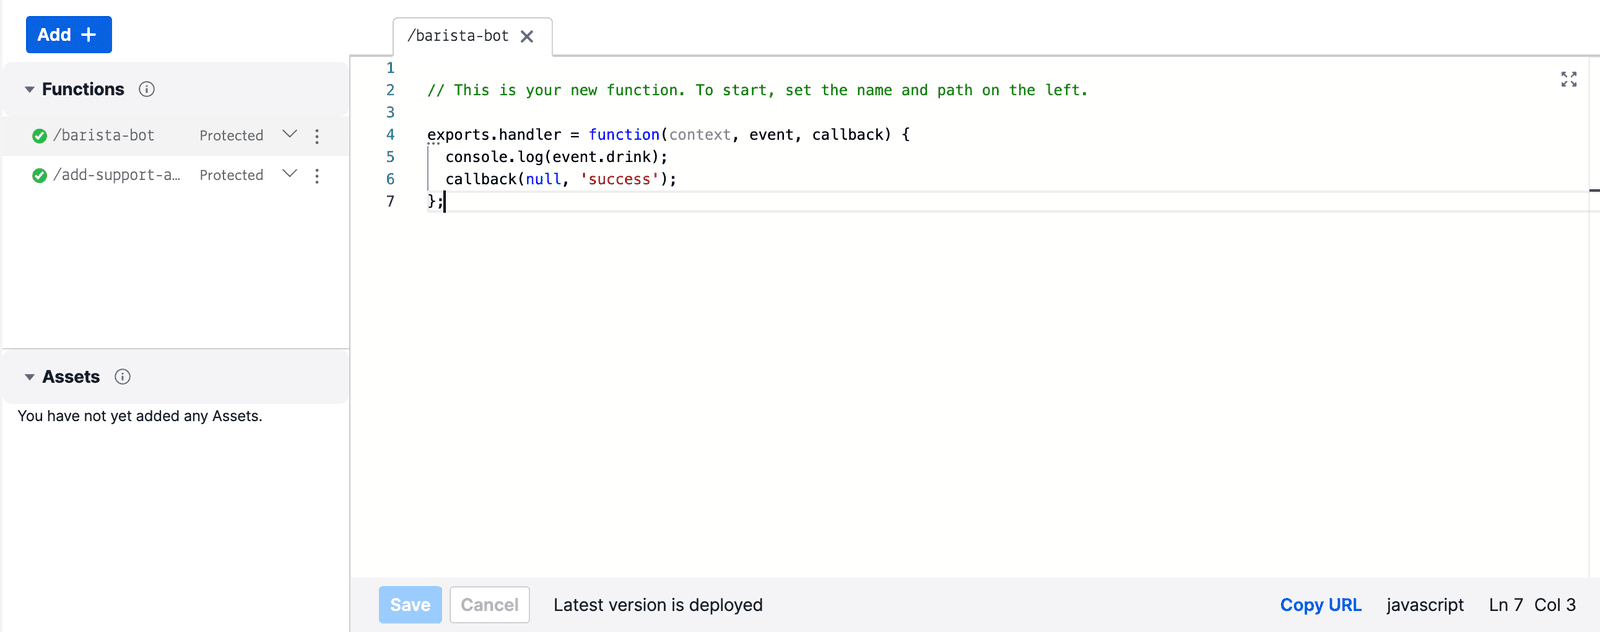
For this tutorial, you will log the customers order with the Function using the following code sample. If you are handling a drink order, you should call another service or write to a database from your Function at this point.
Use the following code in your Function:
1exports.handler = function (context, event, callback) {2console.log(event.drink);3callback(null, "success");4};
The following image shows the Function in the Twilio Console:
Make sure to save your Function and go back to the Function widget inside your Twilio Studio flow. Select the Service where you created the Function, select ui for the Environment, and choose the barista-bot Function.
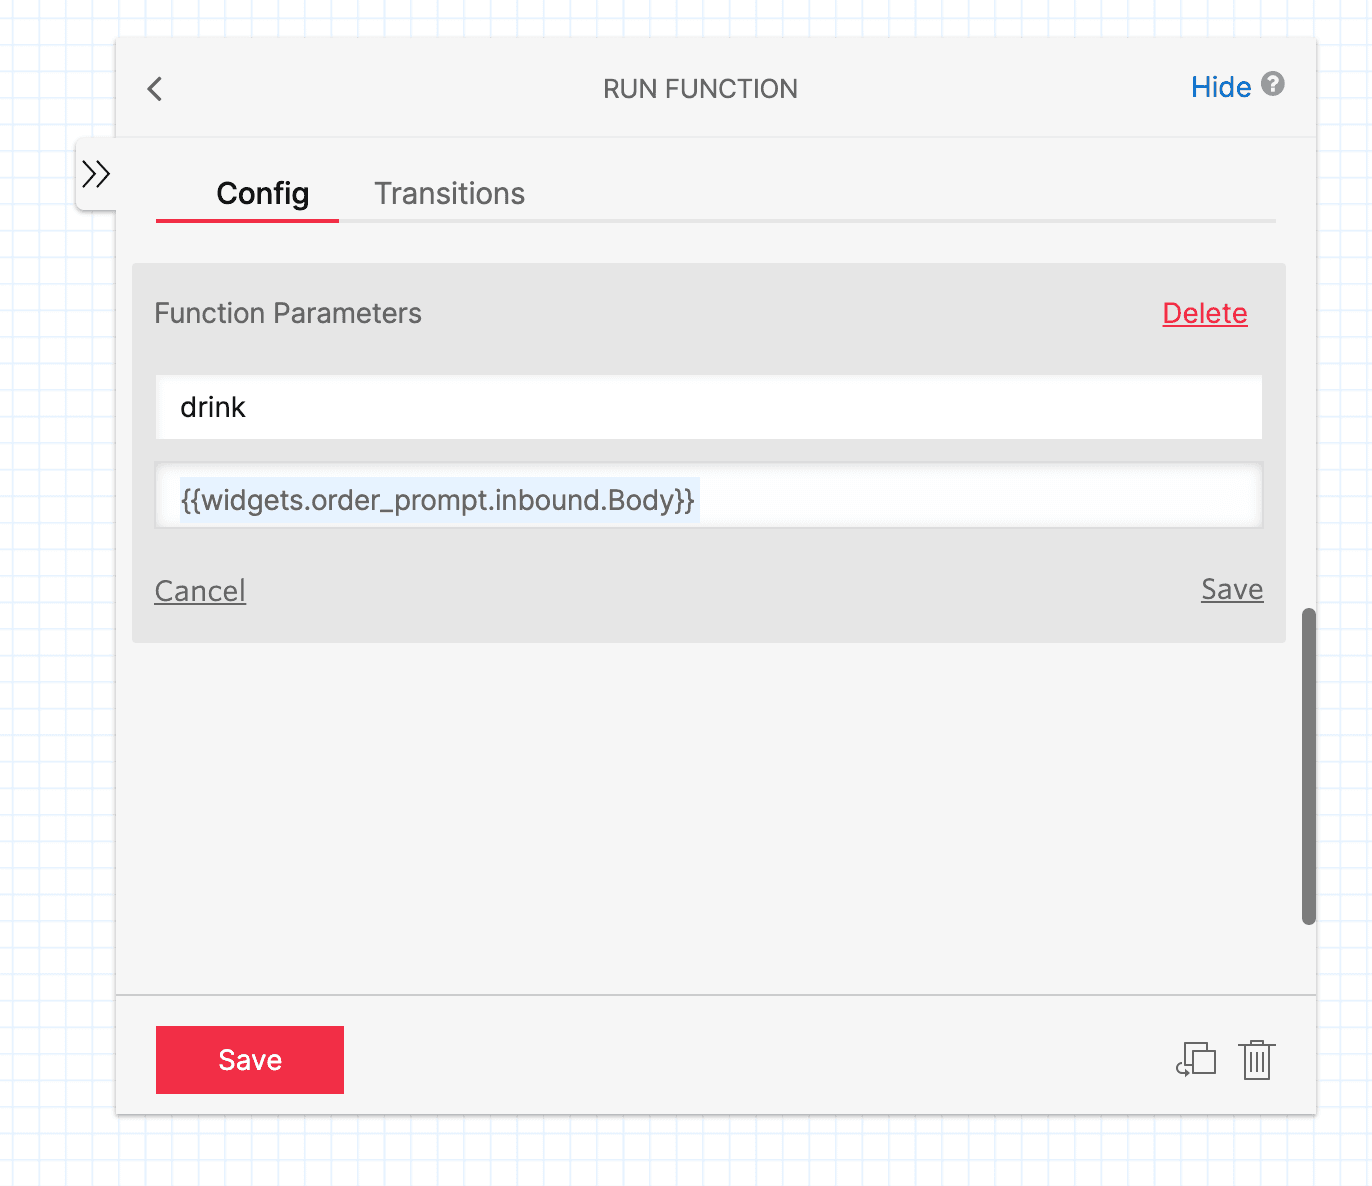
You can also add a parameter to the request which is just a value that will be sent to the Function. Scroll down to the section for Function Parameters and create a field called drink. The value can then be set to the same variable we're checking in our split above: {{widgets.order_prompt.inbound.Body}} (where order_prompt matches the name of your initial prompt widget).
The following image shows the Function parameters configuration:
Once the request goes out to our barista function, we're all set! Our user will get the coffee they ordered, all from a pretty simple interaction.
But what if the user doesn't enter one of our five coffee choices? We still want to help them out. Sometimes the best solution is for the chatbot to hand things off to a human. If the user enters something that isn't on our list, let's offer to give them a phone call so the barista can get the order directly. We'll drag another Send & Wait For Reply widget onto the Canvas, and this time connect it to the No Condition Matches transition on our split_order widget.
The following image shows the ask_to_call widget:
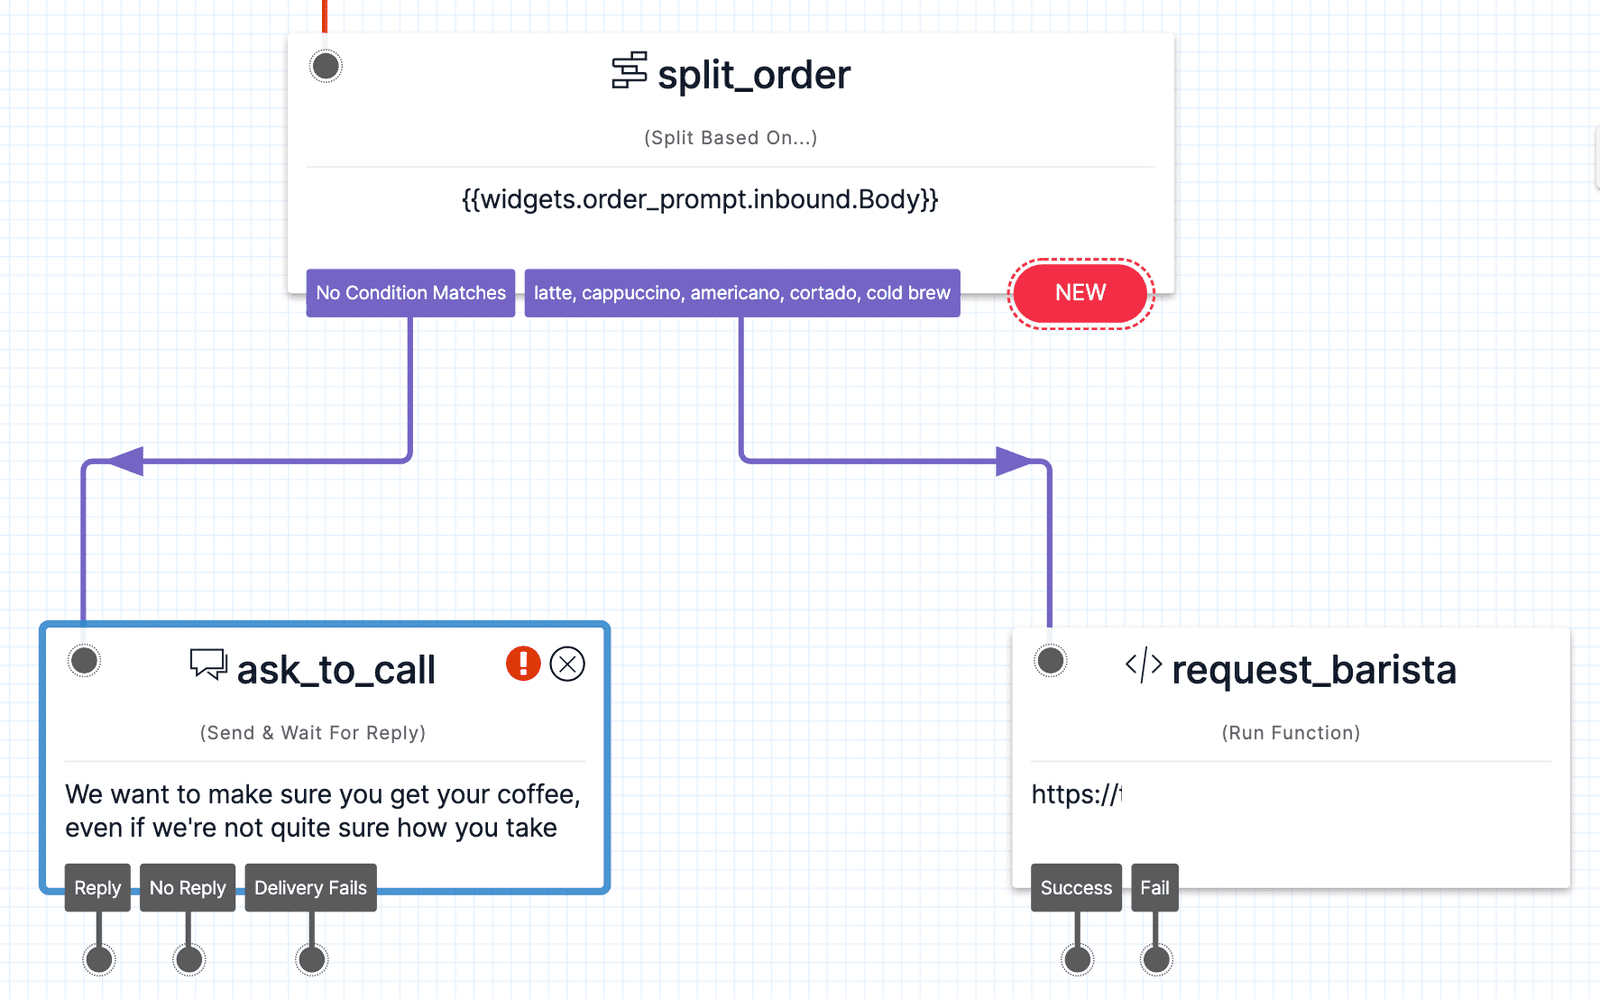
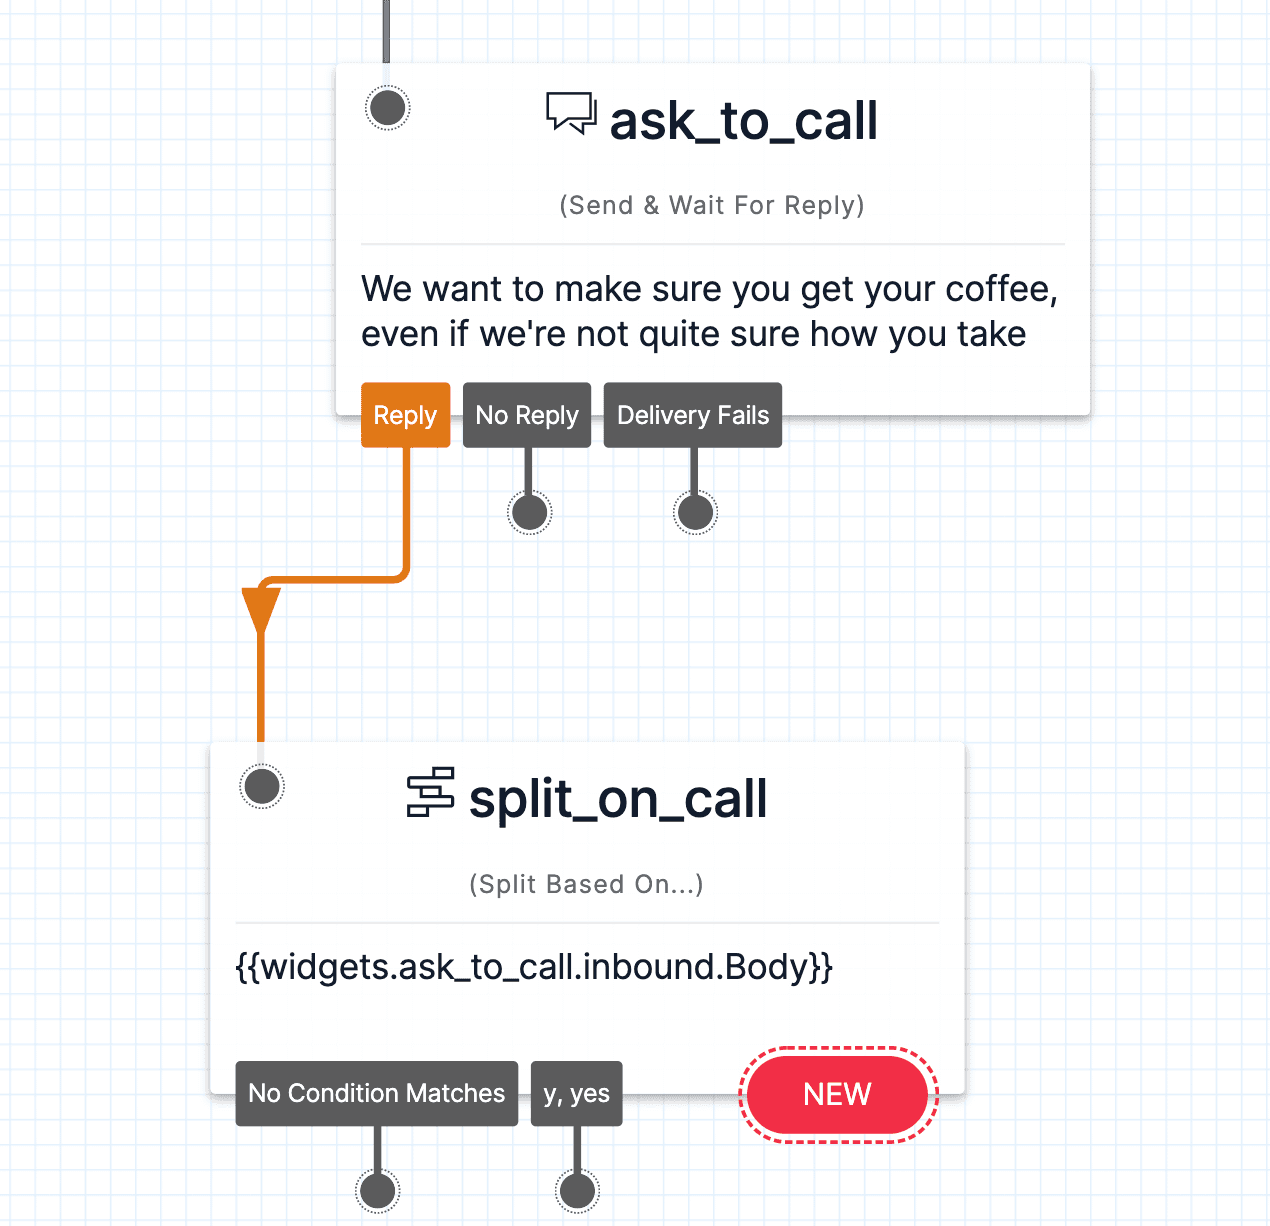
For the message prompt, we'll put "We want to make sure you get your coffee, even if we're not quite sure how you take it. We'll connect you to a barista directly—is now a good time to call?" Another Split Based On widget will help us handle the user's response here—if they type "Y" or "yes" we can make the call to the barista. Let's drag the widget onto the Canvas and select the inbound.Body Liquid variable of our latest Send & Wait For Reply as the variable to test, then create our conditions.
The following image shows the split_on_call widget:
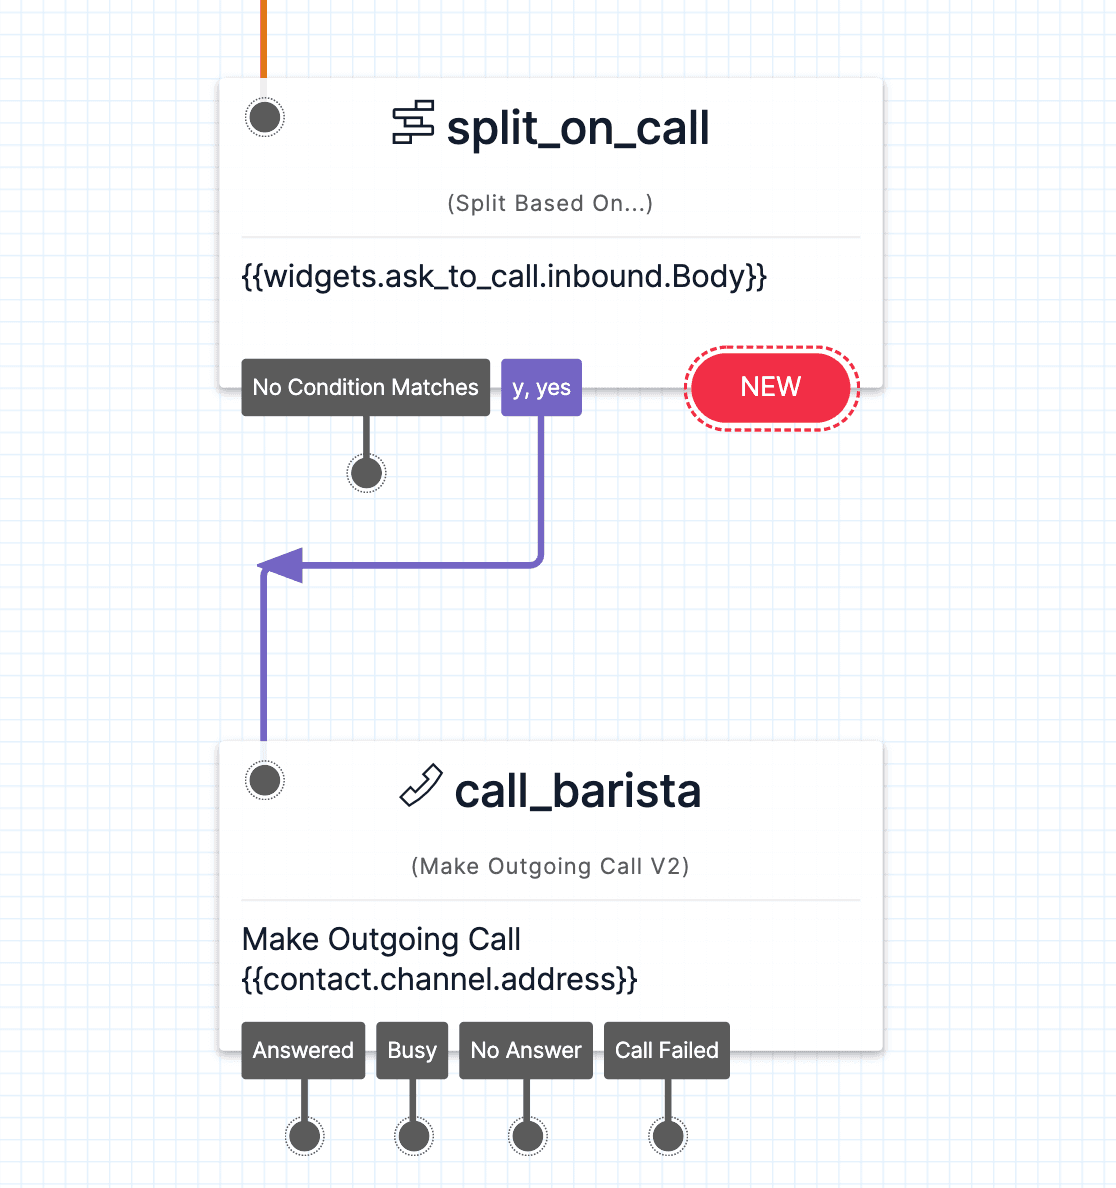
From here, we can drag a Make Outgoing Call widget onto the Canvas and connect it to our 'y, yes' condition. Studio will trigger an outbound call from the Flow to the user so they can speak with a barista.
Warning
When an incoming message triggers a Studio Flow, and the phone number is already assigned to a Messaging Service, you cannot use the Make Outgoing Call widget. For more information, see the Make Outgoing Call widget configuration requirements.
The following image shows the Make Outgoing Call widget:
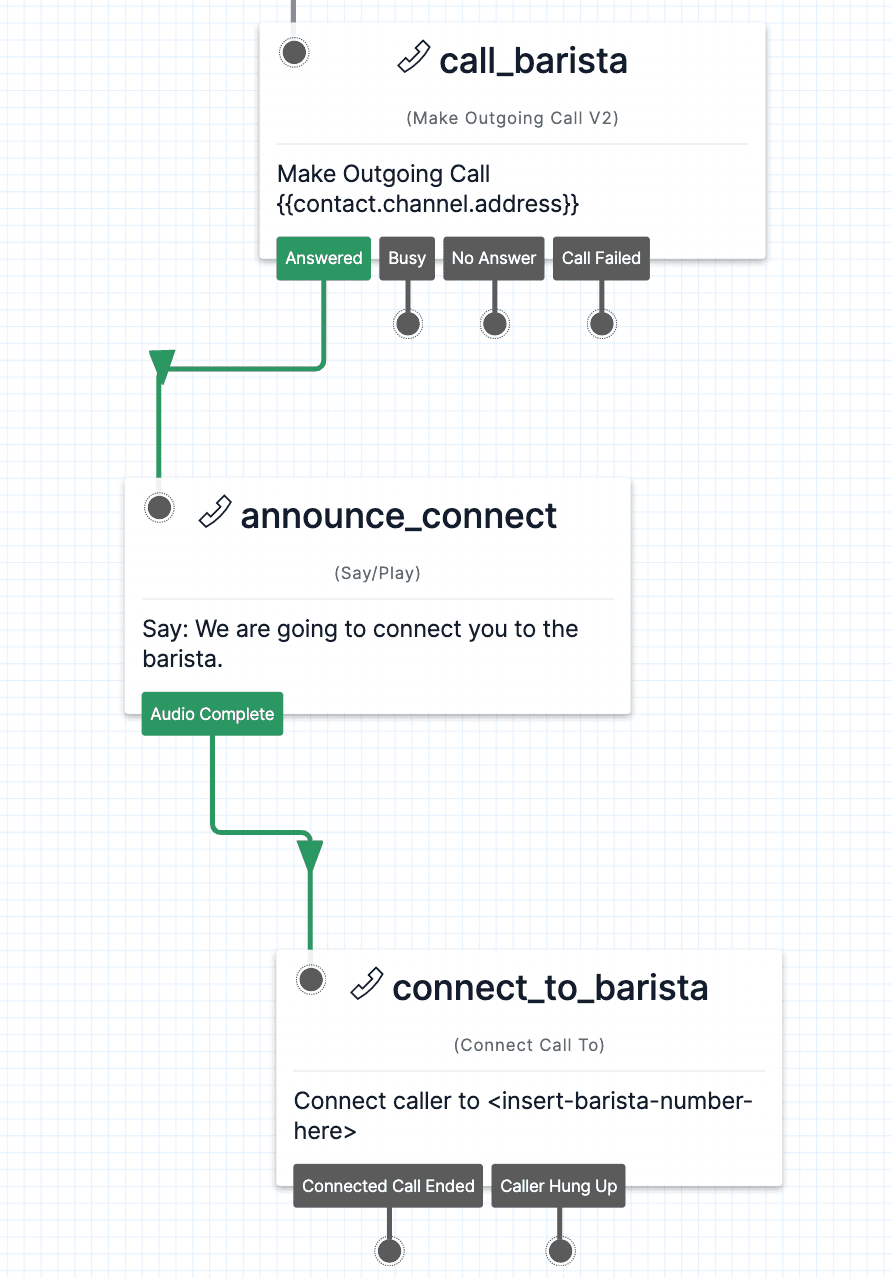
Once the user picks up, we'll use a Say/Play widget to announce that we're connecting them to the barista, and then a Connect Call To widget to connect them once the message is finished playing. Drag these widgets onto the Canvas and connect the dots.
The following image shows the Say/Play and Connect Call To widgets:
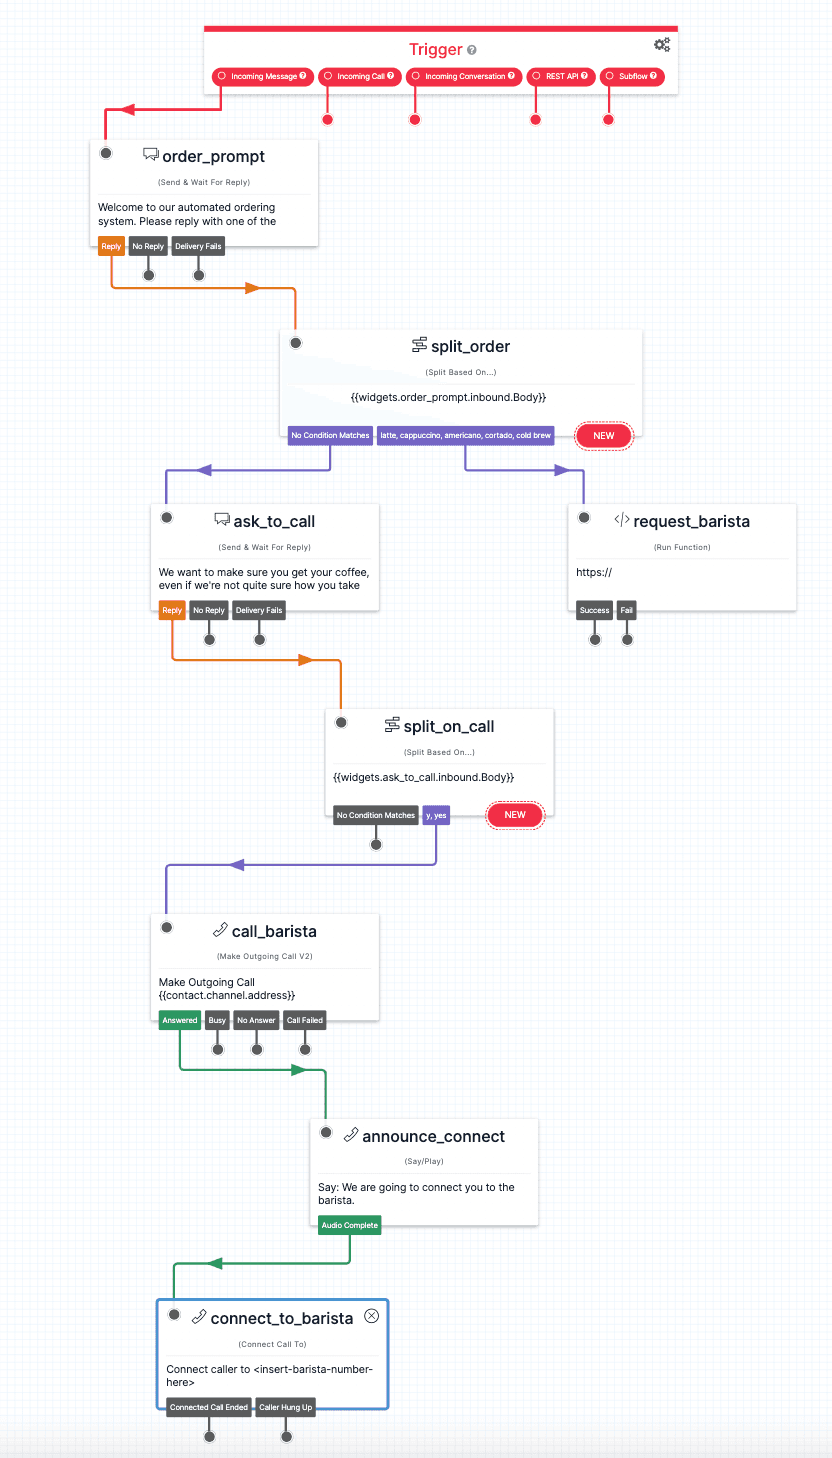
The final state of the Canvas is that we have our Trigger (Start) widget take an incoming message, connect to a Send & Wait For Reply widget, then to a Split Based On widget, with transitions to either a Twilio Function (successful order) or another Send & Wait For Reply (unsuccessful order). This second Send & Wait For Reply connects to a Split Based On widget, which ultimately leads to a Make Outgoing Call widget that calls the user from the bot, a Say/Play widget that announces the connection, and a Connect Call To widget which connects the user to the barista by voice.
The following image shows the complete Studio Flow:
Once you're happy with your Flow and you've published all changes, you can connect it to a Twilio Number so people can start interacting with it.
Navigate to the Active Numbers section of the Twilio Console and click on the number you'd like to connect to the Flow. (If you do not have any phone numbers, you can purchase one from the Console.)
After clicking on the number, you will see its configuration menu where you can connect the number to your Studio Flow.
To trigger a Studio Flow with an Incoming Message, scroll down to the Messaging section in the configuration menu. Under Configure with Other Handlers, select the dropdown option "Webhook, TwiML Bin, Function, Studio Flow, Proxy Service". Then, under A Message Comes In, select the dropdown option "Studio Flow". You'll see another dropdown menu appear where you can select the Studio Flow you'd like to connect to when a message comes in to this number.
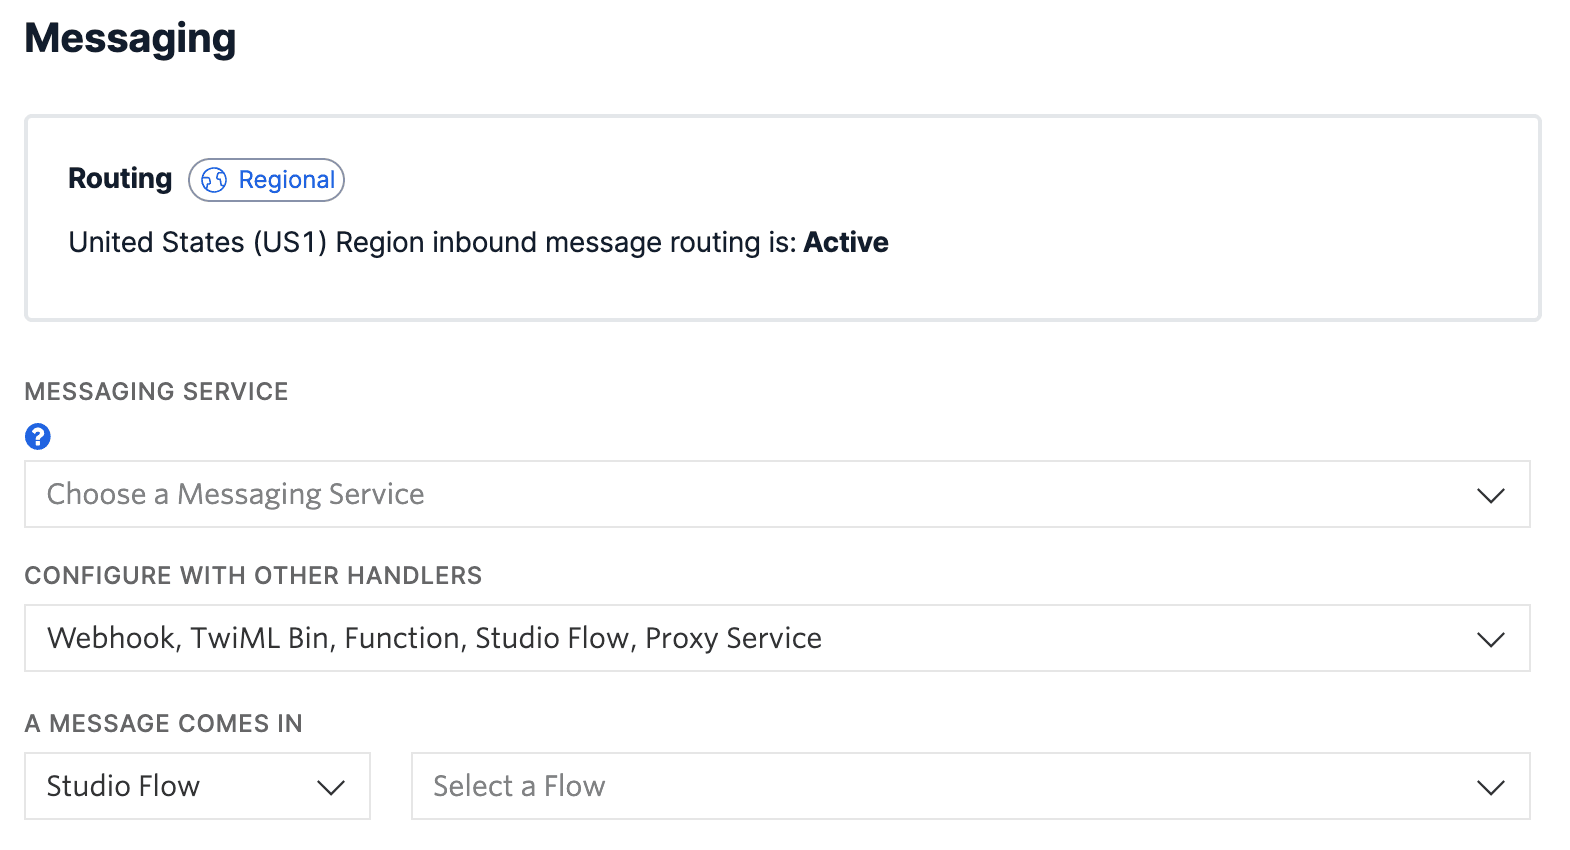
Choose the Flow you'd like to connect the number to, and then press Save to save these changes. Your Flow is now connected to your Twilio number!
Congratulations! You've made a chatbot that is smart enough to route a coffee order to a barista system, or to hand off to a human if things get tricky. What other chatbots will you build next?