How to build an IVR with Twilio Studio
Twilio Studio is a visual drag-and-drop editor for creating communications workflows. Studio Flows are composed of widgets that represent operations in the Twilio API. By connecting these widgets, you can build applications, such as an IVR (Interactive Voice Response) system, without writing code.
If you've ever pressed 1 on your phone to connect to an agent, you've interacted with an IVR. An IVR is an automated phone menu that lets callers navigate by voice or keypress so that calls are routed to the appropriate destination.
In this tutorial, you'll create a basic IVR that:
- Collects a keypress or speech input.
- Routes callers to one of two phone numbers (Sales or Support).
Info
New to Twilio Studio? Review the Getting started guide for Twilio Studio before beginning this tutorial.
Before you start, you need:
- A Twilio account. If you are new to Twilio, create a free account. You can review the features and limitations of a free account.
- A Twilio phone number. Follow the instructions to purchase a phone number.
Create a new Studio Flow that will hold the logic for the IVR.
Use the Twilio Console to create a Flow from scratch. If this is your first Flow, see Create a Flow for detailed steps. Name the Flow, for example, "IVR Tutorial."
The first task is to gather information from callers.
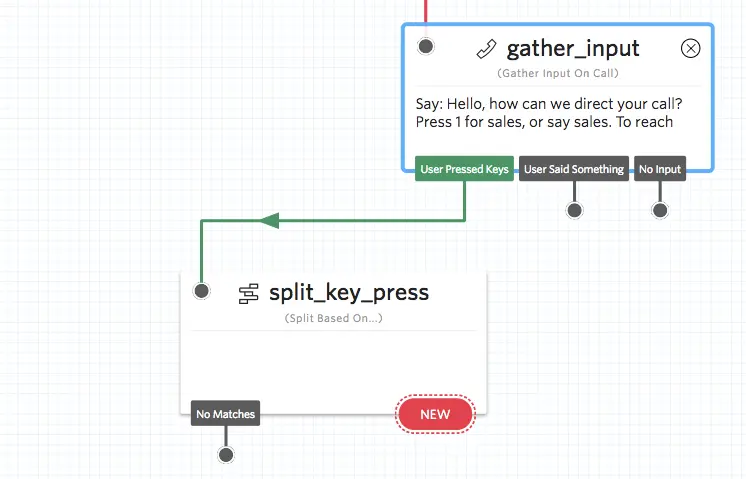
- In the Widget Library, locate the Gather Input on Call widget and drag it to the Canvas.
- Connect the Trigger (Start) widget to the new widget by dragging from the red dot under Incoming Call to the Gather widget. This connection tells the Flow how to handle an incoming call.
-
Select the widget on the Canvas and, in the configuration pane, rename it to
greet_caller. -
Ensure Say/Play a Message is set to "Say a message," then enter the following prompt (or similar) in the text field:
Hello, how can we direct your call? Press 1 for Sales or say "Sales". Press 2 for Support or say "Support". -
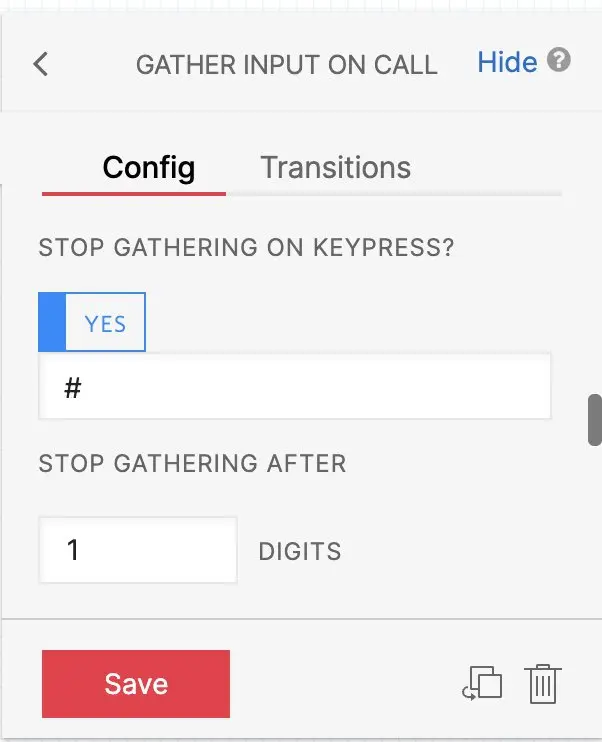
Scroll to Stop gathering on keypress?, choose YES, and set Stop gathering after _ digits to
1. This setting prevents the widget from waiting for additional input after the caller presses one key.
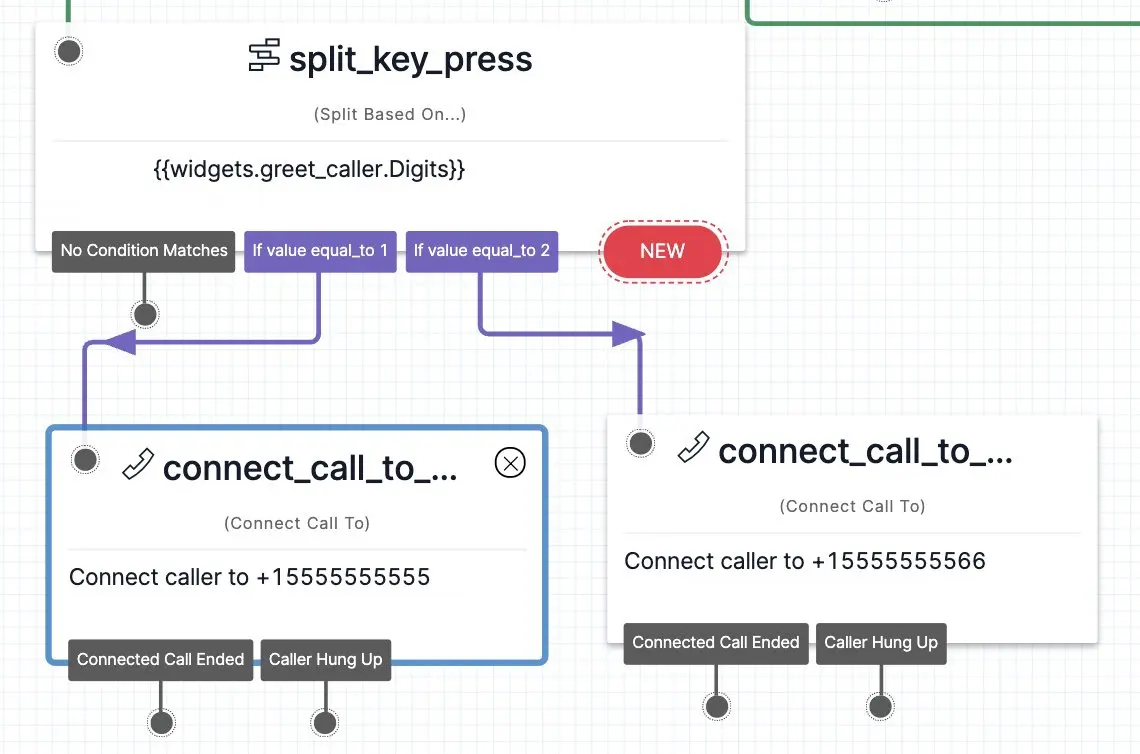
With caller input collected, determine where to route the call.
- Drag a Split Based On… widget to the Canvas and connect it to the User Pressed Keys transition from
greet_caller. - Rename the widget to
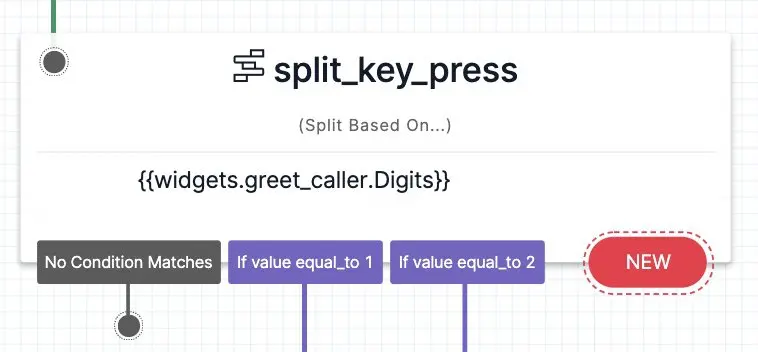
split_key_press. - In the configuration pane, set Variable to test to
widgets.greet_caller.Digits.
- In the Transitions tab of
split_key_press, click New, select Condition Matches, and set If value equal_to… to1.
This transition represents callers who pressed 1 for Sales. - Repeat the step above, creating a second condition where the value equals
2for Support.
The widget now shows transitions for "1," "2," and No Matches.
Use the Connect Call To widget to forward the call.
- Drag two Connect Call To widgets to the Canvas—one for Sales and one for Support.
- Rename them
connect_call_to_salesandconnect_call_to_support. - For each widget, choose Single Number and enter the appropriate destination phone number (use different test numbers for Sales and Support).
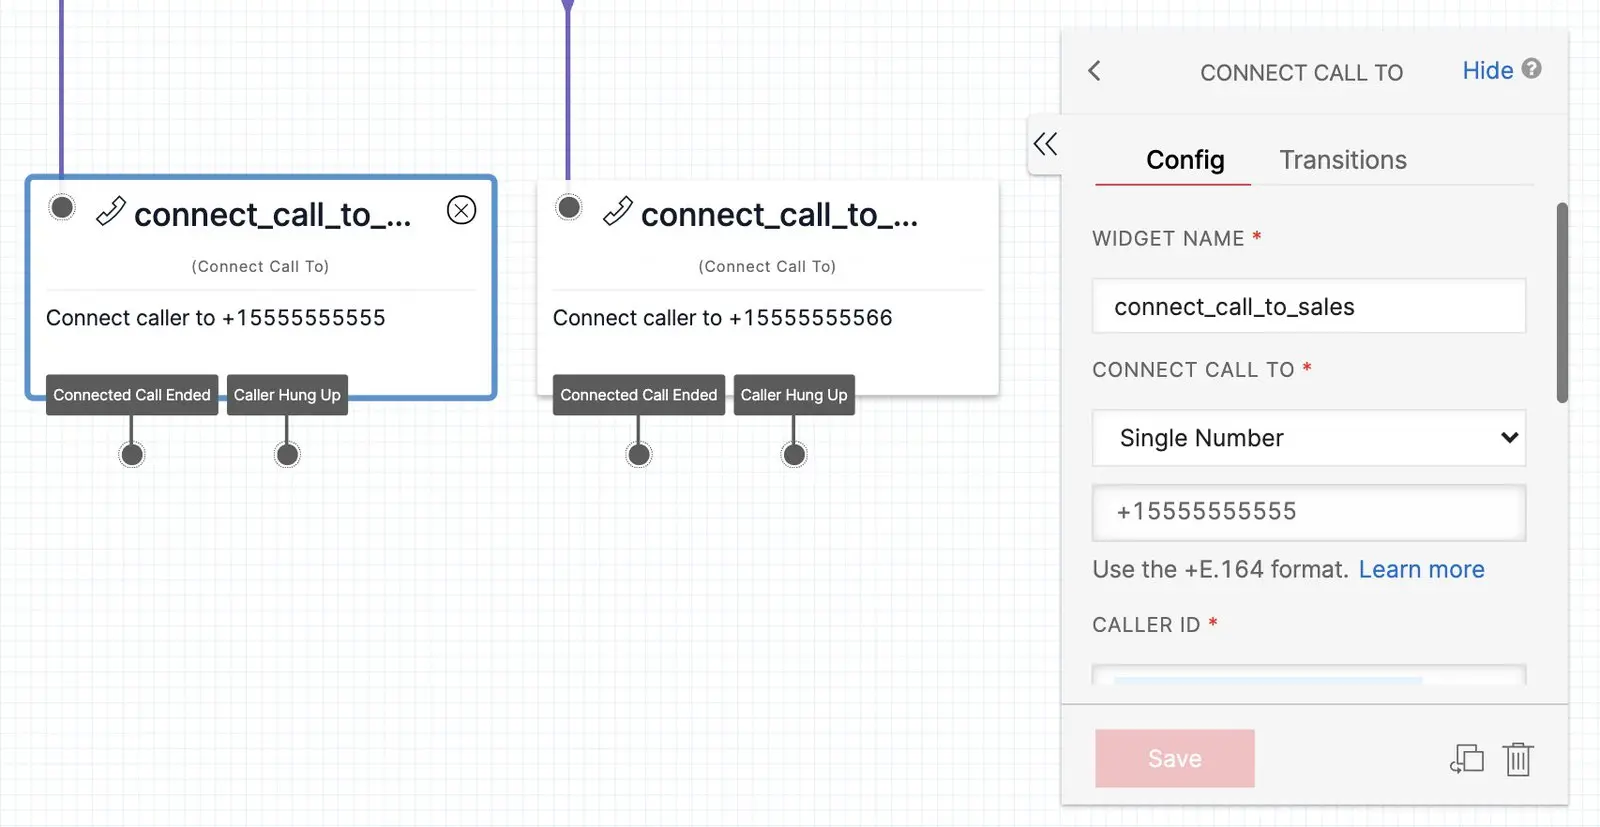
Connect the transition labeled 1 from split_key_press to connect_call_to_sales, and the transition labeled 2 to connect_call_to_support.
Next, handle callers who speak their selection.
- Drag another Split Based On… widget to the Canvas and rename it
split_voice_input. - Set Variable to test to
widgets.greet_caller.SpeechResult. - Connect User Said Something from
greet_callertosplit_voice_input.
- In Transitions for
split_voice_input, click +, choose Condition Matches, select Contains, and set the value toSales. - Add another Contains condition with the value
Support.
Using Contains instead of Equal To allows the match even if punctuation is present (for example, "Sales.").
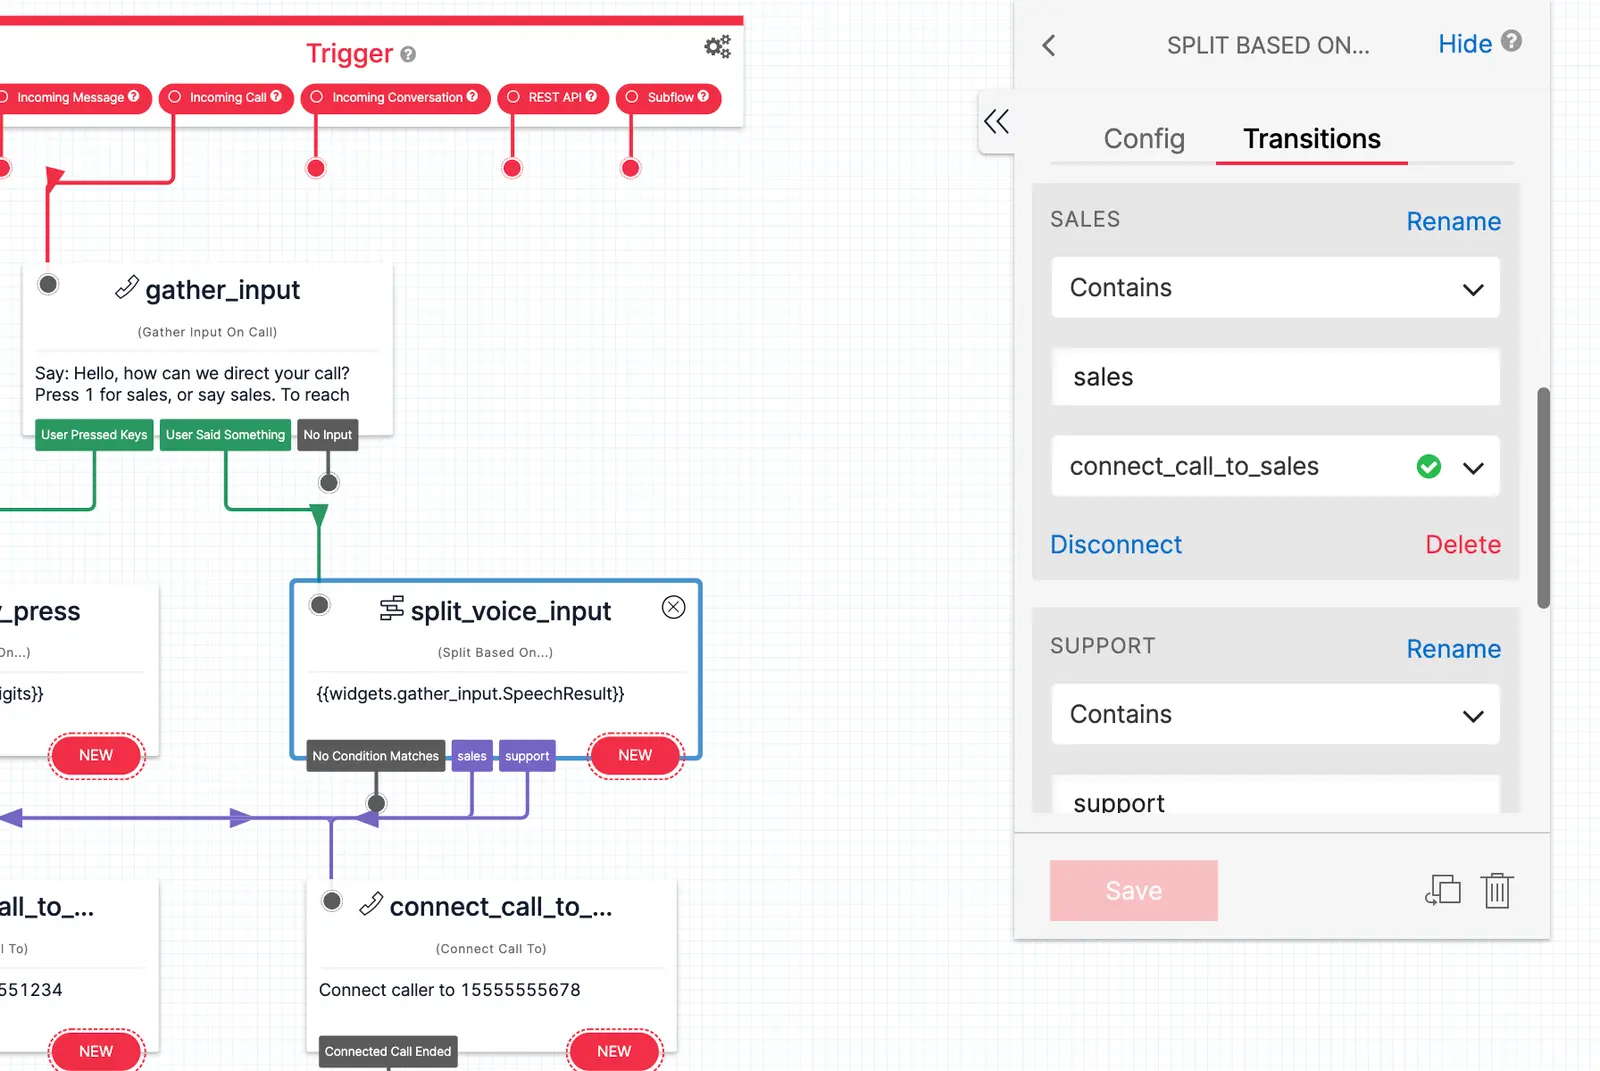
- Connect the
Salestransition toconnect_call_to_salesand theSupporttransition toconnect_call_to_support.
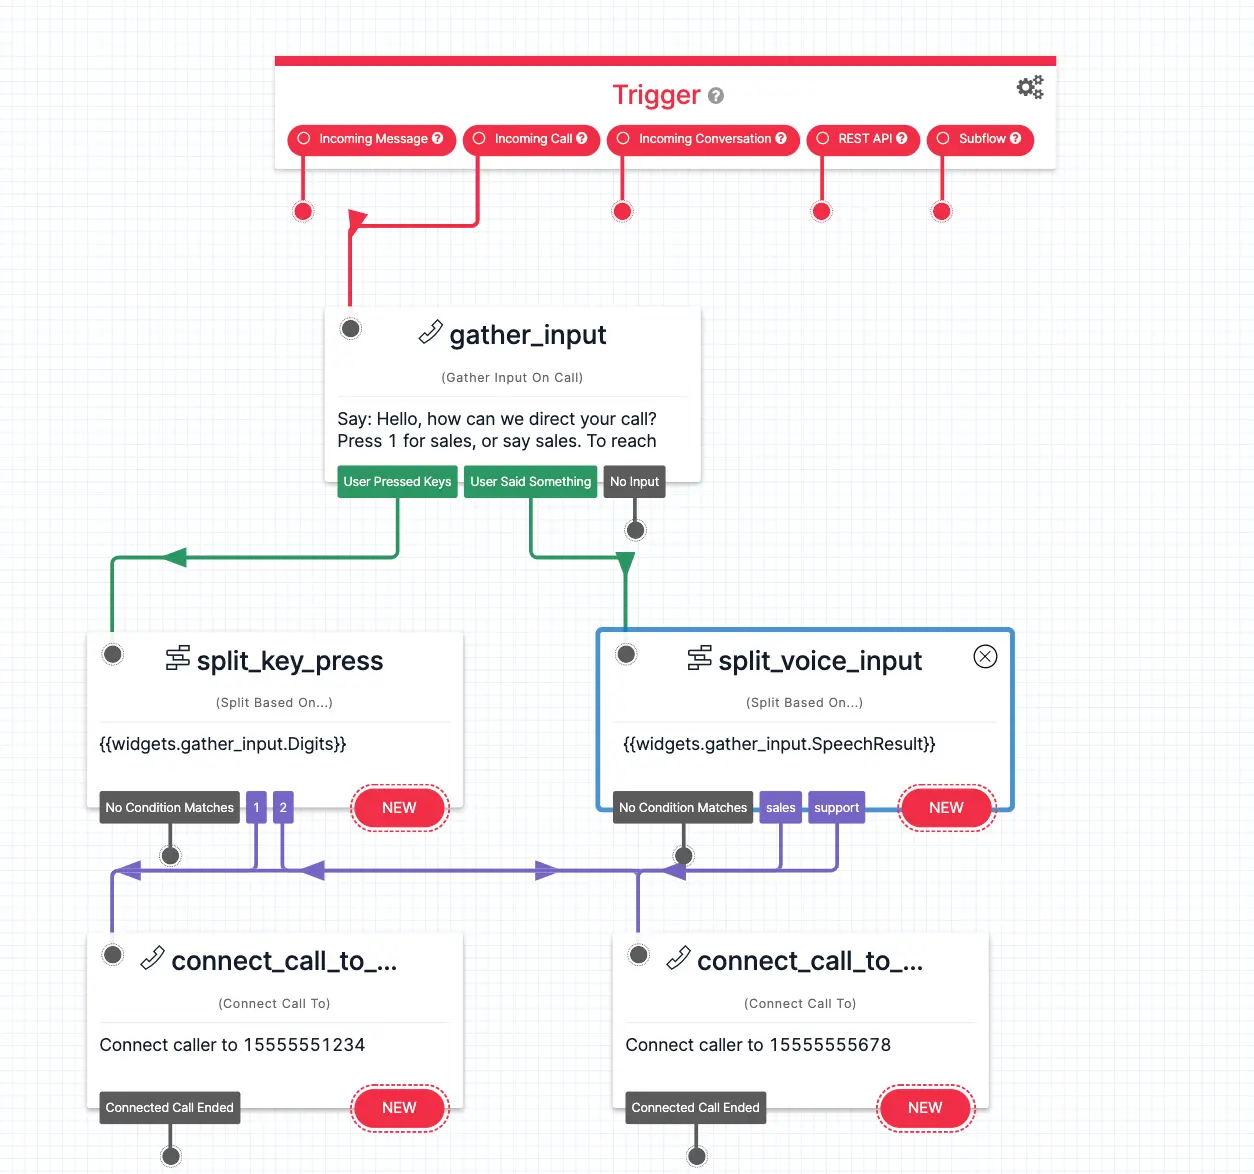
The final Canvas should show:
- Trigger (Start) → Gather Input on Call (
greet_caller) greet_caller→ split_key_press (Digits) → Connect Call To (Sales or Support)greet_caller→ split_voice_input (Speech) → Connect Call To (Sales or Support)
After saving and publishing the Flow, connect it to a Twilio phone number.
Once you're happy with your Flow and you've published all changes, you can connect it to a Twilio Number so people can start interacting with it.
- Go to Numbers & senders and select the number you'd like to connect to the Flow. If you don't have any phone numbers, click Set up a new phone number.
- Select the Configuration details tab.
- Select Voice and emergency calling, then click Edit details.
- On the Edit voice configuration dialog, select the Webhook, TwiML Bin, Function, Studio Flow, Proxy Service option.
- Under How do you want to set up your primary method?, select Studio Flow.
- Select the Studio Flow you'd like to connect to your phone number, then click Save.
Call the configured Twilio number and verify that keypress or speech input routes the call to the correct destination.
Explore additional Studio tutorials: