Creating Tasks and Accepting Reservations: Create a Task using the REST API
Recall the TaskRouter Task lifecycle:
Task Created → eligible Worker becomes available → Worker reserved → Reservation accepted → Task assigned to Worker.
Before we create our first Task, make sure that our Worker Alice is in a non-available Activity state. Bob's Activity state won't matter right now, as we will create a Spanish language Task that he is not eligible to handle.
With your Workspace open in the TaskRouter web portal, click 'Workers' then click to edit Alice and set her Activity to 'Offline'. Your Workers should look like this:
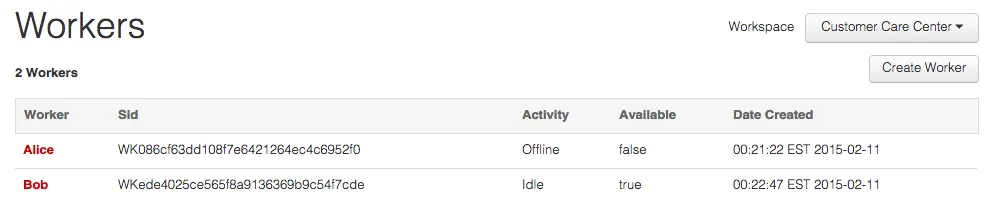
To simulate reality, we'll create a Task using the REST API rather than the web portal. We'll add on to our Program.cs to create a task with our web server. Replace the with your Twilio AccountSid, API key SID, API key secret, WorkspaceSid, and WorkflowSid.
Install Twilio's C# SDK and its dependencies into your project.
1using System;2using System.Net;3using SimpleWebServer;4using Twilio;5using Twilio.Rest.Taskrouter.V1.Workspace.Task;67namespace taskroutercsharp8{9class MainClass10{11// Find your Account SID: https://www.twilio.com/console12// Create API keys: https://www.twilio.com/docs/iam/api-keys/keys-in-console13const string AccountSid = "{{ account_sid }}";14const string ApiKey = "{{ api_key }}";15const string ApiSecret = "{{ api_secret }}";16const string WorkspaceSid = "{{ workspace_sid }}";17const string WorkflowSid = "{{ workflow_sid }}";1819public static void Main (string[] args)20{21TwilioClient.Init(ApiKey, ApiSecret, AccountSid);2223WebServer ws = new WebServer (SendResponse, "http://localhost:8080/");24ws.Run ();25Console.WriteLine ("A simple webserver. Press a key to quit.");26Console.ReadKey ();27ws.Stop ();28}2930public static HttpListenerResponse SendResponse(HttpListenerContext ctx)31{32HttpListenerRequest request = ctx.Request;33HttpListenerResponse response = ctx.Response;3435String endpoint = request.RawUrl;3637if (endpoint.EndsWith("assignment_callback")) {38response.StatusCode = (int) HttpStatusCode.OK;39response.ContentType = "application/json";40response.StatusDescription = "{}";41return response;42} else if (endpoint.EndsWith ("create_task")) {43response.StatusCode = (int)HttpStatusCode.OK;44response.ContentType = "application/json";45var task = TaskResource.Create(46WorkspaceSid, attributes: "{\"selected_language\":\"es\"}", workflowSid: WorkflowSid);47response.StatusDescription = task.Attributes;48return response;49}50response.StatusCode = (int) HttpStatusCode.OK;51return response;52}53}54}
Alternatively, we can also create a Task using the command line utility curl, which should exist on any Mac or Linux workstation. Again, remember to replace the with your matching credentials and Sids, then execute the following command at your terminal:
1ATTRIBUTES_OBJ=$(cat << EOF2{3"selected_language": "es"4}5EOF6)7curl -X POST "https://taskrouter.twilio.com/v1/Workspaces/WSXXXXXXXXXXXXXXXXXXXXXXXXXXXXXXXX/Tasks" \8--data-urlencode "WorkflowSid=WWXXXXXXXXXXXXXXXXXXXXXXXXXXXXXXXX" \9--data-urlencode "Attributes=$ATTRIBUTES_OBJ" \10-u $TWILIO_API_KEY:$TWILIO_API_SECRET
You can find your Twilio AccountSid on the TaskRouter Getting Started page by clicking show API credentials. To get an API key SID and secret, create an API key.
If you don't have curl, you can run this request using an HTTP test tool like Insomnia or using the Task creation dialog in the TaskRouter web portal: with your Workspace open, click 'Tasks' then 'Create Task'.
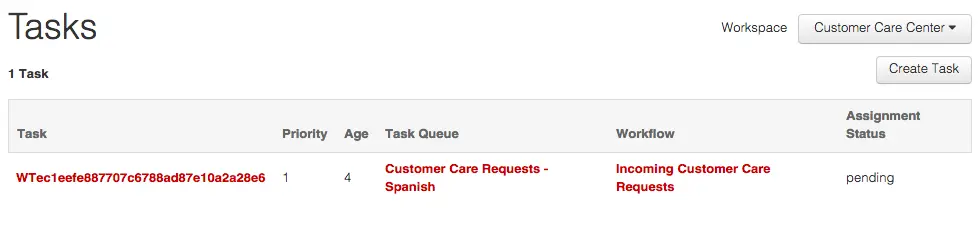
To see our newly created Task in the TaskRouter web portal, with your Workspace open, click 'Tasks' in the main navigation. Notice that the Task has been added to the "Customer Care Requests - Spanish" Task Queue based on the Attributes we provided in the curl request. The Assignment Status is 'pending' because there is no available Worker that matches the Task Queue:
Look again at the TaskRouter Task lifecycle:
Task Created → eligible Worker becomes available → Worker reserved → Reservation accepted → Task assigned to Worker.
The first stage - 'Task Created' - is complete. To trigger an automatic Task Reservation, the next step is to bring an eligible Worker (in this case Alice) online.
With your Workspace open in the TaskRouter web portal, click 'Workers', then click to edit Alice and set her Activity to 'Idle':
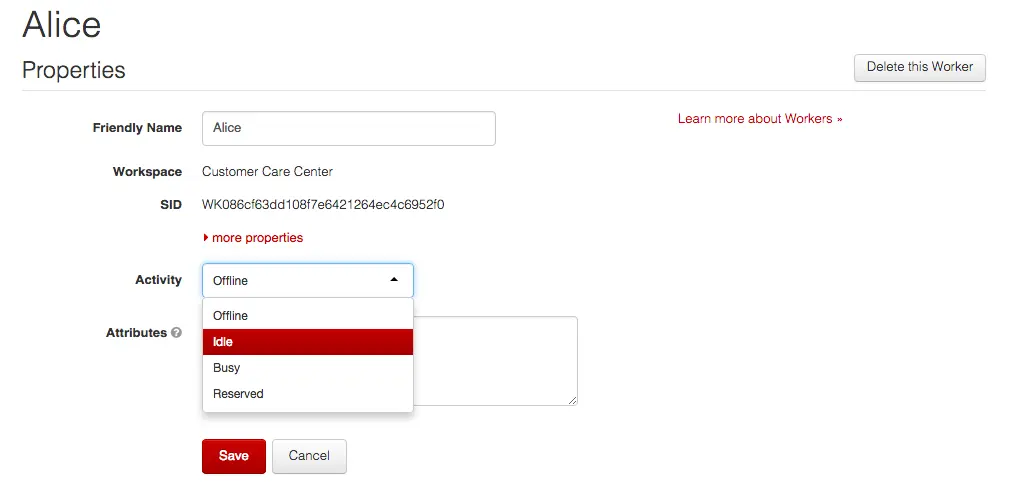
When you hit save, Twilio will create a Reservation between Alice and our Task and you will receive a Webhook request at the Assignment Callback URL that we set up in the previous step. If you're using ngrok, open http://localhost:4040 in your web browser to see a detailed log of the request that Twilio made to your server, including all the parameters that your server might use to determine whether to accept a Reservation:
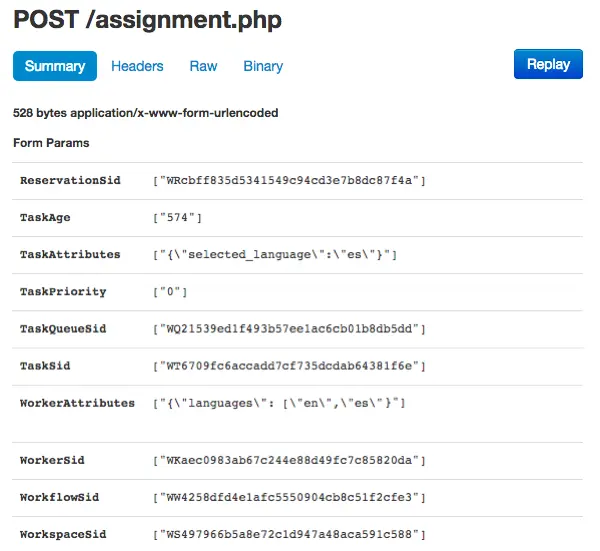
We're now one step further along the Task Reservation lifecycle:
Task Created → eligible Worker becomes available → Worker reserved → Reservation accepted → Task assigned to Worker.
Time to accept the Reservation.