Getting started with the Event Webhook
This document will guide you through adding and configuring an Event Webhook. If you are new to the concept of a webhook or need information about further working with Event Webhooks that you have already created, see the Twilio SendGrid Event Webhook Overview.
Warning
Categories and Unique Arguments will be stored as a "Not PII" field and may be used for counting or other operations as SendGrid runs its systems. These fields generally cannot be redacted or removed. You should take care not to place PII in this field. SendGrid does not treat this data as PII, and its value may be visible to SendGrid employees, stored long-term, and may continue to be stored after you have left SendGrid's platform.
There are two parts to setting up the Event Webhook: a URL you provide and a SendGrid operation that makes POST requests to that URL. This means you must have a web server configured to accept POST requests at the URL you provide.
This doc assumes you are familiar with HTTP, web servers, and your own data tooling, which will allow you to provide a URL that accepts SendGrid's requests. However, this document lists several options below that may help you test the Event Webhook during setup. These testing tools should be used only to confirm that you have configured the Event webhook correctly during initial setup or when troubleshooting.
Your laptop or desktop development computer is not typically accessible as a web server from outside your local network. In other words, when you run your local development setup, you cannot access it from the larger internet, which means SendGrid's POST requests cannot reach a URL like http://localhost:3000/my-webhook-endpoint.
ngrok makes it possible to expose your machine to external traffic by creating a secure tunnel to the outside world. See the ngrok documentation for more information about setting up a tunnel to your machine.
You may prefer to use a webhook testing site to verify that you have correctly configured the Event Webhook. These sites require no setup in your development environment. However, they are not services you or SendGrid control, and they should be used only with the sample data provided by the Test Your Integration feature explained in the "Add an Event Webhook" section of this page.
Webhook testing sites are handy for a quick confirmation that your Webhook is configured correctly, but they are not meant to process real data or handle anything more complex. Examples include:
The following pages provide code samples to help you start processing Event Webhook data with your own server. These starter examples can be run locally with a tool such as ngrok for initial testing on your local machine.
Once you have a URL ready to accept SendGrid's POST requests, you can add an Event Webhook in the SendGrid application user interface (UI).
To add a new Event Webhook to your account using the SendGrid UI, follow the steps below. You can also manage your webhooks with the SendGrid Webhooks API.
- In the Twilio SendGrid application UI, navigate to Settings > Mail Settings.
- Under Webhook Settings, click Event Webhooks.
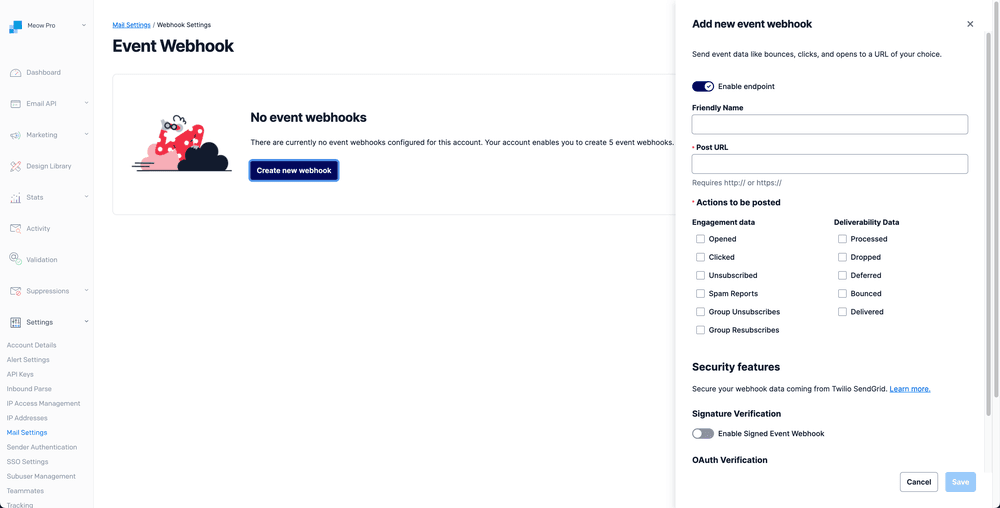
- The Event Webhook settings page will load. Click Create new webhook.
- A dialog will open where you can configure the Event Webhook. See the next section of this page to understand and configure each form field.

To configure your Event Webhook, populate the form fields described below. Only the Post URL and Actions to be posted fields are required.
- Enabled: Toggle the webhook to be active (blue).
- Friendly Name: Add an optional name to help you differentiate among your webhooks.
- Post URL: Add the URL where the SendGrid should send data. This URL may be your server's endpoint, an endpoint provided by a third-party data tool you are using, or a testing URL from a tool like ngrok. This URL should handle incoming
POSTrequests from Twilio SendGrid. See the Twilio SendGrid Event Webhook Overview if you are unfamiliar with webhooks or the purpose of this URL. - Actions to be posted: Select the event types you would like to receive data about in each webhook request payload. See the Event Webhook Reference for more information about each event type.
- Security features: See Getting Started with the Event Webhook Security Features for details about configuring the settings under this heading. The Event Webhook allows you to verify that the
POSTrequests are coming from SendGrid with either or both Signature Verification and OAuth Verification. - Test Your Integration: Click this button to receive an HTTP
POSTrequest at your specified Post URL containing a JSON array of example events. The test request will be made up of example events and will not include real data from your mail send. - Click Save to save the Event Webhook configuration.
If your web server does not return a 2xx response type, SendGrid will retry the POST request until it receives a 2xx response or the maximum time has elapsed. All events are re-tried at increasing intervals for up to 24 hours after the event occurs. This time limit is a rolling 24 hours, which means new failing events will receive their own 24-hour retry period.
Now that you have created your first Event Webhook and sent a test event to your Post URL, you can modify your Webhook and store the event data in a way that best suits your needs.
See the Twilio SendGrid Event Webhook Overview for more information about editing, modifying, deleting, and troubleshooting your Webhook.