Linked Audiences
Linked Audiences lets marketers create targeted audiences by combining behavioral data from Segment Profiles with warehouse entity data in a self-serve, no-code interface.
The tool streamlines audience creation so you can target customers precisely, personalize messages, and manage marketing spend without waiting for data-team support.
With Linked Audiences, you can:
- Preserve rich relationships between all the data in your warehouse by creating connections with any entity data back to your audience profile.
- Build advanced audience segments that include the rich context needed for personalization downstream.
- Use a low-code builder that lets marketers activate warehouse data without waiting for data-team requests before launching campaigns.
To learn more about specific use cases you can set up with Linked Audiences, see Linked Audiences Use Cases, or visit Linked Audiences with Braze and Iterable to see how you use Linked Audiences with these destinations.
Before you begin setting up your Linked Audience, ensure you have:
- Set up Profiles Sync.
- Set up your warehouse permissions using either BigQuery, Databricks, Redshift, or Snowflake.
- Ensure your Data Graph is set up.
- Workspace Owner or Unify Read-only, Engage User, Entities Read-only, and Source Admin roles in Segment.
To set up your Linked Audience, complete the following steps:
- Step 1: Build a Linked Audience
- Step 2: Activate your Linked Audience
- Step 3: Send a test event to your destination
- Step 4: Enable your Linked Audience
- Step 5: Monitor your Activation
Linked Audiences allows you to filter based on properties like profile traits, relational data mapped to the Data Graph, events, and existing audiences.
To build a Linked Audience:
- Navigate to Engage > Audiences.
- Select + New audience > Audience.
- On the Select Audience Type screen, select Linked audience, then click Next. Note: If you can't select Linked audience, make sure you've set up your Data Graph in Unify.
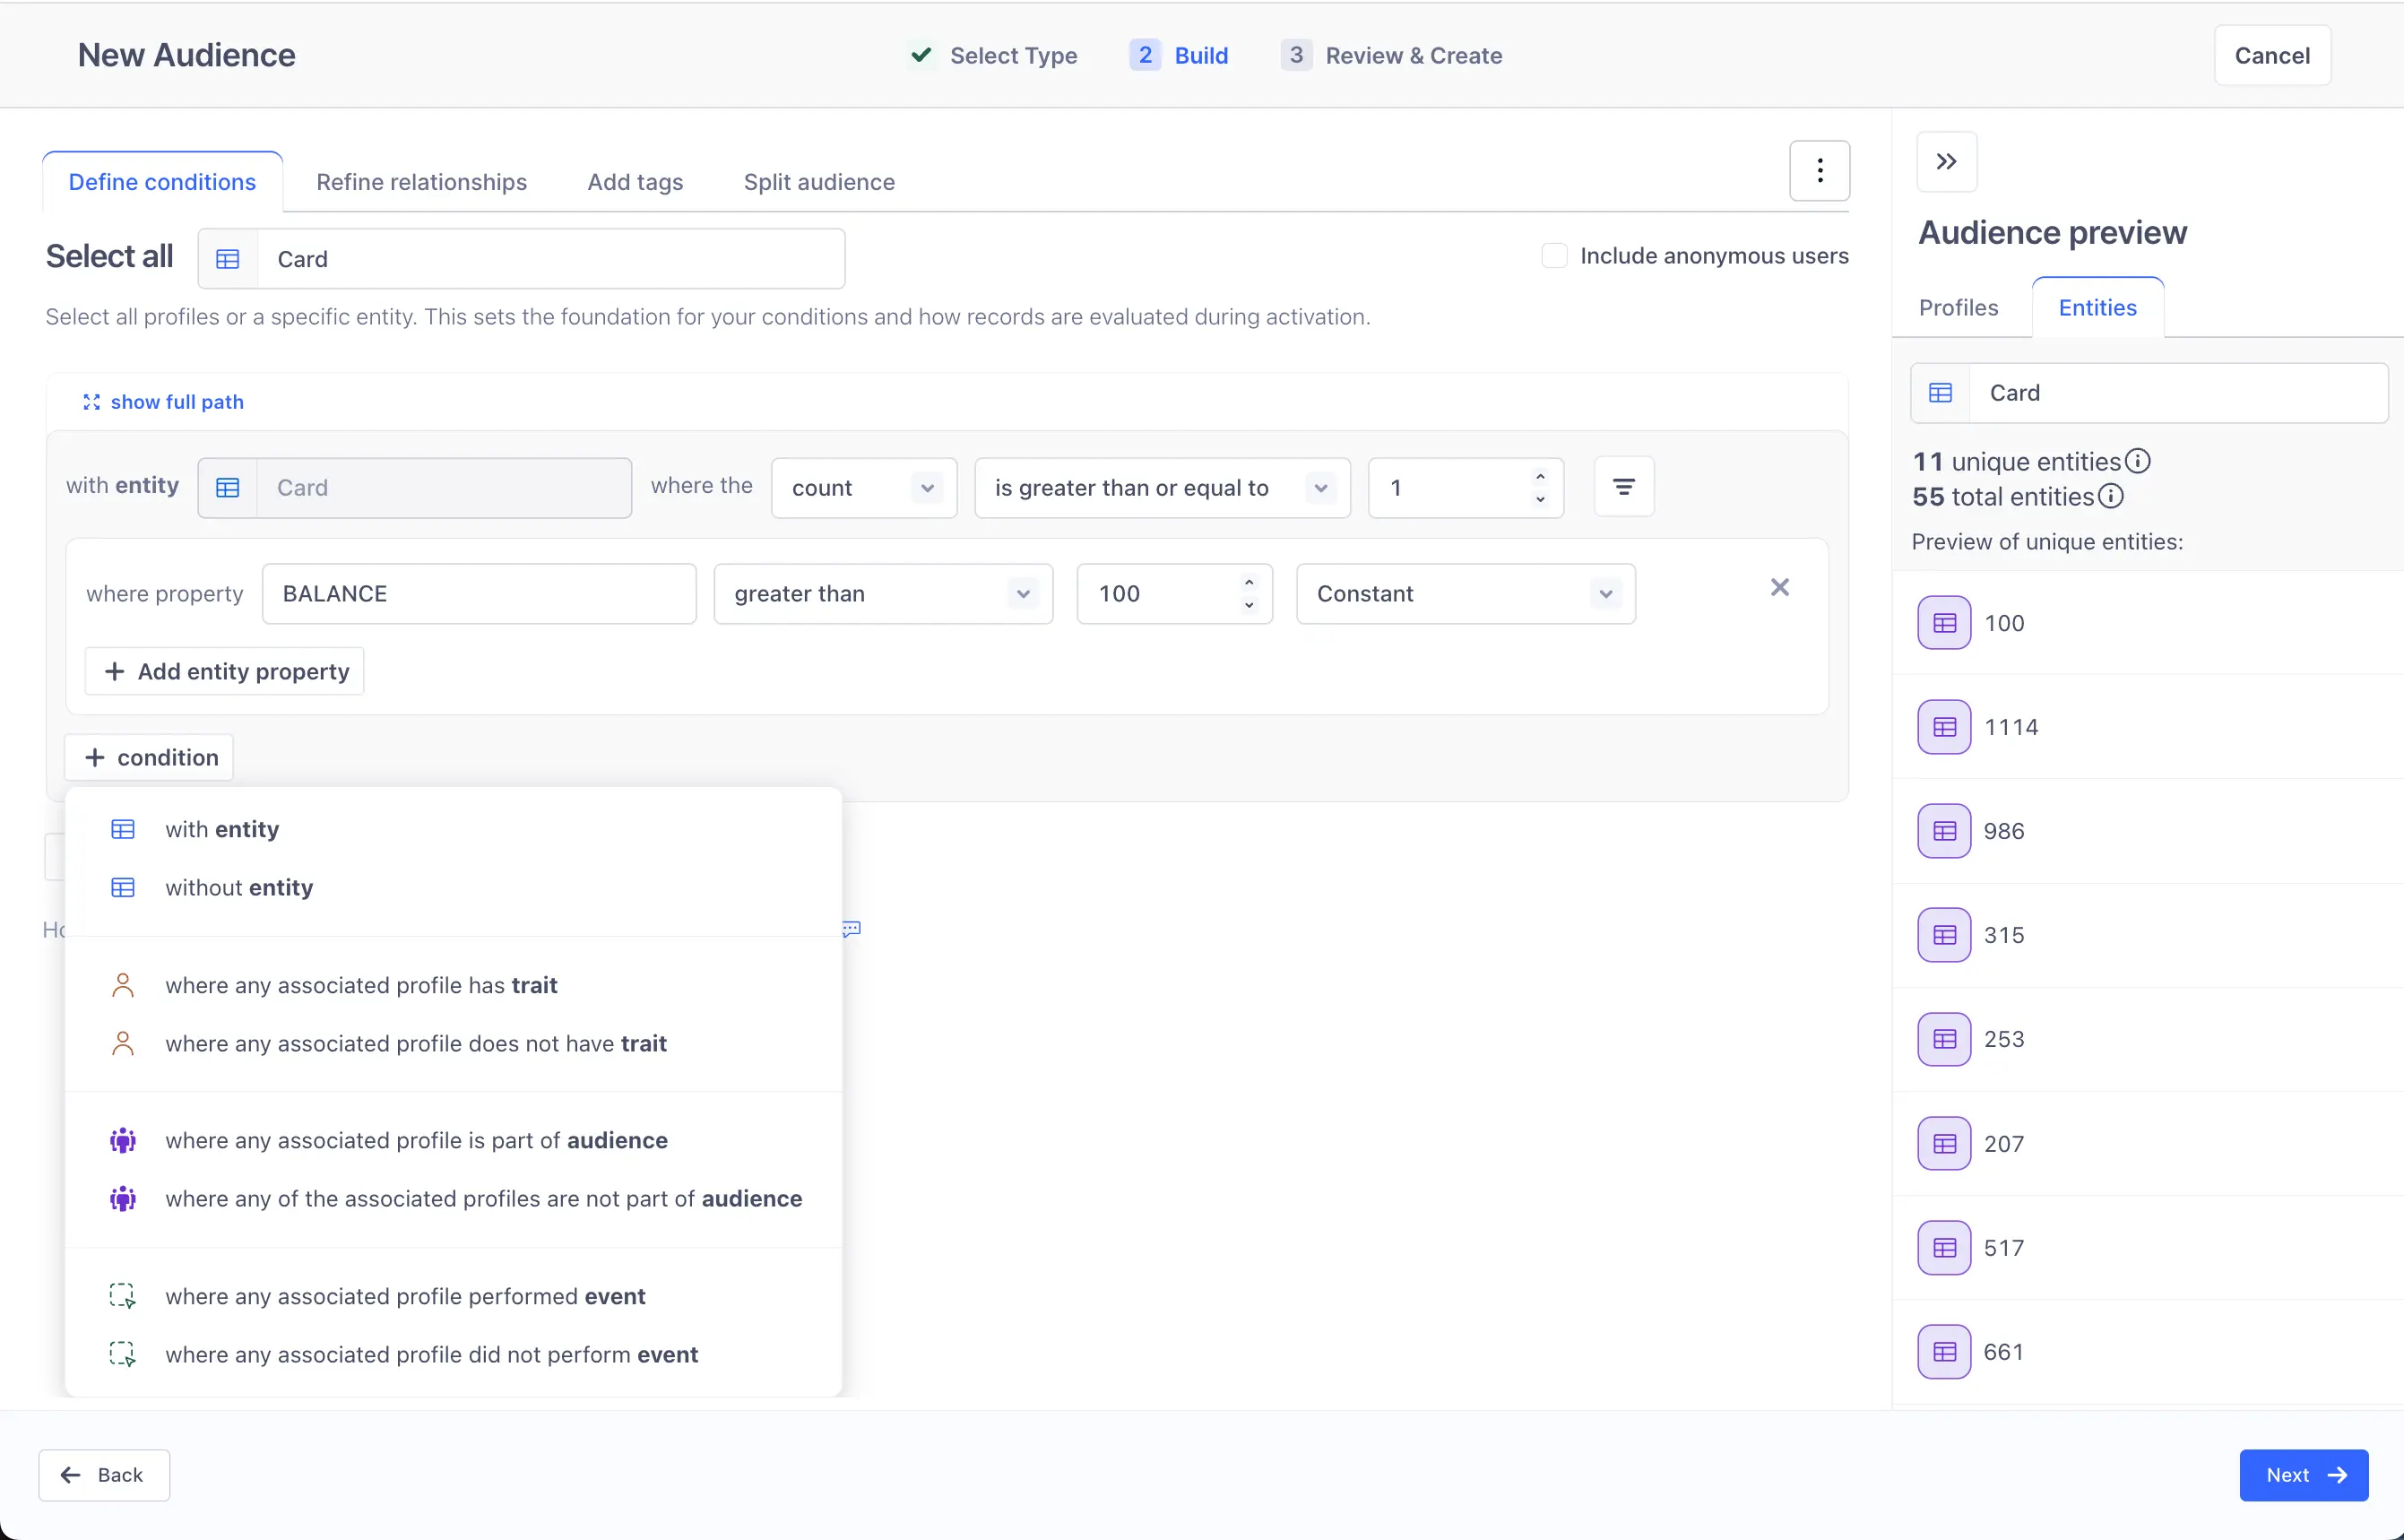
- Select the profile or target entity you want to build your audience on. Based on your targeting choice, the builder dynamically displays the respective conditions, operators, and validations.
- Select the conditions on which to build your audience.
- Click Preview to view your audience selection and see a count and list of audience members who meet the criteria. Select between the Profiles tab and the Entities tab on the audience preview side sheet. You can view a preview of the entity count and a sample list of the selected entity.
- When your audience is complete and accurate, click Next.
- Enter an audience name and description to identify this configuration. Optionally, select a folder to add this audience.
- Click Create Audience.
After creating your Linked Audience, you'll be brought to the Overview page with the Linked Audience in a disabled state.
Info
Once an audience is saved, users cannot switch the activation target from profile to an entity or vice versa. Users should delete or disable the current audience and recreate the audience with the updated activation target.
The Linked Audience builder sources profile traits and event keys from the data warehouse, as well as entities like accounts, companies, or opportunities. Profile data must sync to the data warehouse through Profiles Sync before you can reference it in the Linked Audience builder. If there is a profile trait or entity that exists in the Segment Profile that hasn't successfully synced to the data warehouse yet, it is grayed out so that you can't select it.
The Linked Audience builder also returns a subset of available entity property key values, event property and context key values, and profile trait key values that you can select in the input field drop-down. This eliminates the need to type in the exact value you want to filter on. If the value you're looking for isn't listed, you can enter it into the input field. Entered values are case-sensitive.
Segment displays:
- the first 500 unique string entity property values from the data warehouse.
- the top 65 event property and context key values.
- the top 65 profile trait key values.
Segment evaluates each condition group independently to determine which profiles match, including any associated entities that satisfy the criteria. Segment then combines the results across condition groups using the AND or OR operator you selected between them. When building a Linked Audience, you define which profiles to include using conditions and condition groups.
- A condition is a single filter applied to your audience. Conditions can be based on profile traits, events, entities, or audience membership. Entity conditions can additionally filter on the properties of a related entity. For example, "Has an account where the plan equals enterprise."
- A condition group is a set of one or more conditions combined with AND or OR operators. You can add multiple conditions to a single condition group, or create multiple condition groups and combine them with AND or OR, letting you intermix operators to define more complex targeting logic. How condition groups behave depends on your activation type:
- Profile-based activation: Each condition group supports AND or OR operators between its conditions, and you can choose AND or OR between condition groups themselves.
- Entity-based activation: The target entity must always be included within the condition group, so the AND operator is enforced between the target entity condition and any other conditions in that condition group.
- Intersection logic & supporting sibling entity conditions: Supports the ability to branch your logic across multiple sibling entities, enabling intersection logic for more precise targeting. (For example, find accounts that have BOTH an active order AND a Credit Card).
- An entity property condition group works like a standard condition group but filters on entity properties specifically. It lets you define multiple AND/OR conditions against the properties of a single related entity. For example, "Order total is greater than $100 AND order status equals completed."
The image below displays entity condition groups (left) and entity property condition groups (right).
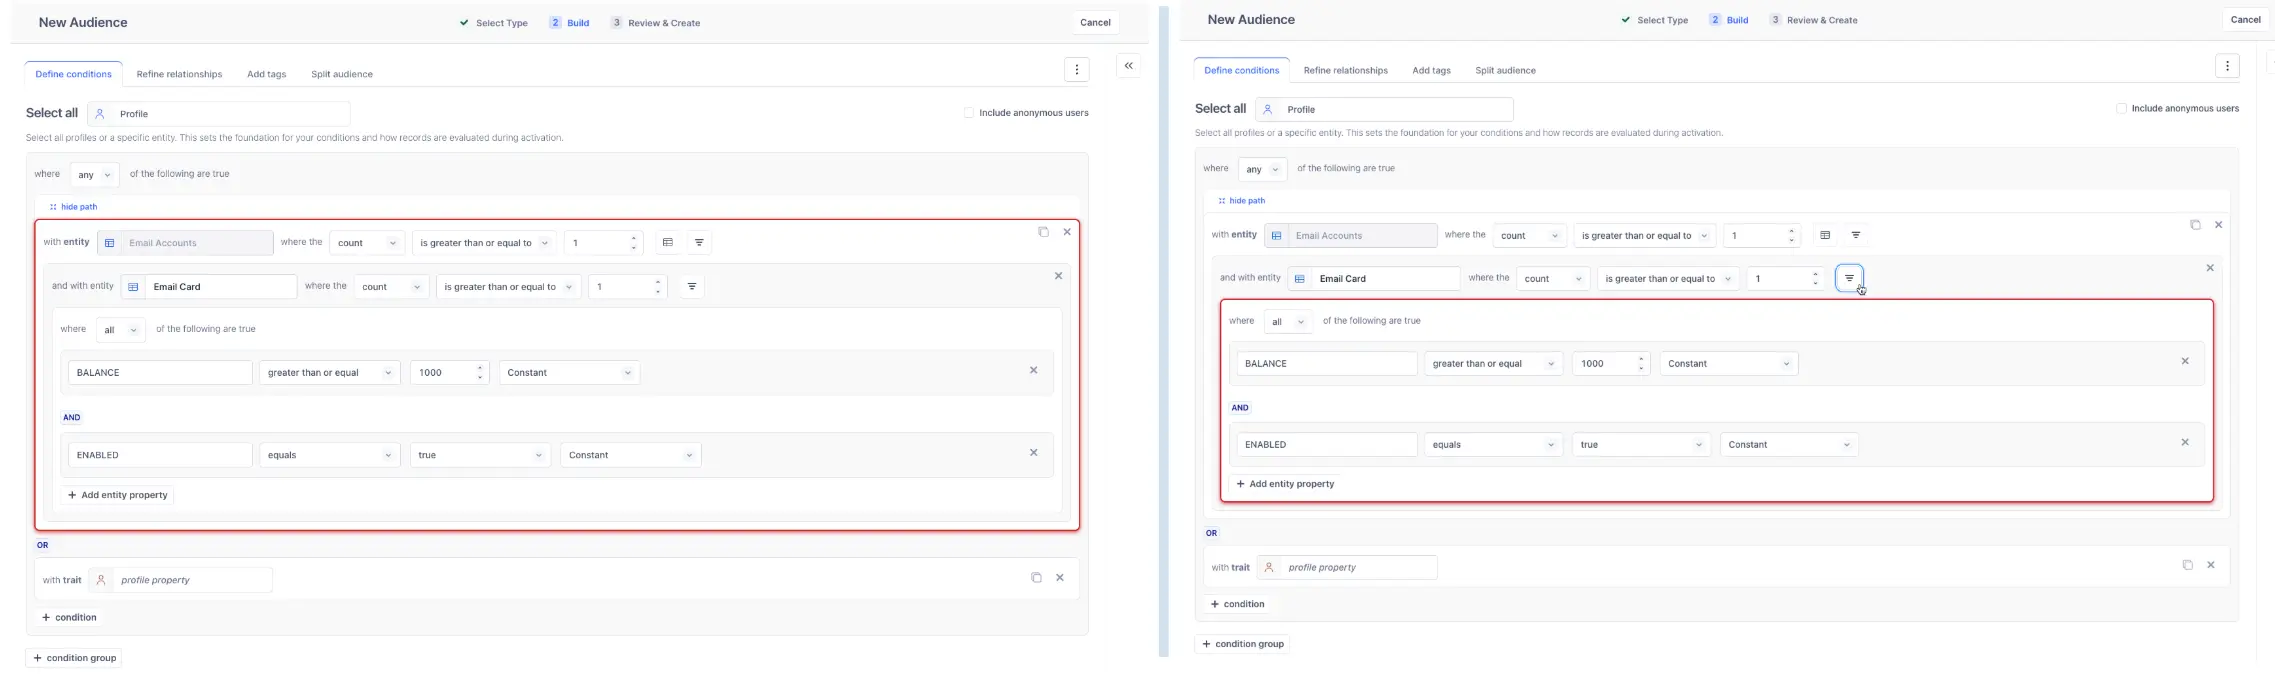
You can duplicate your conditions in the audience builder into the same condition group. You can only create nested entity conditions up to six levels in depth. For example, an entity condition that queries for relationships between Profiles, Accounts, Credit Cards, and Transactions has four levels of depth.
You can choose from the following conditions as you're building your Linked Audience:
| Conditions | Description |
|---|---|
| With entity | Creates a condition that filters profiles or the target entity associated with entity relationships defined in the Data Graph. With this condition, you can navigate the full nested entity relationships, and filter your audience on entity column values. Each subsequent entity you select in an entity branch acts as a filter over the profiles that are available at the next depth of that specific branch. |
| Without entity | Creates a condition that filters profiles or target entities that are not associated with entity relationships defined in the Data Graph. With this condition, you can navigate the full nested entity relationships, and filter your audience on entity column values. Each subsequent entity you select in an entity branch acts as a filter over the profiles that are available at the next depth of that specific branch. |
| With trait | Creates a condition that filters profiles or the target entity with a specific trait. |
| Without trait | Creates a condition that filters profiles or the target entity without a specific trait. |
| Part of audience | Creates a condition that filters profiles that are part of an existing audience. |
| Not part of audience | Creates a condition that filters profiles that aren't part of an existing audience. |
| With event | Creates a condition that filters profiles or the target entity that have a specific event in their event history. You can also filter on event property values. |
| Without event | Creates a condition that filters profiles or the target entity that do not have a specific event in their event history. You can also filter on event property values. |
Info
Linked Audiences supports filtering on nested properties within profile traits but not events or entities.
Entity and event conditions support the following filtering options:
- At least: 1 or greater
- Exactly: 0 or greater
- At most: 0 or greater
When filtering by 0, you can't additionally filter on entity properties or nested entities.
When building an audience based on audience membership, you can use existing audiences as criteria for creating new audiences. You can include or exclude profiles based on their membership in other audiences, allowing you to generate more specific audience segments. Select the gear icon to configure the behavior of the referenced audience. You can choose from:
- (Recommended) Import audience conditions: This copies the conditions from the referenced audience and generates a combined SQL query. The audience runs independently, even if you disable the original audience or update it later. Use this option when you need the freshest compute result, since this eliminates the Profile Sync delay (about 1 hour).
- Use audience membership traits: This references the original audience membership traits, so it may take extra time to update if that audience needs to recompute. Use this option if the base audience membership doesn't need to be recomputed every time, in order to save on compute costs.
The Part of Audience configuration can be updated if desired and will be reflected in the next audience run. Note that Part of Audience does not support filtering upon entity filters, where the Part of Audience condition filters the target entity based on its existence in a reference audience.
To see which audiences reference a particular audience in their definitions, select the Consumers tab when viewing a classic or linked audience. This tab lists all dependent audiences to help you understand and manage relationships between your audience segments.
When building entity conditions, you can filter profiles and entities based on aggregated values across related entities using aggregation filters. This allows you to target audiences based on metrics like total spend, average usage, or maximum transaction value without pre-computing these values in your warehouse.
These are the available aggregation types:
- Count (default): Filter based on the number of related entities
- Sum: Filter based on the total of a numeric entity property
- Average: Filter based on the mean of a numeric entity property
- Minimum: Filter based on the lowest value of a numeric entity property
- Maximum: Filter based on the highest value of a numeric entity property
For example, you can filter based on:
- Profiles with total transaction value over $1,000 in the last 90 days
- Brokers who sold over $5M in the last 12 months
- Users with wishlist items totaling over $300
Event conditions
When filtering on event properties, you can dynamically reference the value of another profile trait, or enter a constant value. These operators support dynamic references: equals, not equals, less than, greater than, less than or equal, greater than or equal, contains, does not contain, starts with, ends with.
Entity conditions
When filtering on entity properties, you can dynamically reference the value of another entity column (from the same entity branch at the same level or above it), profile trait, or enter a constant value. You can only dynamically reference properties of the same data type. Dynamic references are supported for specific operators depending on the data type, as in the following table:
| Data type | Supported operators |
|---|---|
| NUMBER | equals, not equals, less than, greater than, less than or equal, greater than or equal |
| STRING | equals, not equals, contains, does not contain, starts with, ends with |
| DATE | equals, not equals, less than, greater than, less than or equal, greater than or equal |
| TIME | equals, not equals, less than, greater than, less than or equal, greater than or equal |
| TIMESTAMP | equals, not equals, less than, greater than, less than or equal, greater than or equal |
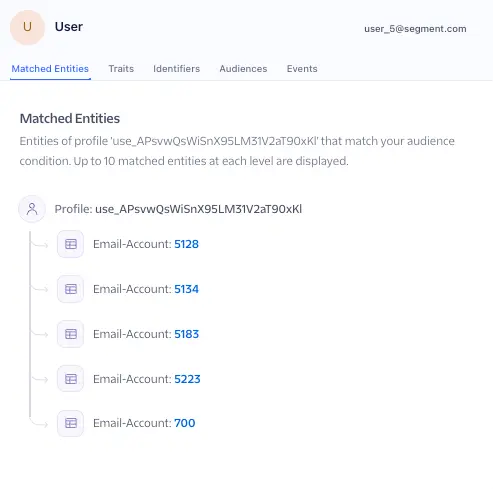
If your audience definition includes entity conditions, the audience preview includes a Matched Entities tab that shows which entities qualified a profile for the audience.
Click on a profile in the audience preview to see its matched entities, including entity relationships, and the entity column values used as filtering criteria. If you're previewing on an entity, Segment also displays the entity relationships and column values used in your filtering criteria. Segment includes the entity ID by default.
The returned data is truncated to ten entities per level, up to six levels of depth. To opt out of this feature, contact Segment Support.
Configure your Linked Audience with advanced capabilities such as:
Rank and refine is in public beta
Rank and refine is in public beta, and Segment is actively working on this feature. Some functionality may change before it becomes generally available.
Rank and refine lets you narrow down and prioritize the related entities returned for each profile based on rank, sort, and reduce criteria. This enables you to control which entity relationships are activated to your downstream destinations.
To refine relationships:
- Go to the Refine relationships tab in the Linked Audience builder after defining your audience conditions.
- Select an entity to refine against the profile. You can select the lowest level entity from any entity branch configured in your audience conditions.
Rank allows you to prioritize which entity relationships are returned per profile based on specific entity property values.
To configure rank criteria:
- Select an entity property from the chosen entity or any ancestor entity up to the profile level.
- Define up to 20 entity properties conditions by using the equals or not equals operators.
Entity relationships matching higher-ranked conditions are prioritized in the results. The audience preview reflects your configured rank criteria.
Sort allows you to order the entity relationships returned per profile in ascending or descending order. If you don't configure sort criteria, results are sorted by the entity ID by default.
To configure sort criteria:
- Select up to 5 entity properties to sort.
- Choose ascending or descending order for each property.
The audience preview reflects your configured sort criteria.
Reduce allows you to limit the number of entity relationships returned per profile. This is useful when you only want to activate on a specific number of entity relationships per profile, such as the top 3 transactions or most recent 5 purchases.
Example use cases:
- Activate only the 3 highest-value transactions per customer.
- Send promotions for the top-ranked wishlist items per profile.
To create splits:
- Go to the Split audience tab in the Linked Audience builder.
- Ensure at least 1 audience condition is defined.
- Add between 2 and 5 splits and define these values:
- Split name: A unique descriptive name.
- Split percentage: The portion of the audience to assign to this split. Percentages must total 100%.
- Configure split-specific tag values for each split:
- All tags from the Add tags tab appear for each split with default values. Override any tag value to customize the event payload for that split. Overridden values are specific to the split and don't affect other splits.
Based on the percentages you define, profiles randomly assign to each split. Profiles remain in the same split across runs as long as they continue to qualify for the audience and the split configuration remains the same. If the percentage distribution or the number of splits change, profiles may qualify for different splits. Profiles re-entering the audience after exiting retain their original split assignment (assuming that the split configuration remains the same).
To modify split names, percentages, or add and remove splits, go to the Split audience tab. Keep in mind that split percentage changes may reassign profiles to different splits. Modifying split percentages or the number of splits may reassign profiles to different splits. Segment recommends triggering a full resync to ensure downstream consistency after making changes.
To monitor splits, you can view the split distribution on the Runs tab. This tab shows cumulative audience counts and individual split counts. Click the past runs to view granular data, including profiles who entered or exited each split.
After you build your Linked Audience, you can send events to your chosen destinations and use them for personalizing your customer communications.
To activate your Linked Audience:
See the step-by-step video on activating Linked Audiences:
Destinations are the business tools or apps that Segment forwards your data to. Adding an activation to your Linked Audience allows you to act on your data and learn more about your customers in real time. To fully take advantage of Linked Audiences, you must connect and configure at least one destination by creating an activation.
Write to BigQuery, Databricks, Redshift, and Snowflake
To write to your data warehouse, connect your warehouse to your Engage space. Once you've connected your data warehouse, add a warehouse Activation from your audience to write enter/exit events to selected schema and table. See the warehouse destination's documentation (BigQuery, Databricks, Redshift, and Snowflake) for connection steps.
Make sure you've enabled your data warehouse destination in Segment before proceeding with the following steps.
- Go to Engage > Audiences.
- Select the Linked Audience you set up in the previous step.
- Select Add activation.
- Select a destination from the catalog.
- Click Next to proceed with next steps.
The Destination Actions framework lets you see and control how Segment sends the event data it receives from your sources to actions-based destinations. Each Action in a destination lists the event data it requires and the event data that's optional. Segment displays available Actions based on the destination you've connected to your Linked Audience. You can see details of each option and how to use it in the Actions Destinations Catalog documentation.
Linked Audiences lets you to write back audience events to Snowflake, Databricks, BigQuery, and Redshift warehouses.
Select the Destination Action to call when the event happens, then click Next.
Configure how and when Segment produces events with each audience run. Select the entities referenced in the audience builder to act as a trigger for your events.
| Trigger | Event type | Definition | Examples |
|---|---|---|---|
| Profile enters audience | Track | Send an event when a profile matches the audience condition. | Send a congratulatory email when a traveler qualifies for premium status with a mileage program. Send a discount to all customers with a particular product on their wishlist. |
| Profile exits audience | Track | Send an event when a profile no longer matches the audience condition. | Send an email to credit card owners to confirm that their credit cards have been paid in full. Send a confirmation to a patient when they have completed all their pre-screening forms. |
| Entity enters audience | Track | Send an event when an entity condition associated with a profile matches the audience condition. | Send a reminder to a customer when a credit card associated with their profile has an outstanding balance. Notify a traveler when a flight associated with their profile is delayed. Notify a customer when a product associated with their profile's wishlist is back in stock. |
| Entity exits audience | Track | Send an event when an entity condition associated with a profile no longer matches the audience condition. | Send a confirmation to a customer when a credit card associated with their profile has been paid off. Send a confirmation to the primary doctor when each of their associated patients completes their annual check up. |
| Profile enters or exits audience | Identify | Send an event when a profile's audience membership changes. | Update a user profile in a destination with the most recent audience membership. |
| Profile enters or exits audience or entity values changed (only for data freshness for Identify events) | Identify | Send an event when a profile's audience membership changes or when enrichment values for entity properties change between runs. | Keep a user profile in a destination up to date with the latest audience membership and entity context data. |
When you configure an activation with the Profile enters or exits audience or entity values changed trigger, Linked Audiences detects changes to entity context data between audience runs and emits an Identify event for profiles whose warehouse values have changed since the last run, even if the profile's audience membership itself hasn't changed. This is useful for long-running journeys or campaigns where you need downstream context data to stay up-to-date in your destination. For example:
- Send a series of "past due" reminder emails that include the current overdue amount, updated each time the warehouse reflects a new balance.
- Send "course completion reminder" emails that include the learner's latest progress, so messaging stays relevant as they advance through a journey in your destination.
- Send abandoned cart emails with an up-to-date list of products and prices reflecting the customer's current cart state.
Supported destinations
Data freshness for Identify events only supports Braze, Customer.io, and AWS S3 destinations. Destinations that don't support data freshness continue to show the original Profile enters or exits audience trigger.
After you select the action and trigger, you can review your configuration and then create the activation by selecting Save. Creating the activation moves you to the activation overview page, where you can configure destination settings (if applicable), identifier strategy, enrichment settings, and mappings.
Some destinations may require configuration of additional destination settings, such as Advertiser ID. Please configure these settings before in order to enable your activation.
Choose how Segment should send the identifiers to your destination. The settings will impact all activations that use this destination for this audience.
Select additional traits and properties to include when the event is sent.
Click Copy to use in Braze Cloud Mode (Actions) to copy the personalization syntax for the selected traits and properties to use in your destination messaging templates.
Info
This feature is in beta for customers using Braze. Some functionality may change before it becomes generally available. This feature is governed by Segment's First Access and Beta Preview Terms.
As you're enriching your events in Linked Audiences, you should view a preview of the event payload schema based on the properties you select. It might look like the following:
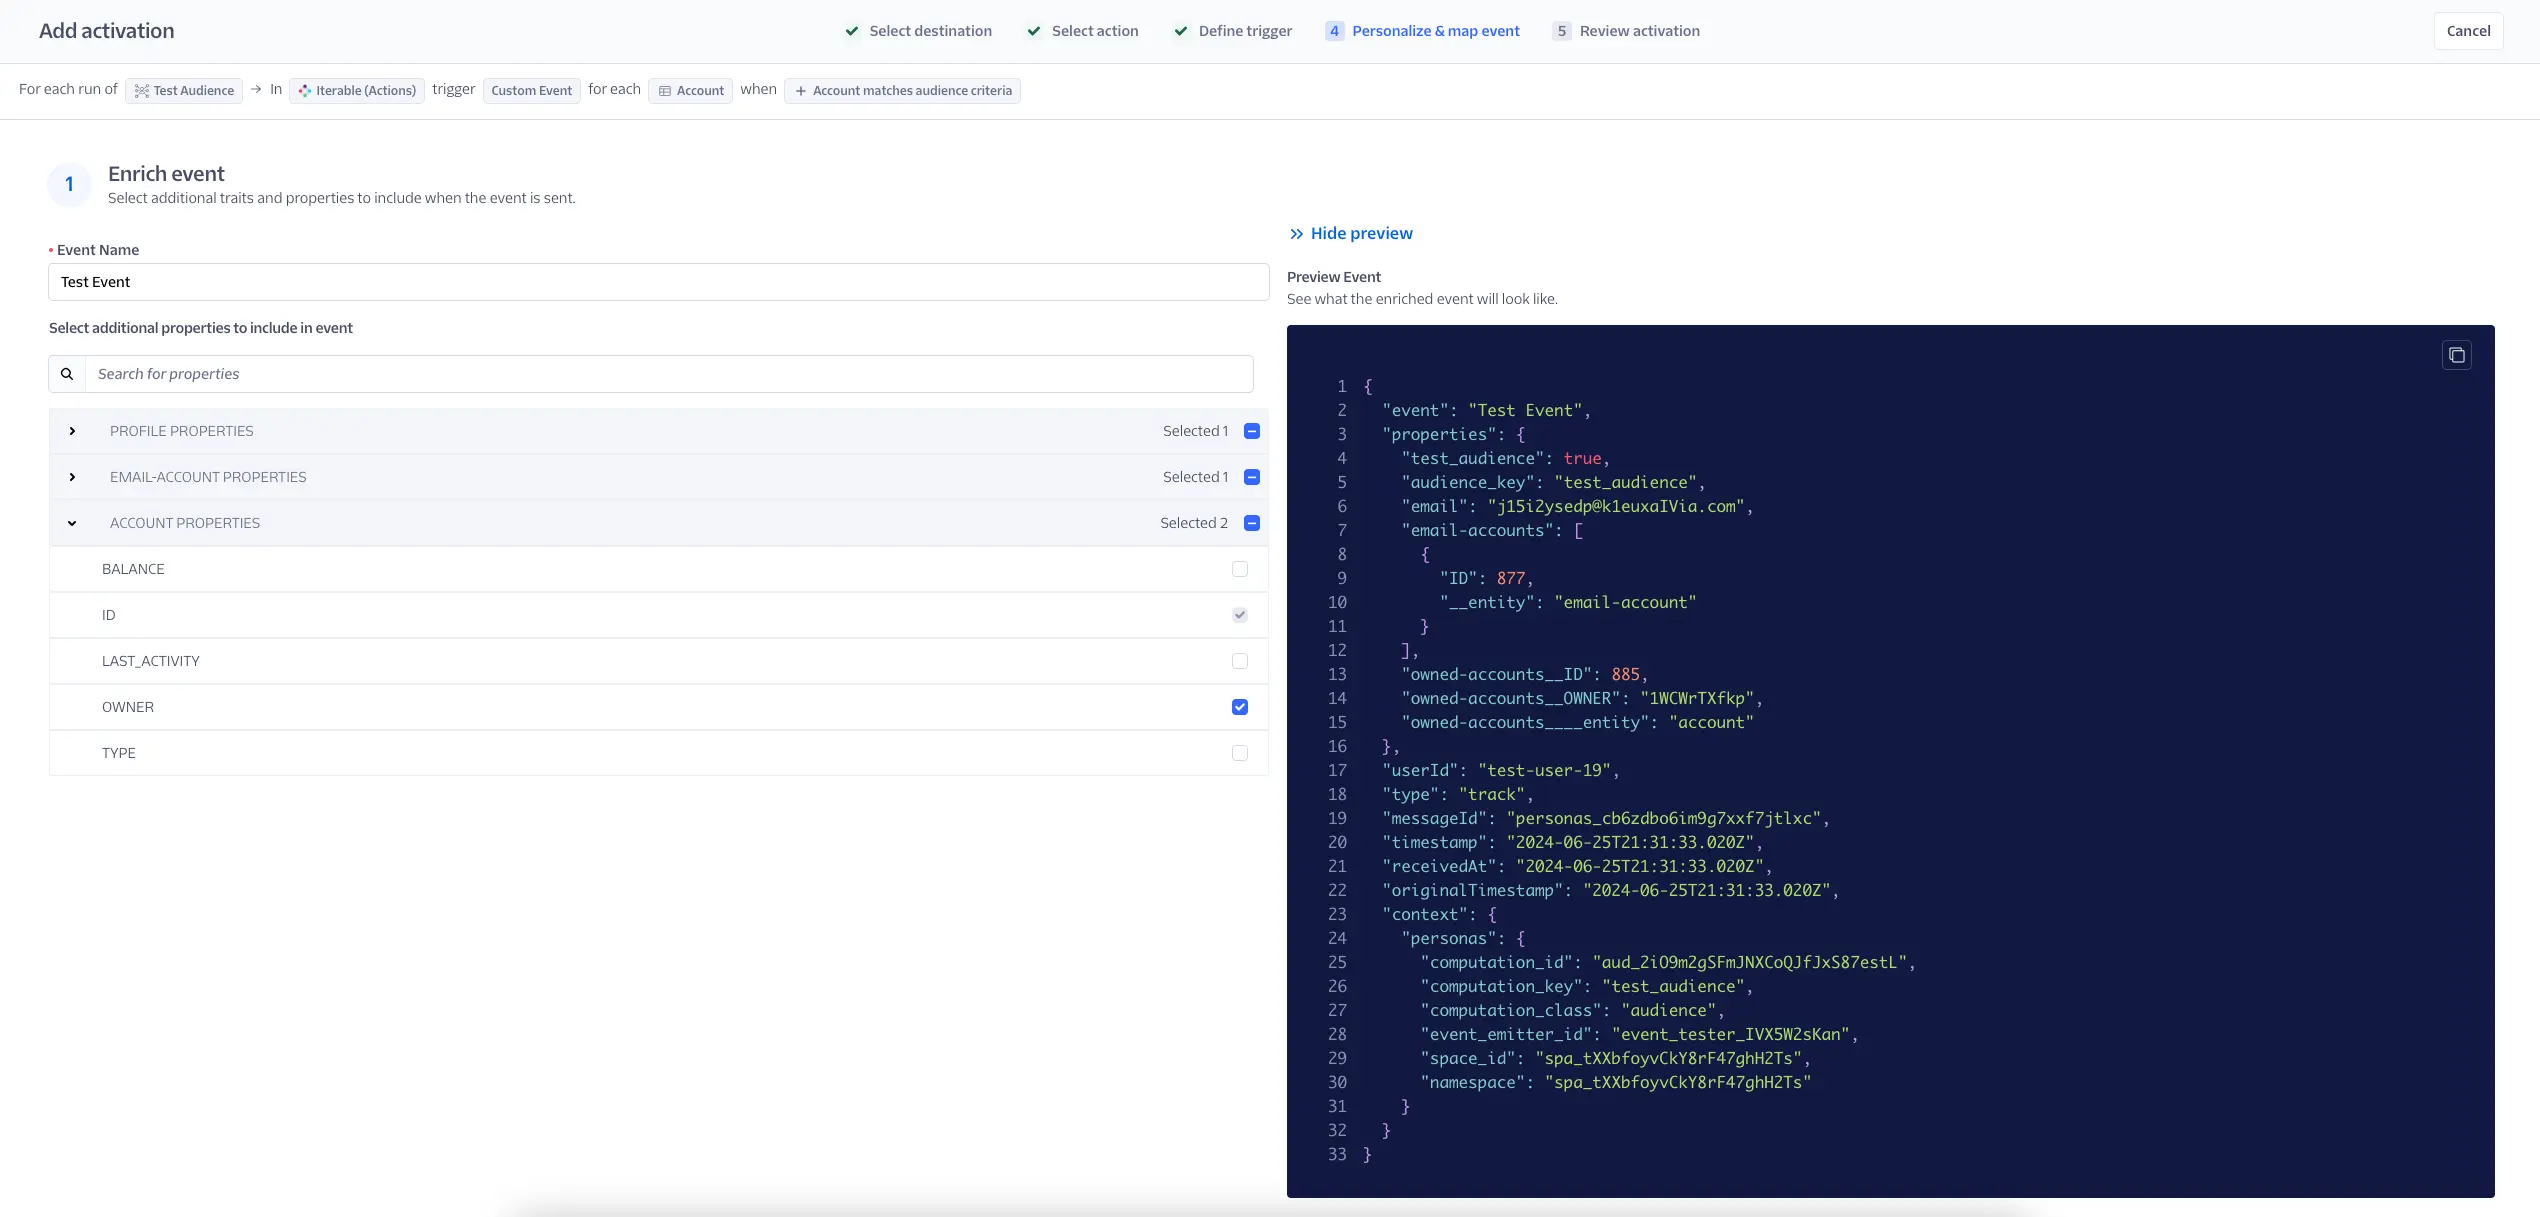
Segment attempts to automatically configure the data fields that will be sent to the destination. These fields are pre-filled with properties configured by default. Only required fields are displayed. All optional & pre-filled fields are hidden, though you can view hidden fields by clicking Show hidden fields. You can review and adjust these settings before enabling this event.
For Snowflake writebacks, Linked Audiences sends Track events and stores the full event payload in a single stringified JSON column in the target table.
Send a test event to ensure that everything is connected properly and your destination receives the event.
Enter the destination User ID for the profile you want to use to test the event, then click Send test event to destination.
The Event content dropdown shows you a preview of what the data sent to your destination might look like.
After turning on your activation, you'll be redirected to the Audience Overview page, where you can view the audience you created. Segment automatically creates your audience in a disabled state so that it doesn't start running until you're ready. A run is when Segment runs the audience conditions on your data warehouse and sends events downstream. Segment automatically triggers a run when you enable your audience. The next run time will be dictated by your configured run schedule.
To enable your audience, select the Enabled toggle, then select Enable audience.
You can trigger a run for your audience if you want to send events to your destination without waiting for the next scheduled run. To do so, select Run Now. This triggers a run for the audience and sends events downstream.
Use the Audience Overview page to view the audience profile count, current run schedule, run status, and upcoming run time.
Determine when an audience should run and send data to enabled destinations with a run schedule:
- Manual: Trigger audience runs manually by clicking Run Now on the Audience Overview page.
- Interval: Trigger audience runs based on a predefined set of time intervals. Supported intervals are: 15 minutes, 30 minutes, 1 hour, 2 hours, 4 hours, 6 hours, 8 hours, 12 hours, 1 day. If you select this option, Segment will run your audience after you enable the audience.
- Day and time: Trigger audience runs at specific times on selected days of the week. If you select this option, Segment will run your audience at the first selected date and time.
You can maintain your run schedule at any time from the audience's Settings tab.
Run schedule timing
Interval run schedules are based on UTC time using a cron-style system. This means the next run time aligns with the nearest UTC interval, which may differ from your local time. For example, if you set a 24-hour interval at 4 PM PST, the next run aligns with 12 AM UTC, which occurs at 5 PM PST. If you set it after 5 PM PST, the next run occurs the following day at 5 PM PST.
You can also click Run Now on the Audience Overview page at any time (even if the run schedule is Interval Overview Day and time) to manually trigger a run on your warehouse and send data to enabled destinations.
There may be up to a five-minute delay from the configured start time for audiences that use the Interval or Day and time run schedules. For example, if you configured an audience with the Day and time compute schedule to run on Mondays at 8am, it can compute as late as Monday at 8:05am. This is to help us better manage our system load.
Execution timing
Linked Audiences don't schedule the next run until the current one finishes. For example, if you set a 15-minute interval but the workflow takes an hour to complete, the next run won't start until that hour-long run ends. After it finishes, Segment calculates the next run time based on the next available interval.
With your Linked Audience activated, follow these steps to monitor your activation:
- From the Audience Overview page, select one of your connected activations.
- In the actions menu, select View delivery overview in Connections, which then opens the Linked Audiences Delivery Overview.
In addition to the standard Audience observability provided by Delivery Overview, Linked Audiences can filter Delivery Overview's pipeline view by Linked Audience events.
To filter by events:
- From your Segment workspace's home page, navigate to Engage > Audiences.
- Find an Audience, click the (...) menu, and select Delivery Overview.
- On the Delivery Overview page, select the Linked audience event dropdown to filter by a specific event.
Linked Audiences have the following steps in Delivery Overview's pipeline view:
- Events from audience: Events that Segment created for your activation. The number of events for each compute depends on the changes detected in your audience membership.
- Filtered at source: Events discarded by Protocols: either by the schema settings or Tracking Plans.
- Filtered at destination: If any events aren't eligible to be sent (for example, due to destination filters, insert function logic, and so on), Segment displays them at this step.
- Events pending retry: A step that reveals the number of events that are awaiting retry. Unlike the other steps, you cannot click into this step to view the breakdown table.
- Failed delivery: Events that Segment attempted to deliver to your destination, but that ultimately failed to be delivered. Failed delivery might indicate an issue with the destination, like invalid credentials, rate limits, or other error statuses received during delivery.
- Successful delivery: Events that Segment successfully delivered to your destination. You'll see these events in your downstream integrations.
You can create alerts related to the performance and throughput of Linked Audience syncs and receive in-app, email, and Slack notifications when event volume fluctuations occur.
Slack and mailing list notification channels require additional setup
Before sending an alert to Slack, you must first create a Slack webhook. For more information about Slack webhooks, see Slack's Sending messages using incoming webhooks documentation.
While you can only enter one email address per alert when signing up for email alerts, you can send the alert to multiple users by entering the email address of a mailing list. To create a mailing list, refer to the documentation for your email provider, like Google's Create a group & choose group settings for Gmail or Microsoft's Create and manage distribution groups for Outlook.
To access Linked Audience alerting, navigate to Engage > Audiences, select a Linked Audience, and click the Alerts tab.
On the Alerts tab, you can create new alerts and view all active alerts for this connection. You can only edit or delete the alerts that you create, unless you have the Workspace Owner role.
You can create an Activation event health spikes or drops alert that notifies you when events sent from your audience to a downstream destination have failures to a destination above a certain threshold. For example, if you set a change percentage of 4% and your destination received 100 events from your audience over the first 24 hours, Segment would notify you the following day if your destination ingested fewer than 96 or more than 104 events.
To create an Activation event health spikes or drops alert:
- From your Segment workspace's home page, navigate to Engage > Audiences.
- Select the Audience you want to create an alert for, select the Alerts tab, and click Create alert.
- On the Create alert side sheet, select the Activation event health spikes or drops alert and pick a destination for which you'd like to monitor event health.
- Enter a percentage threshold to trigger activation event health notifications.
- Select one or more of the following alert channels:
- Email: Select this to receive notifications at the provided email address.
- Slack: Select this to send alerts to one or more channels in your workspace. You can post messages to your channel with either a webhook or a workflow.
- In-app: Select this to receive notifications in the Segment app. To view your notifications, select the bell next to your user icon in the Segment app.
- Click Save.
You can create an Audience size change alert that notifies you when your audience increases or decreases by a certain threshold. For example, if you set a change percentage of 4% and your destination had 100 members over the first 24 hours, Segment would notify you the following day if your audience had fewer than 96 or more than 104 members.
Audience size change alerts are currently in Public Beta
Audience size change alerts are in public beta, and Segment is actively working on this feature. Some functionality may change before it becomes generally available.
To create an Audience size change alert:
- From your Segment workspace's home page, navigate to Engage > Audiences.
- Select the Linked Audience you want to create an alert for, select the Alerts tab, and click Create alert.
- On the Create alert side sheet, select the Audience size change alert and pick a destination for which you'd like to monitor event health.
- Enter a percentage threshold to trigger audience size change notifications.
- Select one or more of the following alert channels:
- Email: Select this to receive notifications at the provided email address.
- Slack: Select this to send alerts to one or more channels in your workspace. You can post messages to your channel with either a webhook or a workflow.
- In-app: Select this to receive notifications in the Segment app. To view your notifications, select the bell next to your user icon in the Segment app.
- Click Save.
You can maintain your Linked Audience by accessing these tabs on the main page of your Linked Audience:
| Tab name | Information |
|---|---|
| Overview | On this tab you can: * View relevant audience information, such as Profiles in audience count, run schedule, latest run, and next run. * Enable or disable, manually run, clone and delete audiences. - Note that cloning a linked audience creates a new linked audience in the builder create flow with the same conditions as the linked audience that it was cloned from. * View the list of profiles in the audience with the Audience Explorer. * View connected destinations and configured activation events. |
| Builder | On this tab you can: * View or edit your linked audience conditions. - Note that if you edit an audience with configured activation events, you should disable or delete impacted events for your audience to successfully compute. Events are impacted if they reference entities that are edited or removed from the audience definition. |
| Runs | On this tab you can: * View information about the last 50 audience runs, such as start time, run duration, run result, and change summary. You can also view granular run stats to help you understand the duration of each step in the run such as: - Queueing run: The time spent in the queue waiting for other runs to finish before this one begins. - Extracting from warehouse: The duration of the audience query and data transfer from the source warehouse. - Preparing to deliver events: The time taken to process and ready events for delivery to connected destinations. * If there are no changes associated with a run, there will be no values shown for the granular run stats. |
| Settings | On this tab you can view or edit the linked audience name, description, and run schedule. |
Connect your destination function to a Linked Audience to have more flexibility in what data sends to your Linked Audience.
To set up a destination function with a Linked Audience:
- Go to Connections > Catalog and select the Functions tab.
- Click + New Function.
- Configure and create your function.
- Connect your function to a destination. Select the Engage space your Linked Audience lives inside.
- Select the data source and configure settings for your function.
- Enable the destination function by switching the toggle on.
- Go to Engage > Audiences and select the audience you want to connect the destination function to.
- Click + Add activation.
- Select the destination function you want to connect to.
- Configure the actions and triggers to send to your Linked Audience.