Salesforce Unify Direct Integration Guide
This guide outlines the process for setting up Salesforce as a data source with Segment Profiles.
Once configured, this integration lets you send Salesforce data directly to Segment Profiles, eliminating the need for a data warehouse and enabling faster data synchronization and profile enrichment.
API usage and billing
The Salesforce Unify direct profile integration increases API usage. Verify your API limits and Segment billing before you enable the Salesforce Unify direct profile integration.
Before you begin, make sure that you have the following:
- A Segment workspace with Unify enabled and Identity Resolution set up.
- Administrator access to your Salesforce account.
Follow the steps in this section to set up the Salesforce Unify Direct Integration.
Start by setting up Salesforce as a source:
- From your Segment workspace, go to Connections > Catalog > Cloud App Objects.
- Select Salesforce as your source.
- Name your Salesforce source and authenticate with your Salesforce credentials.
- Once connected, use Selective Sync to choose the Salesforce collections and columns you want to sync.
After successful authentication, Segment adds the source but it isn't immediately enabled by default.
Don't enable the source before configuring a Profiles destination
After adding Salesforce as a source, don't enable it yet. You must first set up the Segment Profiles destination and configure the mapping. Enabling the source before completing these steps might result in incomplete or incorrect data syncing.
Next, add a Segment Profiles destination:
- From the Overview tab of your Salesforce source, click Add destination.
- From the catalog destination page, click Segment Profiles, then click Add destination.
- Name your destination, then click Create.
- In the Salesforce source you created, go to the Models tab and click Create Model.
- Select the fields you want to map to the Segment Profiles destination.
- Preview and validate the schema with real-time Salesforce data.
- Name your model and save it.
- In the Salesforce source, go to Models > Add mapping.
- Segment returns you to the Segment Profiles destination. Click Add mapping.
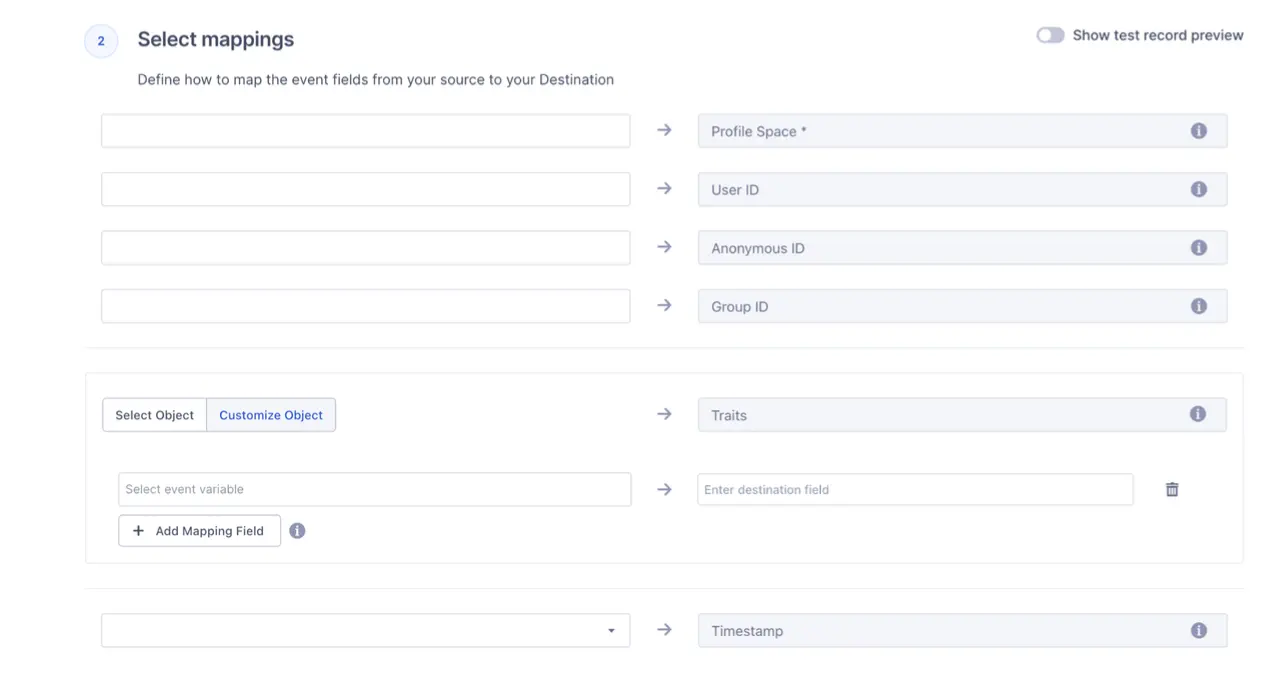
- Select your data model and map your selected Salesforce data to fields in Segment Profiles (typically "Identify" for profile updates).
- Select the Profile space you want to update.
- Map Salesforce fields to Segment Profile fields. You must map either a User ID or Anonymous ID field.
- Test your mapping with real data from Salesforce.
- Save your mapping configuration.
Finish by enabling the destination mappings and the source:
- From the settings tab of the Segment Profiles destination, toggle the Enable destination switch to Enabled, then click Save.
- From the overview tab of the same Segment Profiles destination, toggle the Mapping Status switch to Enabled.
- Return to your Salesforce source and navigate to Settings > Basic settings.
- Toggle Enable source on.
Data now begins to sync between Salesforce and Segment.
After you've connected Salesforce and the Segment Profiles destination, the integration begins syncing data.
- New or updated records in Salesforce are sent to Segment Profiles based on your mapping configuration.
- The initial sync includes historical data within the range specified in your Selective Sync settings.
- Further syncs take place at regular intervals (typically hourly).
Keep the following in mind as you work with the Salesforce Unify direct integration:
- Start with a subset of data to test your integration before expanding to all Salesforce objects.
- Regularly review your mapping to ensure it reflects any changes in your Salesforce schema or Segment Profile needs.
- Monitor both your Salesforce source and Segment Profiles destination for errors and data discrepancies.
The Salesforce Unify direct integration supports mapping from a single Salesforce collection per data model. For complex use cases requiring data from multiple collections, you might need to create multiple data models and mappings.