Generate Events from Signals
This guide details how to use signals and their associated data, generated in one of the Signals SDKs with the Auto-Instrumentation dashboard in your Segment workspace. On this page, find details on:
- Creating custom rules to capture and translate signals into actionable analytics events.
- Example rules that you can use as a basis for further customization.
This guide assumes that you've already added the Signals SDK to your application. If you haven't yet, see the Auto-Instrumentation Setup guide for initial setup.
Auto-Instrumentation in public beta
Auto-Instrumentation is in public beta, and Segment is actively working on this feature. Some functionality may change before it becomes generally available.
Regional availability
Auto-Instrumentation isn't supported in EU workspaces.
After you set up the Signals SDK to capture the signals you want to target, you can create rules in your Segment workspace to translate the captured signals into traditional Segment analytics events. These rules are deployed in your application the next time a user launches your app.
The process works like this:
- The SDK sends raw signals from your app or website to Segment.
- You build event rules in your workspace that define how those signals should become analytics events.
- You publish the event rules.
After publishing, Segment analyzes user interactions in your app or website against these rules and automatically generates analytics events when matching interactions occur.
To start creating rules in the Event Builder, follow these steps:
- Ensure you have the
Workspace OwnerorSource Adminrole in Segment. If your source is connected to a tracking plan, you will also need, at a minimum, theTracking Plan Read-onlyrole. To view the content in the Event Builder tab, you will need, at a minimum, theSource Read-onlyrole. - In your Segment workspace, go to Sources and select a source.
- Open the Event Builder, then click Create Rules.
Where's the Event Builder tab?
The Event Builder tab only appears after you've enabled Auto-Instrumentation under the Analytics.js tab in the source's settings. If you don't see the tab, reach out to your Segment CSM.
The Rules Editor is where you define rules that transform raw signal data into analytics events. Using the dropdown-based editor, you can:
- Combine multiple signals into a single event (for example, a click followed by a navigation).
- Set conditions to control when events should be triggered.
- Assign custom event names.
If your source is connected to a tracking plan, you can quickly confirm that a rule's event and properties are planned. When creating or editing a rule, choose an event by typing its name or selecting from the tracking plan's events in a dropdown. Similarly, add properties by typing their names or selecting from the event's properties in a dropdown. The Planned column, shown next to each property mapping and in the Event Rules table, indicates whether the property or event is planned.
You can enrich your events by adding properties based on signal metadata. For example:
- Capture
product.pricein your Add to Cart event. - Add a boolean field like
couponAppliedto your Order Completed event.
These properties are sent alongside your event, giving your team deeper insights without requiring any manual instrumentation.
To verify that a rule is working as expected before you deploy, you don't need to enter a cycle of creating and updating the rule, generating signals, then checking the source debugger for the generated event. As you create, edit, or view a rule, you can preview it in real time against the current signal buffer to see which signals match and what the resulting event will look like. Event properties are mapped to the values found in the matched signals, and complete matches are grouped by anonymous ID.
When viewing a rule, you can revert to a previous version of its definition. If multiple versions are available, a version dropdown appears in the top-right corner of the side sheet. Select the version you want, and the rule definition updates to match it. To apply the change, scroll to the bottom of the side sheet and click Restore to this version.
Signals come in various types, each associated with specific data that you can use to create analytics events. This section contains code samples that detail each signal type. Because Segment has standardized these definitions across both the Signals-Swift and Signals-Kotlin libraries, they're useful when you create rules in your Segment workspace.
The Base Signal serves as the foundation for all other signal types. It's defined by the RawSignal<T> interface, where T represents the data type associated with the signal.
This interface ensures that every signal inherits essential properties:
1interface RawSignal<T> {2var anonymousId: String //3var type: SignalType // Specifies the signal category.4var timestamp: String // The exact time when the signal was generated.5var index: Int // An integer representing the signal's position.6var data: T // The specific data of type `T` associated with the signal.7}
The Signal Type enum defines the different types of signals the SDK can collect:
1enum SignalType {2Interaction, // User interactions like clicks or touches.3Navigation, // Navigation events.4Network, // Network requests and responses.5LocalData, // Data loaded from local or other external sources.6Instrumentation, // Events generated from Segment Track/Screen/... events.7UserDefined // Custom events defined by the user.8}
The SDK collects Interaction signals when you enable one of the UIAutoSignal options, like useSwiftUIAutoSignal: true. These signals primarily track user interactions with UI components:
1class InteractionData {2var component: String // The type of UI component interacted with, like "Button" or "Image".3var title: String? // Optional title of the component, if applicable.4var data: Object? // Additional data related to the interaction, if any.5}67class InteractionSignal extends RawSignal<InteractionData> {8type = SignalType.UIInteraction // Sets the signal type to UI Interaction.9}
The SDK collects Network signals when you enable the useNetworkAutoSignal option in your Signals Configuration, like useNetworkAutoSignal: true. These signals are generated when your application makes network requests:
1enum NetworkAction {2Request, // A network request is made.3Response // A response is received.4}56class NetworkData {7var action: NetworkAction // The type of network action, either Request or Response.8var url: String // The URL involved in the network action.9var statusCode: Int? // The HTTP status code of the response, if applicable.10var data: Object? // Additional data associated with the network action.11}1213class NetworkSignal extends RawSignal<NetworkData> {14type = SignalType.Network // Sets the signal type to Network.15}
The SDK collects Local Data Signals when data gets loaded from local soures, like SQLite databases or local caches. These signals help track how your application manages local data:
1enum LocalDataAction {2Loaded, // Data was loaded from a local source.3Updated, // Existing data was updated.4Saved, // New data was saved locally.5Deleted, // Data was deleted from a local source.6Undefined // Any other unspecified local data action.7}89class LocalData {10var action: LocalDataAction // The type of action performed on the local data.11var identifier: String // A unique identifier for the data, like "Loaded User Info".12var data: Object? // Additional details or data associated with the action.13}1415class LocalDataSignal extends RawSignal<LocalData> {16type = SignalType.LocalData // Sets the signal type to LocalData.17}
The SDK collects Instrumentation Signals when traditional Segment analytics events are invoked:
1enum EventType {2Track, //3Screen, //4Identify, //5Group, //6Alias, //7Unknown // Any other unspecified event type.8}910class InstrumentationData {11type: EventType // The type of Segment event.12rawEvent: Object? // Additional details of the event.13}1415class InstrumentationSignal extends RawSignal<InstrumentationData> {16type = SignalType.Instrumentation // Sets the signal type to Instrumentation.17}
You can also define your own signals. Use the following example as an implementation guideline:
1interface MyCustomData {2var event: String // A custom event description or identifier.3}45class MyCustomSignal extends RawSignal<MyCustomData> {6type = SignalType.UserDefined // Sets the signal type to User Defined.7}
You can use Signals to create tracking rules using the event builder.
The following example tracks all Screen events:
1function screenCall(currentSignal) {2if (currentSignal.type == SignalType.Navigation && currentSignal.data.action == NavigationAction.Entering) {3analytics.screen(currentSignal.data.screen, null, null)4}5}67function processSignal(signal) {8screenCall(signal)9}
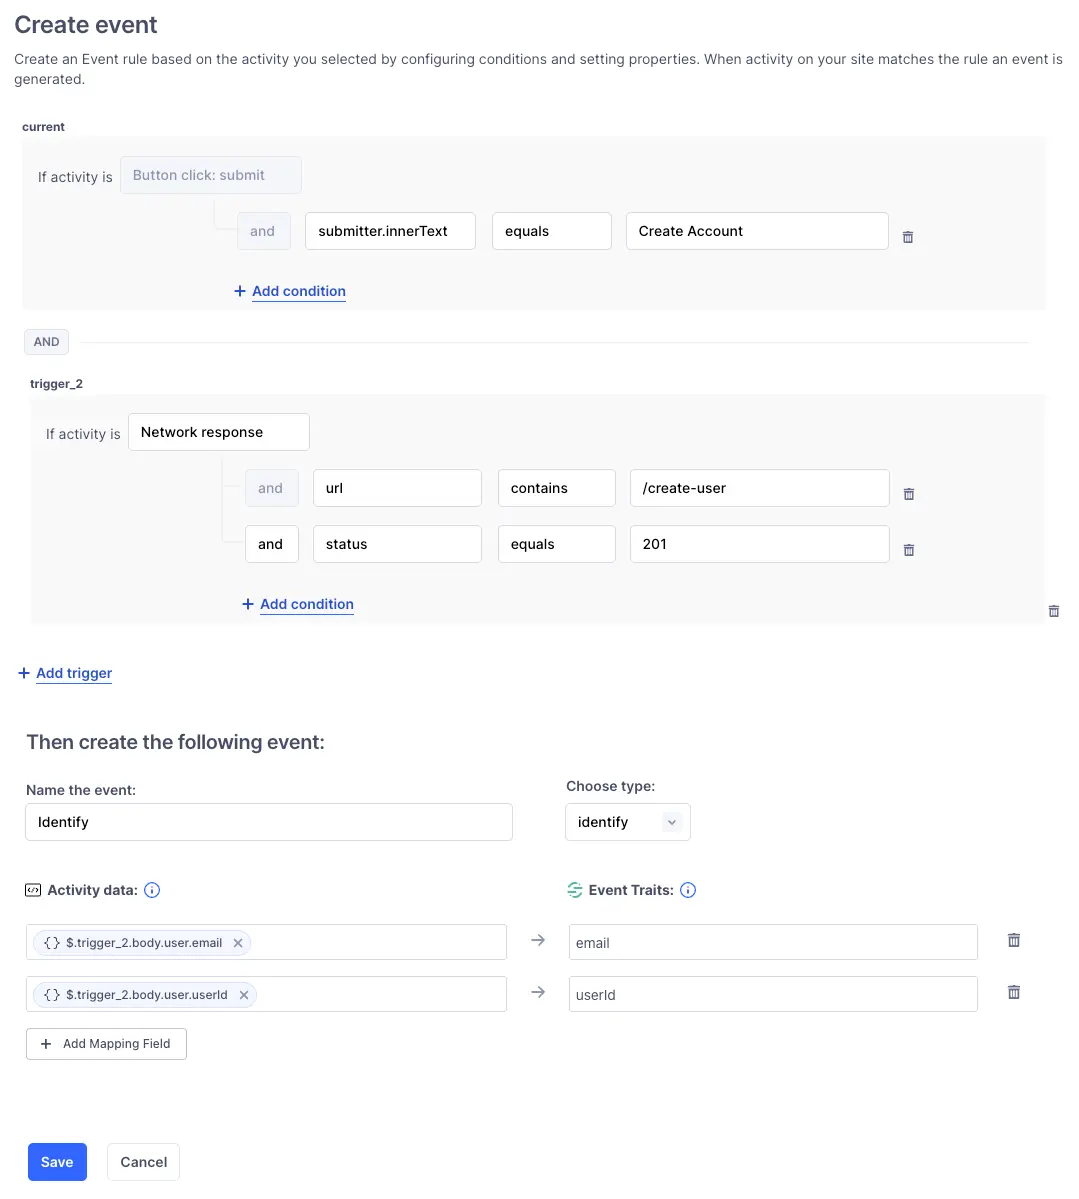
The following screenshot shows an Identify event rule that combines a button click with a successful network response to extract user data and trigger an identify call.
Building off of the screen tracking example, you could create a rule that identifies users:
1function detectIdentify(currentSignal) {2var loginType;34// Check if the signal is related to network activity on a login URL5if (currentSignal.type == SignalType.Network && currentSignal.data.url.includes("login")) {6loginType = "login";7}89// If a login type was detected, identify the user10if (loginType) {11var traits = new Object();12traits.loggedIn = true; // Set user status to logged in13let loginData = currentSignal.data.data.content; // Extract login data from the signal14traits.userName = loginData.userName; // Capture the user's name1516if (loginType === "login") {17var userId = loginData.userId; // Get userID from login data18analytics.identify(userId, traits); // Identify the user with the Identify call19}20}21}2223//...other functions2425function processSignal(signal) {26//...other functions27detectIdentify(signal); // Process the Identify call based on incoming signals28}
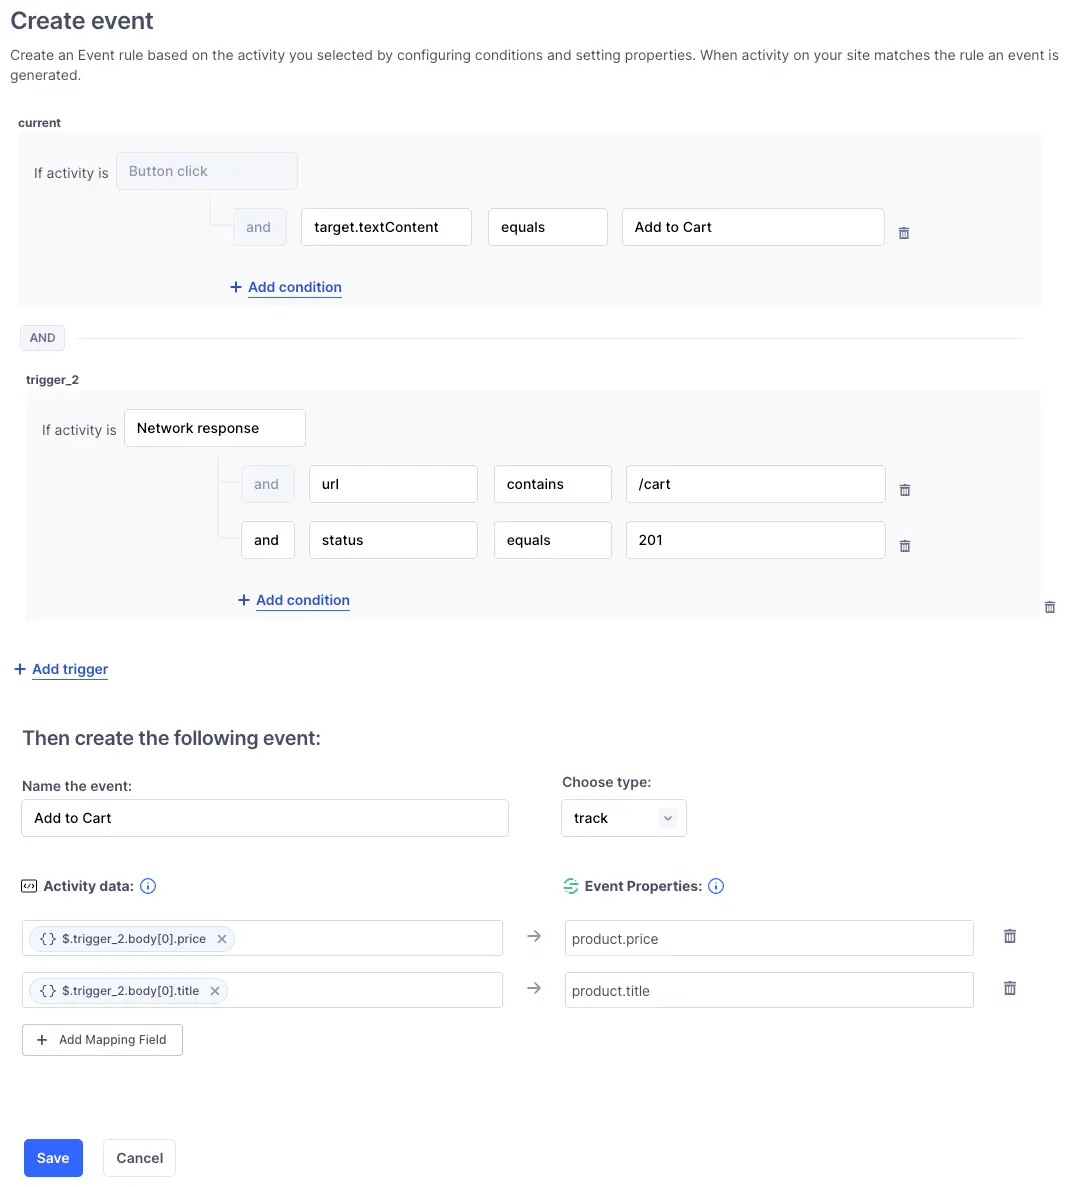
This rule implements a core ordering event from the e-commerce Spec. It shows a Track event triggered by a button click and a network response, with product details from the response mapped to event properties.
1function trackAddToCart(currentSignal) {2// Check if the signal is an interaction with the "Add To Cart" button3if (currentSignal.type == SignalType.Interaction && currentSignal.data.title == "Add To Cart") {4var properties = new Object(); // Initialize an object to store event properties56// Find the network response signal for additional data7let network = signals.find(currentSignal, SignalType.Network, (signal) => {8return signal.data.action === NetworkAction.Response;9});1011if (network) {12// Extract and assign product details from the network response13properties.price = network.data.data.content.price; // Product price14properties.currency = network.data.data.content.currency ?? "USD"; // Currency, defaulting to USD if undefined15properties.productId = network.data.data.content.id; // Product ID16properties.productName = network.data.data.content.title; // Product name17}1819// Track the "Add To Cart" event with the defined properties20analytics.track(currentSignal.data.title, properties);21}22}2324//...other functions2526function ProcessSignals(signal) {27//...other functions28trackAddToCart(signal); // Process the "Add To Cart" tracking based on incoming signals29}