Set up live agent assistance with Conversation Intelligence and Flex
This guide shows you how to set up a Flex plugin and backend service that use Conversation Intelligence to surface real-time insights and guidance to agents during live calls. You'll clone a sample application, configure Conversation Intelligence with language operators, and deploy a Flex plugin that displays the live results directly in the agent desktop.
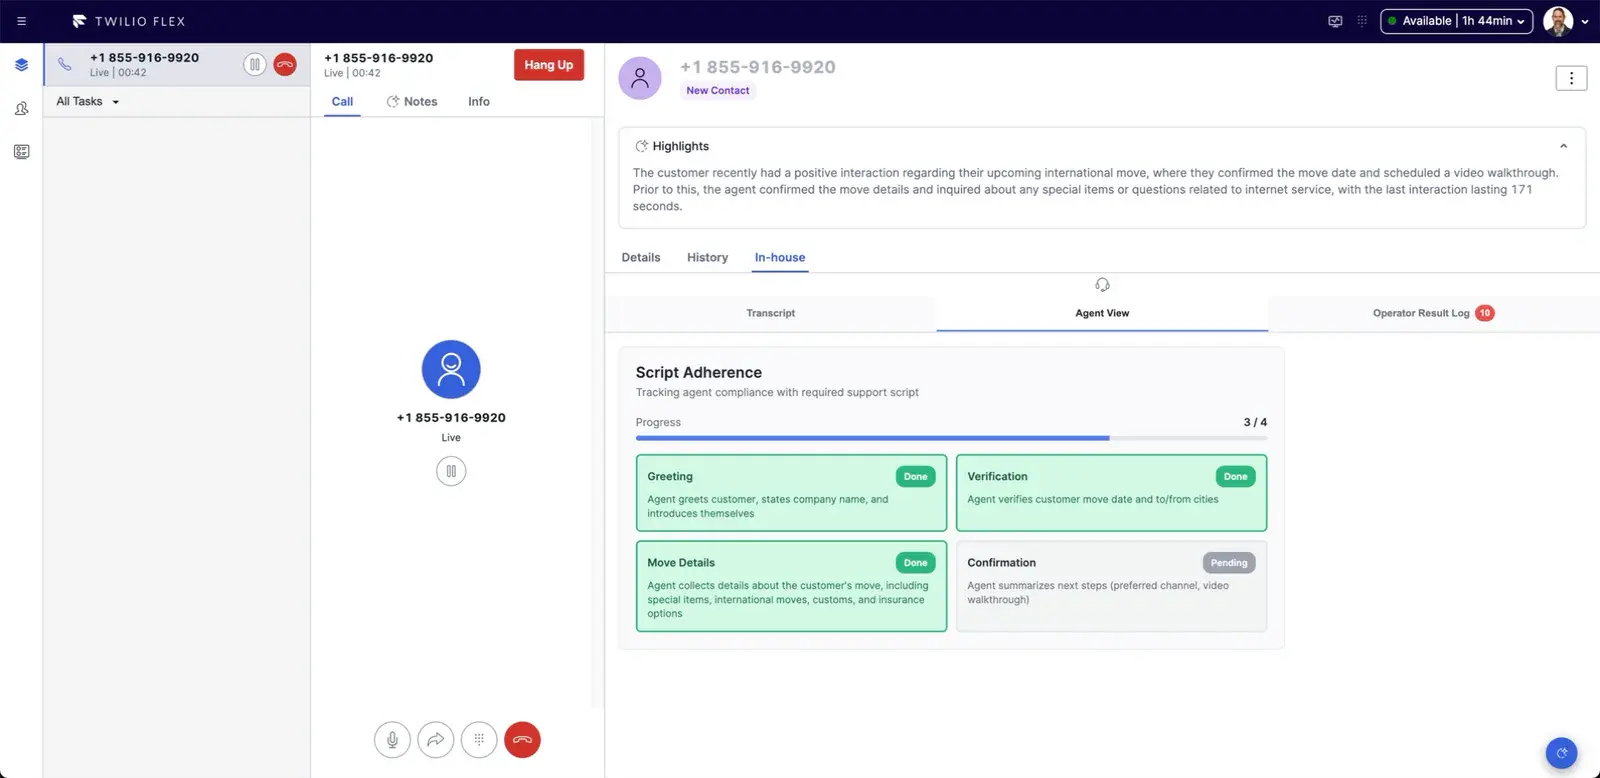
The following are some examples of how you can use Conversation Intelligence and Flex to provide real-time assistance to agents during live calls:
- Triggering next best actions (both conversation prompts and system actions)
- Delivering targeted responses or actions based on sentiment, for agents and supervisors
- Providing live coaching, either automated or with supervisor input
- Surfacing contextual data relevant to the current issue, question, or comment
- Identifying sales-related opportunities (upsell, cross-sell, churn risk response, competitor mention)
In this guide, you'll learn how to build a live agent assistance solution using Twilio Flex, Conversation Intelligence, and Conversation Orchestrator. The solution provides real-time insights and guidance to agents during live calls, helping them improve customer interactions and outcomes.
There are three primary components to this solution. In this example, the components are already built for you, and you'll mainly be setting up the configuration in your Flex instance.
The server can run on your own desktop (using ngrok), but you'd typically deploy it to your cloud platform of choice. This guide uses Node, but you could use Python or another stack of your choice. The server is responsible for receiving webhooks from the Twilio Conversations services, processing them, and providing a standardized format for use in the Flex plugin. This standard format is then piped over to the plugin via SSE (Server-sent Events), using the Call SID as an identifier.
Use Conversation Orchestrator and Conversation Intelligence to gain insights on the active call. You can set up these services using the Twilio Console or the API.
A custom plugin receives information processed by the backend service and formats for display to the human agent directly inside the Flex agent desktop. Information is displayed based on the active Task represented by a Call SID.
- Sign up for Twilio and buy a Twilio phone number with voice capabilities.
- Install Node.js 18 or higher
- Install and set up ngrok
- Install Twilio CLI
- Install Flex plugin CLI
To start ngrok and create a tunnel to your localhost, run:
ngrok http 3001
The ngrok console displays your forwarding URL (for example, https://your-ngrok-domain.ngrok.app).
In a terminal, clone the application repository and navigate to the project directory:
git clone https://github.com/twilio-demos/flex-agentassist-cintel.git
The repository includes two main folders: /server and /plugin-cintel-rtt
In each of the /server and /plugin-cintel-rtt directories, run:
npm install
Create .env files for both your server and your plugin:
1TWILIO_ACCOUNT_SID=ACxxxxxxxxxxxxxxxxxxxxxxxxxxxxxxxx2TWILIO_API_KEY=SKxxxxxxxxxxxxxxxxxxxxxxxxxxxxxxxx3TWILIO_API_SECRET=your_api_secret4TWILIO_FLEX_PHONE_NUMBER=+1xxxxxx12345SERVER_URL=https://your-ngrok-domain.ngrok.app
REACT_APP_BACKEND_URL=https://your-ngrok-domain.ngrok.app
- In the Twilio Console, go to Communications > Numbers & senders > Overview and click your Twilio phone number.
- On the Configuration details tab, click Voice and emergency address.
- Click Edit configuration details and select the region.
- Under How do you want to configure this number?, select Webhook, TwiML Bin, Function, Studio Flow, Proxy Service.
- Under How do you want to set up your primary method, select Use Studio Flows and select Voice IVR.
- Under Call status change, enter
https://your-ngrok-domain.ngrok.app/webhook/statusand select HTTPPOST.
Set up Conversation Intelligence with language operators. You can use Twilio-authored language operators for common tasks like sentiment analysis and summaries, or create custom language operators tailored to your business needs.
-
Create a conversation configuration with capture rules.
- In the Twilio Console, go to Orchestration > Conversation Orchestrator > Conversation configurations.
- Click Create a conversation configuration and follow the steps in the UI.
- On the Name configuration page, set Conversation configuration name and Description. Under Webhook, enter your webhook URL (for example,
https://your-ngrok-domain.ngrok.app/webhook/cor-event) and select thePOSTHTTP method. - Skip Messaging and chat traffic.
- On the Voice traffic page, check the Set up automatic capture box and select your Twilio phone number.
- On the Configure lifecycle page, select Basic and set voice calls to close On Hangup.
- On the Enable Conversation Memory page, select an existing memory store or create one. Check the Turn on observations and summaries box.
- Review the Voice transcription page.
- Review the Summary page and click Create conversation configuration.
- On the Name configuration page, set Conversation configuration name and Description. Under Webhook, enter your webhook URL (for example,
-
Create an intelligence configuration and link it to the conversation configuration.
- In the Twilio Console, go to Orchestration > Conversation Intelligence > Intelligence configurations.
- Click Create Intelligence configuration and follow the steps in the UI. Make sure to attach the conversation configuration you created in the previous step.
- Click Create rule for the intelligence configuration and follow the steps in the UI.
- Add language operators and set parameters.
- Apply triggers and actions.
- Optionally, enable context.
Define a rule with the Script Adherence operator to ensure agents follow a script during calls. For more information, see Script Adherence operator best practices.
This example evaluates if the agent greeted the customer, verified their identity, gathered move details, and confirmed next steps.
| Operators | Parameters | Triggers | Actions |
|---|---|---|---|
| Script Adherence | script | Every communication ({"on":"COMMUNICATION","parameters":{"count":1}}) | Webhook ({"method":"POST","type":"WEBHOOK","url":"https://your-ngrok-domain.ngrok.app/webhook/cintel-action"}) |
1Category: Greeting2Action: Greet the customer with business name and agent name.3Required Phrase: "Thanks for contacting {company name}. This is {agent_name}."4Score weight:10%56Category: Verification7Goal: Confirm identity quickly8Action: Capture customer move date and to/from cities within first 50 seconds of conversation.9Score weight:20%1011Category: Move Details12Goal: Confirm move details and answer questions13Action: Agent collects details about the customer's move, including special items, international moves, customs, and insurance options14Score weight:40%1516Category: Confirmation17Goal: Next Steps18Action: Agent summarizes next steps (preferred channel, video walkthrough)19Score weight:30%
Define a rule with the Sentiment and Summary operators to evaluate the sentiment of the conversation and generate a summary. This example triggers after every 5 communications.
| Operators | Parameters | Triggers | Actions |
|---|---|---|---|
| Sentiment and Summary | N/A | Every 5 communications ({"on":"COMMUNICATION","parameters":{"count":5}}) | Webhook ({"method":"POST","type":"WEBHOOK","url":"https://your-ngrok-domain.ngrok.app/webhook/cintel-action"}) |
-
Deploy the Flex plugin and test it locally.
1cd plugin-cintel-rtt2twilio flex:plugins:start -
Confirm you are connected to the correct profile for your target Flex account.
twilio profiles:listTo switch the profile, run:
twilio profiles:use PROFILE_ID -
Deploy the UI component that agents will use.
-
Update
webpack.config.jscase statement to match your Twilio CLI profile name for your Flex account. -
Copy
/plugin-cintel-rtt/.envto/plugin-cintel-rtt/.env.productionwith your backend URL. -
Run
twilio flex:plugins:deployusing the example below.twilio flex:plugins:deploy --profile=<YOUR_PROFILE_NAME> --changelog "Initial" --description "Flex live agent assistance plugin example"
-
-
When the deployment completes, the Twilio CLI prints a
twilio flex:plugins:releasecommand. Run that command to release your plugin and make it active for agents.
-
Start your local server.
1cd server2npm run dev -
Open your Flex instance and set your status to Available.
-
Make a call to the phone number configured in your conversation configuration.
-
Accept the task.
As you speak, the Agent View tab in Flex will automatically check off agent adherence steps (Greeting, Identity, and more) as the language operator detects them.
You can expand the sample application by adding a custom language operator, such as Upsell Opportunity Detection.
Regardless of which language operators you add, your plugin implementation needs to be aware of the types of language operator results it will receive. In this guide, the plugin is responsible for taking the raw output, which is normalized by the server webhook implementation, and figuring out how to display it.
Here are some examples of how you can customize the plugin to display results from your language operators:
- To update the steps in your Script Adherence operator, change
plugin-cintel-rtt/src/config/scriptDimension.jsonto match. - To show results for Summary and Sentiment operators above the transcript, update
plugin-cintel-rtt/src/components/TranscriptPanel.tsx. - To change how operator results are processed before they're passed to other components as props, update
plugin-cintel-rtt/src/components/OperatorResultLog.tsx.
Alternatively, you can also implement more logic in the backend server, with pre-defined message payloads for various types of results that your plugin knows how to display.